

It is said that, “Strategy without tactics is the slowest route to victory.” It’s also the most boring route that can be taken. Using tactics offers a variety of strategic opportunities that gives characters advantages and can end battles quickly. Engaging in combat is more than just swinging a sword or firing a bow until something dies. There are many ways to attack, and factors such as numbers, terrain, and line of sight can affect the manner of attack.
With that in mind, this section offers mechanics for attack, defend, move, riding, and advanced tactics, each with descriptions, modifiers, and effects, with sample battle maps offering a visual explanation (battle maps and tokens may be used but are not required for combat). Combat in this system works better when characters work together, using tactics can offset modifiers and provide groups with an advantage.

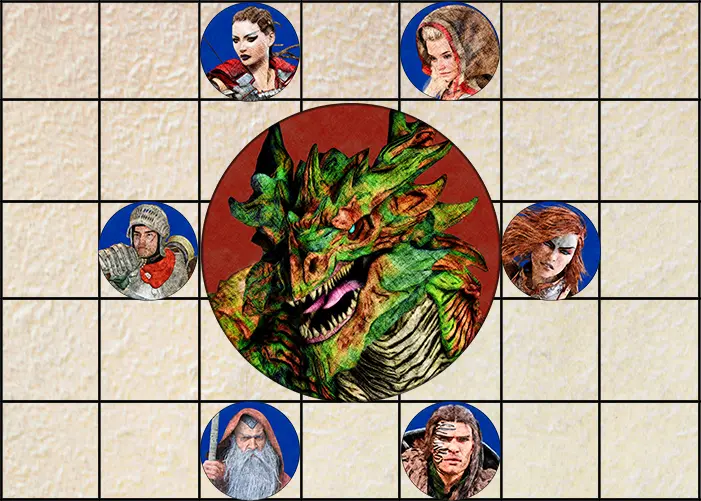
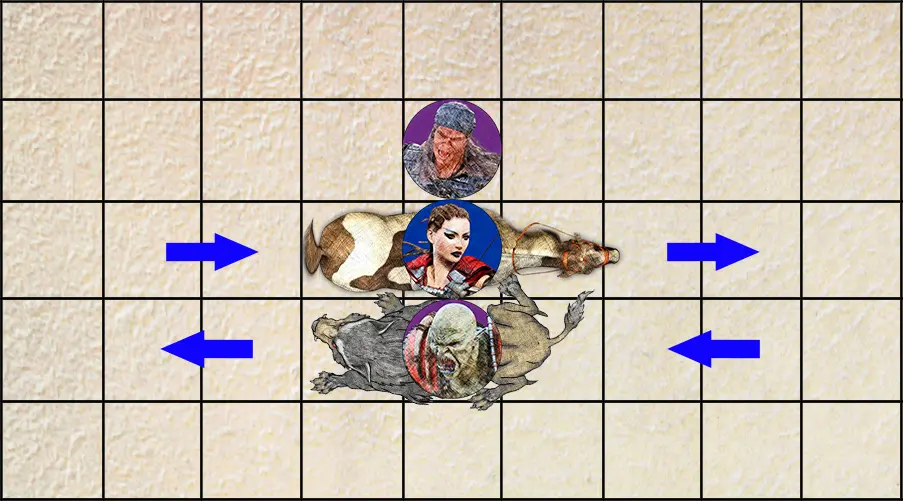
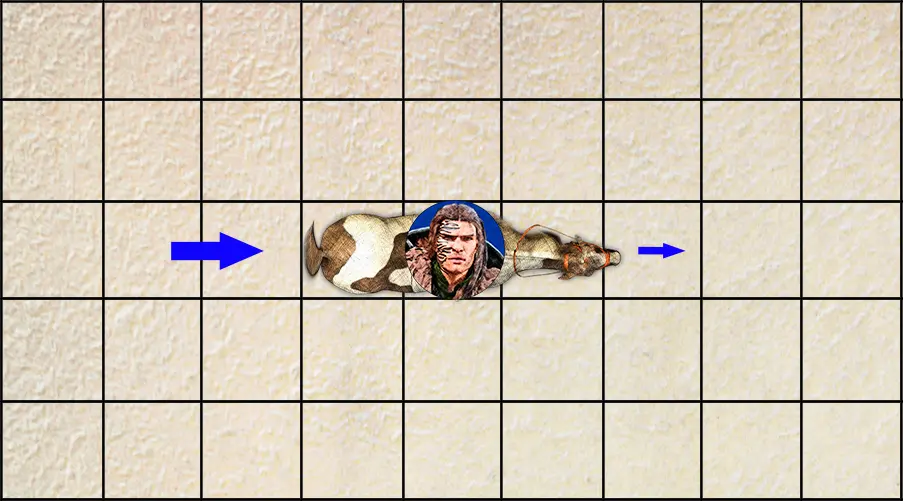
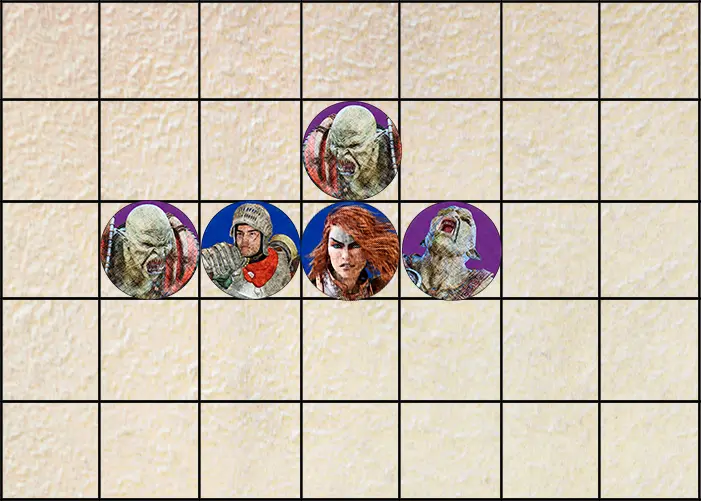
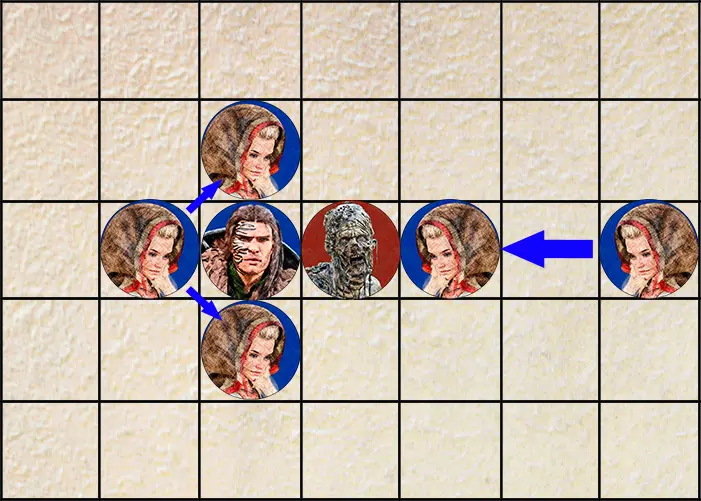
One of the more effective group tactics, these use multiple attackers to surround a foe making it easier for attackers to hit and harder for opponents to defend. Flanking is a siege tactic that consists of three categories: a Standard Flank has two attackers and one defender of the same size, while a Siege Flank has more than two attackers and one defender, and a Scaled Flank involves opponents of different sizes.
Depending on the number of combatants and degree of siege, attackers get a modifier to hit and the defender has a modifier to defend. Each type has a set of scenarios with a description and image example of the flank type.
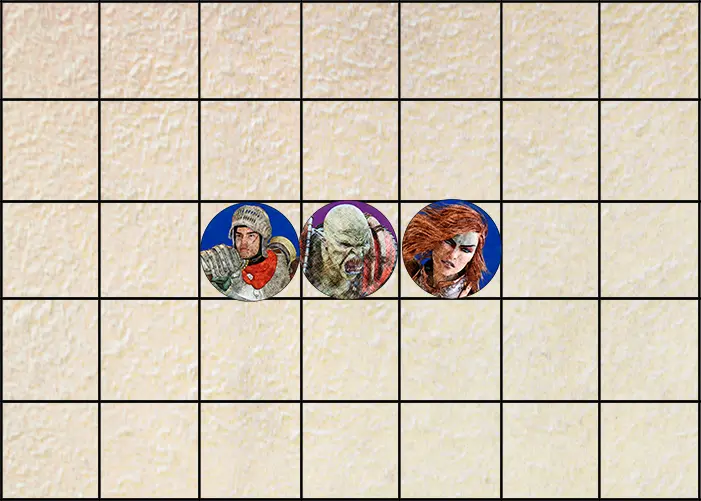
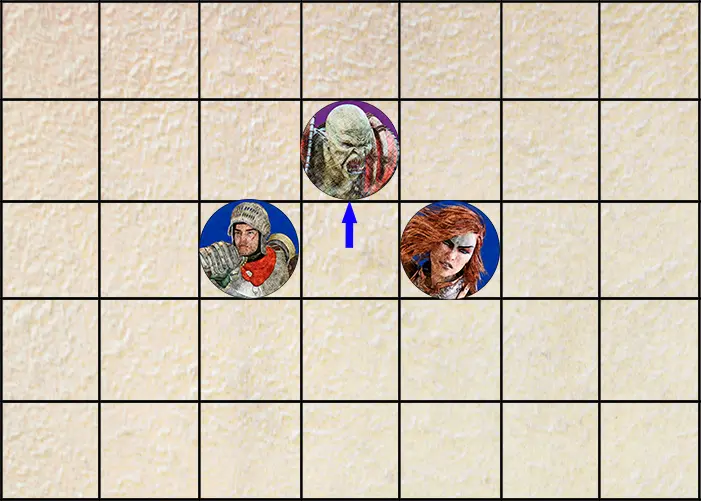
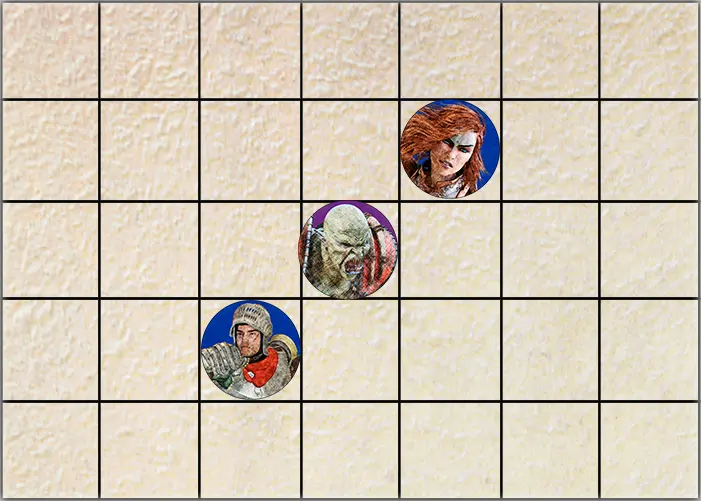
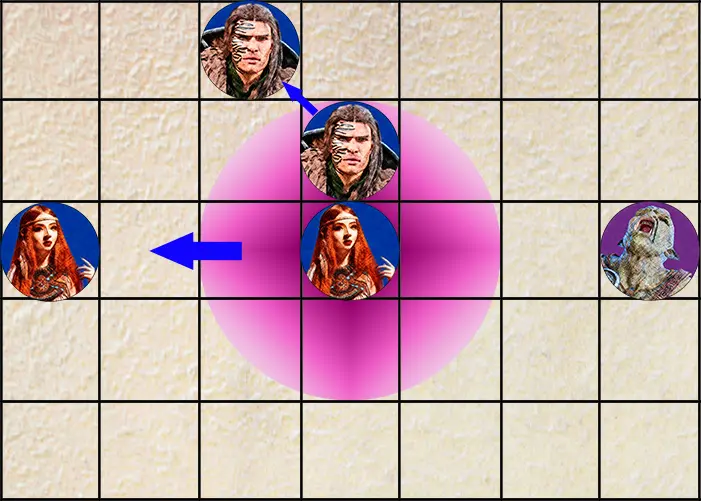
Two (2) characters are required and they must be on opposite sides of the defender (scenario 1). Attackers gain a +2 modifier to attack actions and the defender has a -2 modifier to defend actions. Vertical or horizontal flanks are better able to negate disengagements, but can be broken with a combat step or the use of a disengage skill, (scenario 2). A diagonal flank (scenario 3) cannot be broken without drawing an attack of opportunity from at least one attacker, without the use of a disengage skill.
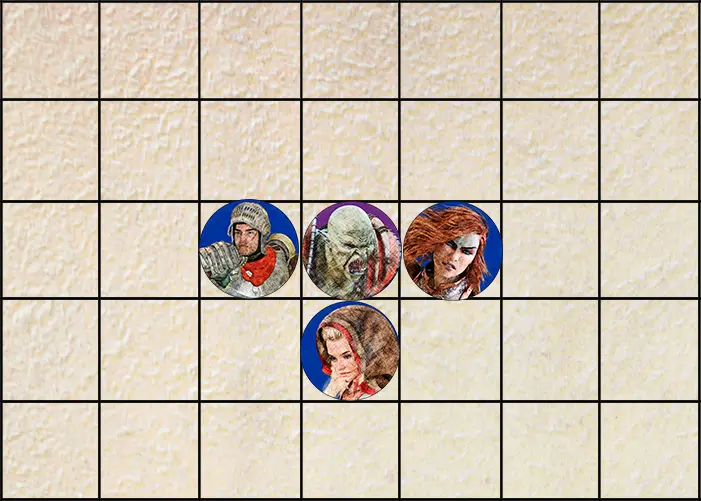
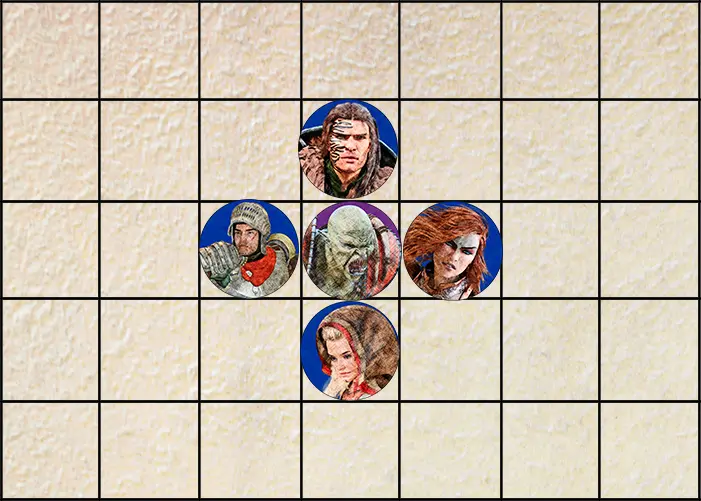

With a third attacker (scenario 4), the defender cannot break the flank without drawing an attack of opportunity and all attackers get a +2 bonus modifier to attack actions, while the defender has a -4 modifier to defend actions. Attacking a defender from four opposite sides is referred to as a Double Flank (scenario 5), which increases the modifier to +4 for all attackers, giving the defender a -4 to any defend actions. Six attackers encircling a single target is considered a Surrounded (scenario 6), giving all attackers a +6 modifier to any attack actions and the defender a -6 modifier to any defend actions.
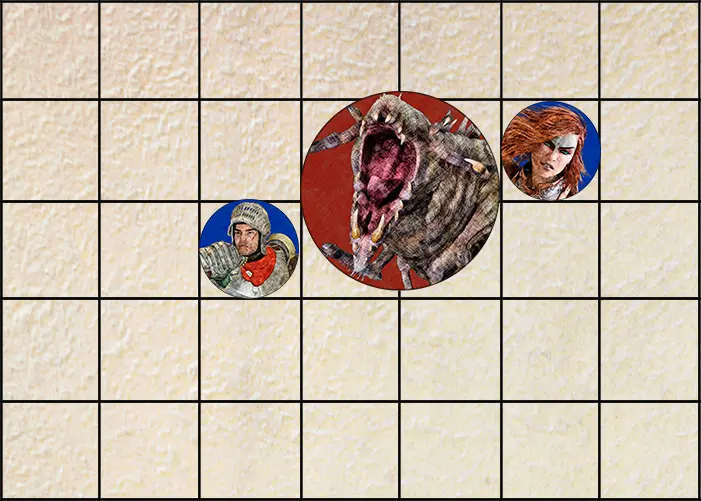
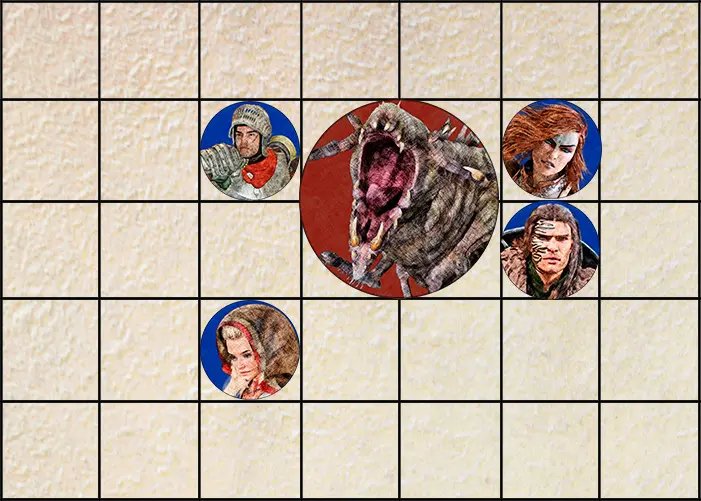
Due to their reach, flanking opponents of one size scale larger (scenario 7) with two or three attackers does not offer combat modifiers beyond the normal size modifiers. With four attackers (scenario 8), all attackers gain an additional +2 modifier to attack actions while the defender has a -4 modifier to defend actions, and the defender cannot break the flank without drawing an attack of opportunity.
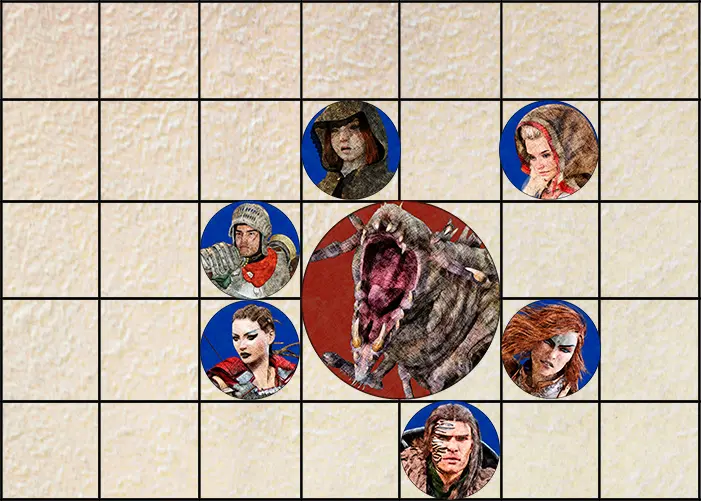
Surrounding a target one size scale larger with six for more combatants (scenario 9) increases the modifier to +4 for all attack actions, while the defender has a -4 to any defend actions. For a target of two size scale larger (scenario 10), six or more combatants are required to gain a flank advantage, providing attackers with a +2 modifier to attack actions, while the defender has a -2 modifier to defend actions.
For those who used ranged attacks, there is a specific tactic for overcoming modifiers to hit combatants in melee and working with melee allies to gain a modifier to attack actions.
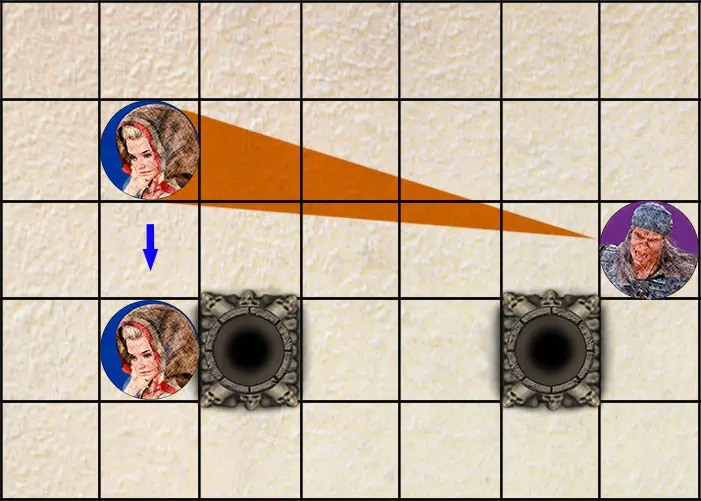
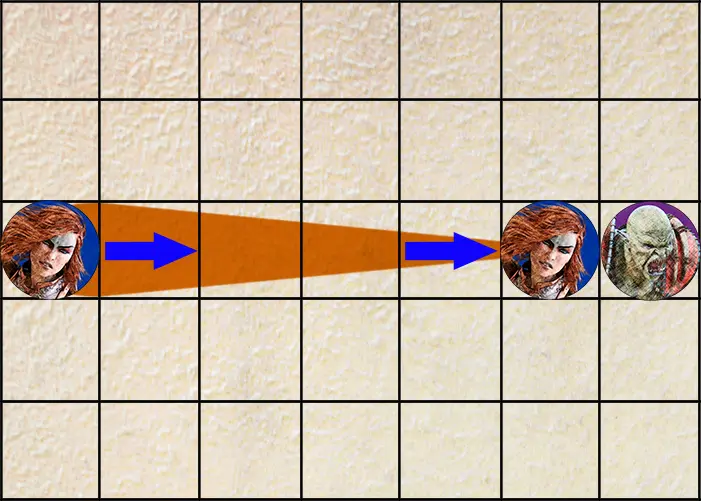
When firing a ranged weapon into melee combat, if the attacker does not have line of sight through allies, a difficult (-4) modifier is applied to the skill roll. Using this tactic, the attacker moves into a clear line of sight before firing.
It is best for the attacker to wait until the Movement phase of initiative to attack if they do not have a clear line of sight.
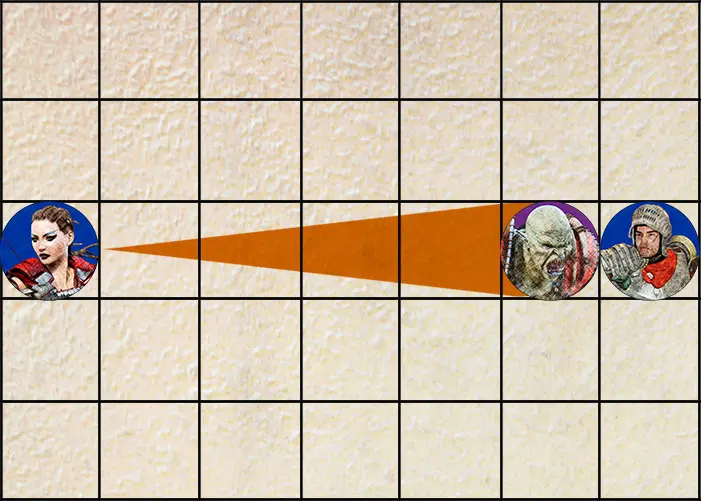
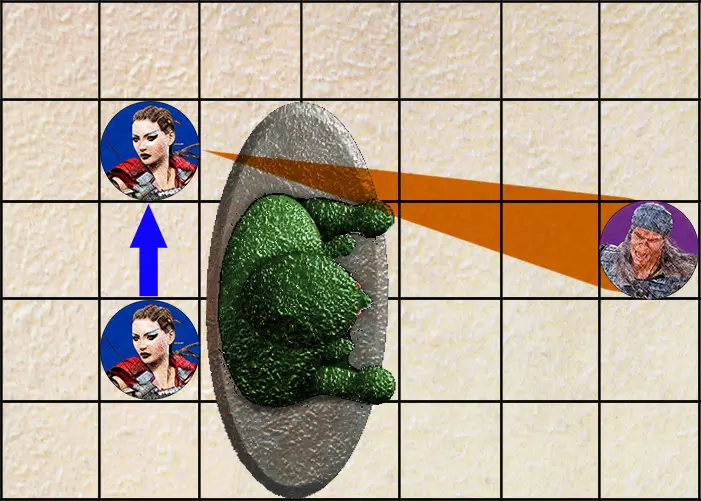
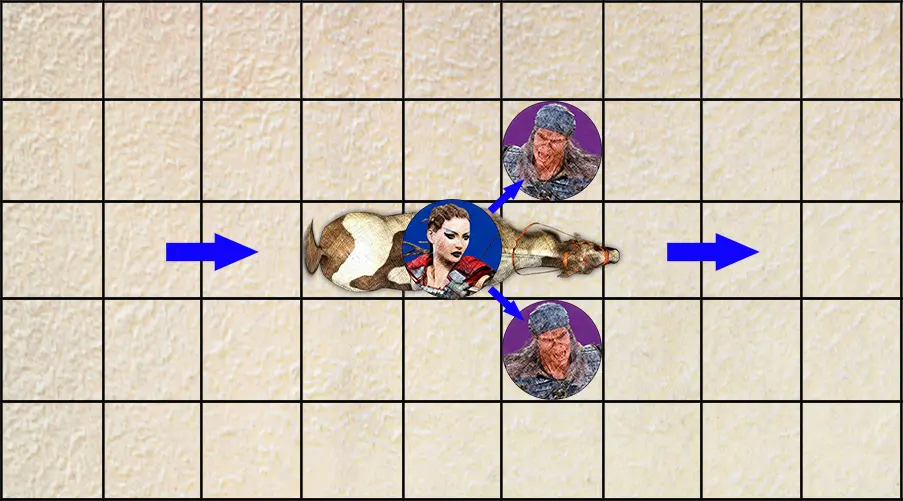
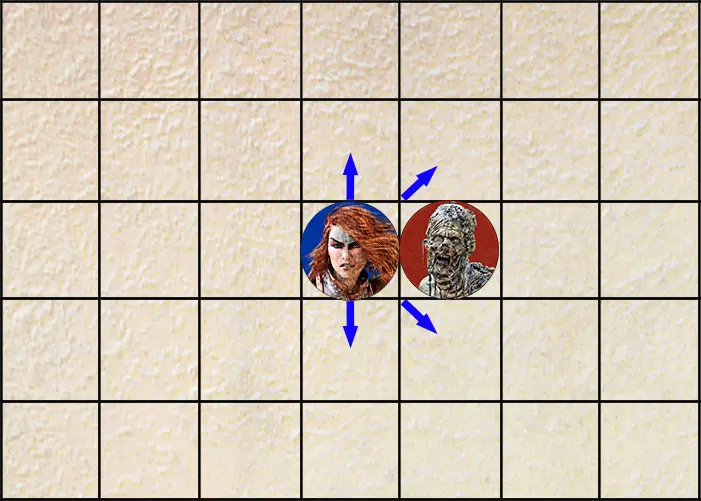
This tactic requires an engaged melee combatant and a shooter capable of firing from a clear position. Attackers get a +2 modifier to attack actions and defenders have a -2 modifier to defend actions so long as the shooter is opposite the ally on the same plane with the opponent (per the scenario image).
A Ranged Flank can be substituted into a Standard, Double, or Surrounded type flank, however, unlike other flanks, this one does not prevent the defender from disengaging as the shooter’s threat zone isn’t factored. To be most effective, this tactic requires coordinated movements between the shooter and melee ally, often by waiting until the Movement phase of initiative to attack.
Ranged attacks can be devastating when you’re out in the open and exposed to a barrage of incoming arrows. In these situations, finding cover can be the difference between living to fight another day and becoming a pincushion.
There are four scenarios for cover: Physical Cover, Atmospheric Cover, Firing from Cover, and Diving for Cover.
Scenario 1
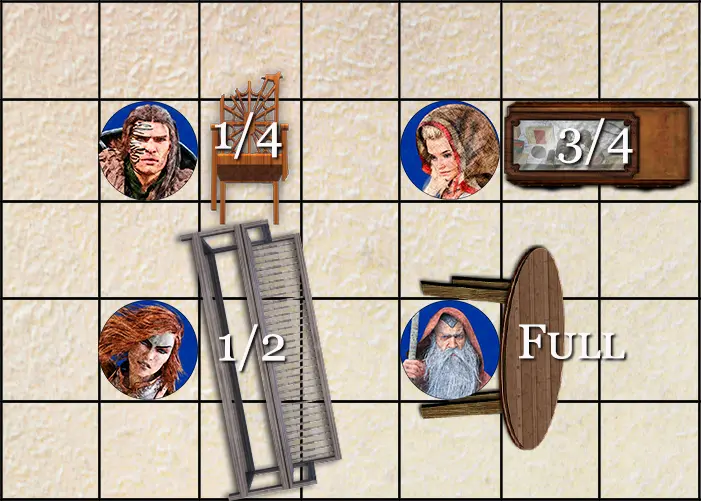
This tactic involves getting behind an object or structure that will protect the character from Ranged attacks. Those shooting at the character have no modifier to hit, however the defender gets an armor rating bonus, based on the percentage of cover:
| ¼ cover: | +2 Physical |
| ½ cover: | +2 Impact +4 Physical |
| ¾ cover: | +2 Elemental +4 Impact +8 Physical |
| Full cover: | Structural Strength |
The bonuses above represent the amount of damage absorbed by the cover object. On a hit, the modifier is added to the armor rating to resist damage, though, with full cover, the item or object’s Structural Strength must be defeated before damage is assessed.
Scenario 2
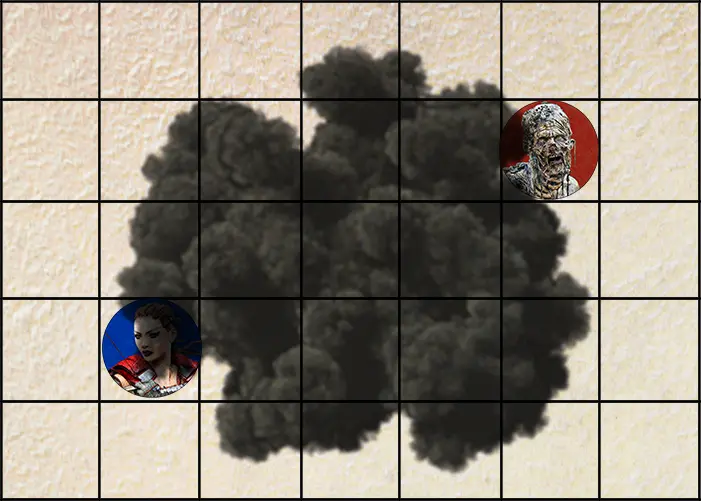
A condition that conceals or obscures a character’s presence, this type of cover typically affects the actions of all combatants, however, it can be used to gain a tactical advantage. The types of cover are:
-more-
| Type of Cover | Modifier |
| Heavy Rain | -2 |
| Light Fog | -2 |
| Flash of Light | -4 |
| Fog | -4 |
| Moonless Night/Gloomy Area | -4 |
| Smoke | -4 |
| Blizzard | -6 |
| Gloom Shadows | -6 |
| Heavy Fog | -6 |
| Thick Black Smoke | -6 |
| Blinding Light | -8 |
| Complete Darkness | -8 |
-less-
In situations where the attacker is unaffected by the condition or can use it to their advantage without being affected by it, the modifier applies only to the affected combatant.
Scenario 3
Shooting a ranged weapon from cover requires the character to use a standard action to emerge from cover and a second standard action to duck back into cover. Because this is a move based action, it must be done on the Movement phase of the initiative turn and requires no skill checks.
However, utilizing the Cover skill these may be taken as Free Actions with successful skill checks, during the Ranged phase of the initiative turn. A failed emergence skill check requires an action, while a failed return skill check requires an action (if available) and must wait for the Movement phase.
Scenario 4
While getting to cover typically requires one or more move actions on the movement phase, if the character is 2-3 yards from cover, they can choose to make a desperate pitch to get there during any initiative phase in which they can react. Requiring one (2 yards away) or two (3 yards away) Free Actions, the character can literally dive behind cover, ending up in a prone position. A character with the Cover skill can attempt to roll into a squatted position after Diving for Cover with a successful skill check – while prone, this position requires only a free action to stand from prone.
While this is technically a move action, it may be used during other initiative phases because it is being used with free actions and the character is ending in a prone state. No skill rolls are required to make this attempt, the character must stand from prone before taking any actions from the covered position.
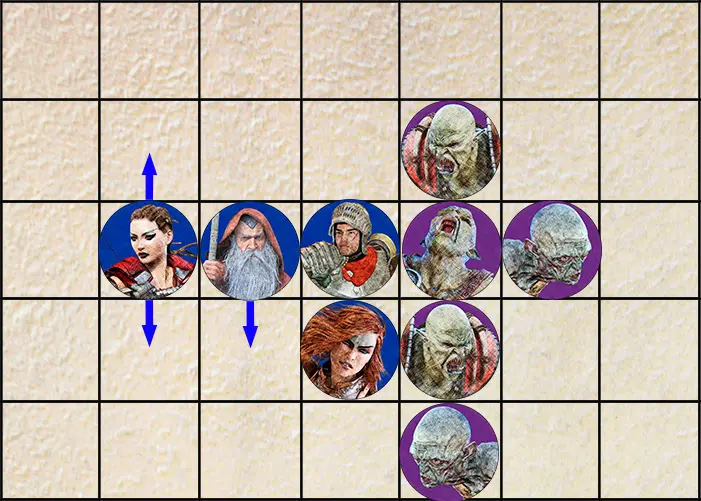
When there is no available cover, there are still options for those who want to get out of the way. These tactics combine the Dodge skill with a degree of movement.
There are two Avoidance scenarios: On-Guard and Move and Escaping Area Attacks.
Scenario 1
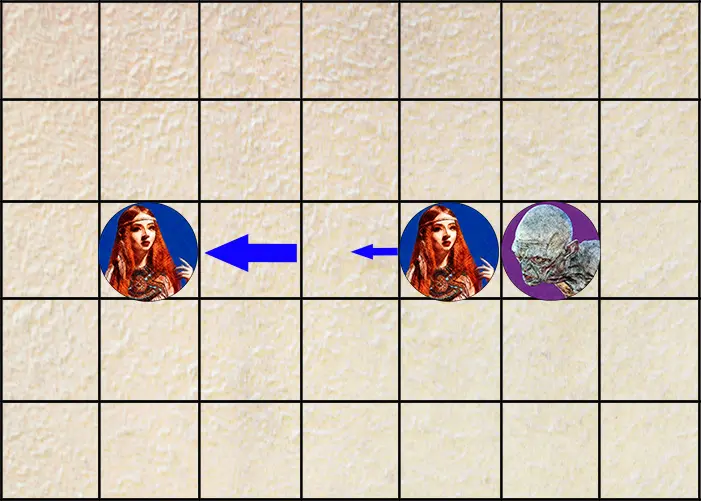
A tactic used to avoid ranged attacks and move in some direction, often towards the shooter. This is a full round action that must be announced before the the shooter attacks, but otherwise may be used in any phase of initiative in which the character can act.
The mechanics are simple, the defender takes a Defensive Stance, in initiative and goes On-Guard, allowing for multiple defend actions. Whether or not the defend actions are successful, the defender may move up to half of their per action move rate in any direction, up to a distance equal to half of their per round move rate.
When closing on a shooter or other foe, they may use move actions (if available) to retreat away before the character arrives.
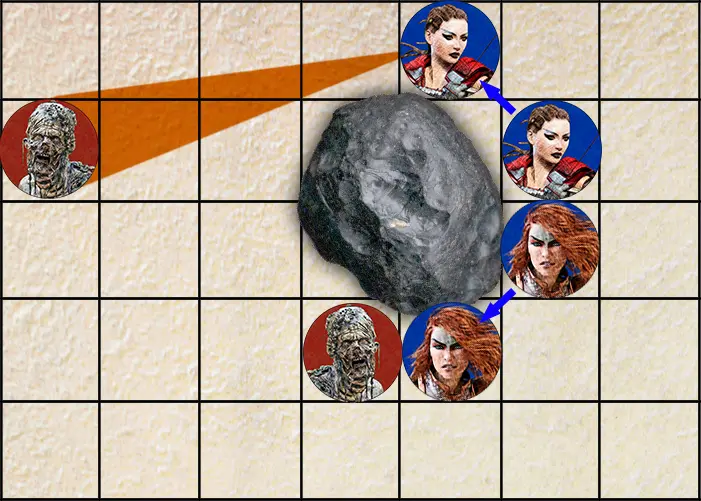
Scenario 2
When caught in an area attack, two (2) actions are required to escape it. First, the defender must make a Dodge skill check – this allows the character to recognize the attack and gives them the ability to move. After a successful Dodge skill check, the character can move out of the area of effect.
Those on the edge of the effect, can use a Free Action combat step to escape. For those further in or who wish to put a greater distance between themselves and the effect, a move action is required. The move action does not require any type of skill check.
A one-yard step or shift that can be made in combat during the character’s attack actions. While these steps can be used anywhere on the battlefield, typically for positional reasons, their tactical usefulness is most noteworthy in melee.
A Combat Step requires an available free action and can be used to Reposition, Overstep, or Disengage.
Scenario 1
On their attack action, the character can take a one-yard move as a free action to reposition in combat. This can be done to set up another tactic, break an existing tactic, or move to a specific location without exiting the threat zone and drawing an attack of opportunity.
Scenario 2
During the character’s attack action, they can take a one-yard step to engage with another target. A free action is required to make the move. The character may move within an existing threat zone to enter the new threat zone, but may not leave a threat zone without drawing an attack of opportunity.
Scenario 3
Combining a combat step (free action) with two standard actions, the character can move back one yard, out of a single threat zone, without drawing an attack of opportunity. Once the character has disengaged, they can take additional actions in the round to move, cast, make a ranged attack, etc.
This tactic cannot be used to disengage from multiple threat zones without drawing an attack of opportunity.
When it comes to combat, some character like to keep their distance, but these tactics are for those who can’t wait to engage.

Scenario 1
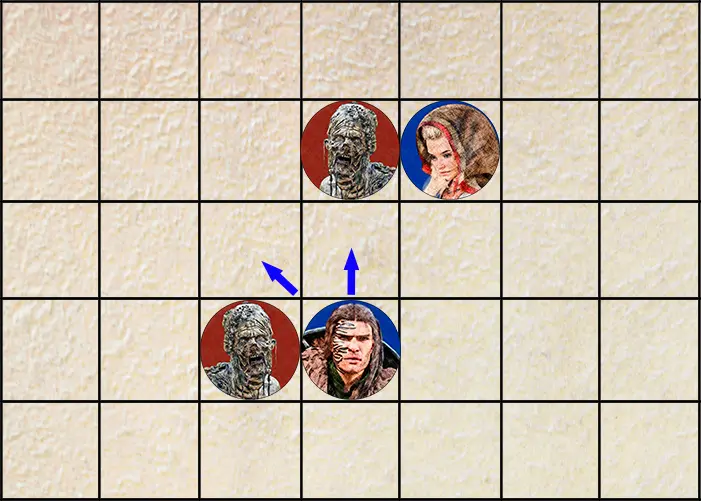
This is an aggressive tactic used to unbalance a foe with a swift, bold assault. It requires a minimum of one move action to invade the opponents threat range. For the remainder of the round the attacking character gets a +2 modifier to attack actions against that foe, and suffers a -2 modifier to all defend skill actions against that foe.

Scenario 2
This tactic is used to drive the defender in a specific direction, one yard at a time. Requiring a combat step and one action, the attacker steps forward into the defender, forcing them to move one yard back as directed by the attacker. The defender can choose to allow themselves to be moved one yard back, hold their ground by spending an action, or take an attack of opportunity at a difficult (-4) modifier – the latter requires a Reaction save to avoid falling prone as they are being pushed back.
Attackers using at least a medium-sized shield are not subject to the attack of opportunity. Defenders in a fatigue state must make a modified Strength save to hold their ground.
Because this is a move based tactic, there are no attack or defend rolls with the exception of those listed above, requiring only for the character to spend the requisite actions.
While the skills in the Mounted Combat tree are used to make attacks, getting into a position to attack is dependent on the ability to maneuver the mount. Rather than just repeatedly riding back and forth, these tactics allow for multiple attacking options.
Charging tactics require a Riding skill check and one or more actions and can be used to make a Melee Pass, Override, Snappy Turn, or Break the Line.
Mount speed at the time of attack determines the hit modifier and damage calculation:
| Speed | Hit Mod | Dam Calculation |
| Walk (up to ¼ move) | +2 | STR+BH+WD |
| Trot (up to ½ move) | -0- | STR+Move+WD |
| Canter (up to ¾ move) | -2 | STR+Move+WD |
| Gallop (up to full move) | -4 | STR+Move+WD |
Scenario 1
The most basic of maneuvers, it is used to guide the mount close enough to a combatant – whether they are mounted or on foot – to make a melee attack. A Riding (-0-) skill check free action is required to get the mount into position to attack. On a pass, combatants are allowed a single attack action and defend action per opponent (weapon speed factor rules apply). With reach weapons, an aggressive initiative attitude allows for a first attack on a footman and a defend action regardless of the defenders initiative attitude. A failure results in poor positioning, negating the pass attack or applying a difficult (-4) modifier to the attack roll.
Scenario 2
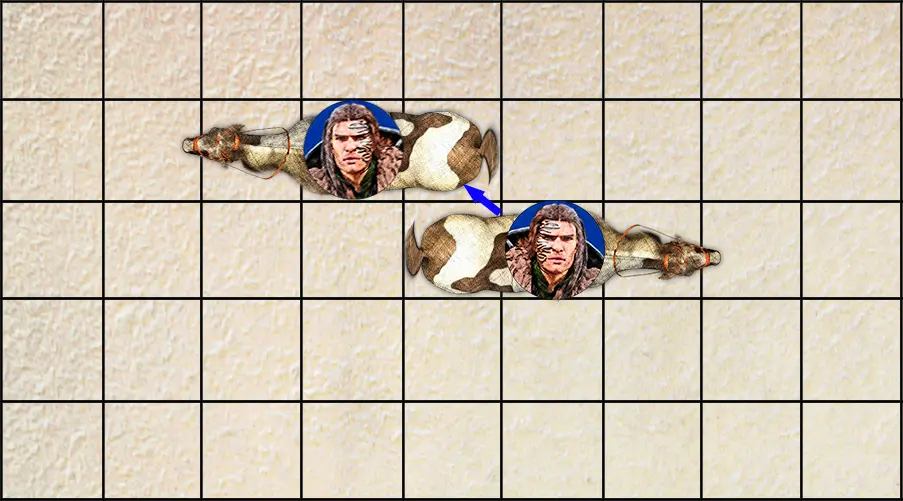
This tactic is used to overtake an opponent moving away from the mounted combatant and get into position for further attack. A Riding (-2) skill check action is required to complete the maneuver, allowing for a melee attack on the pass and cutting off the target’s move with the mount to make additional attacks. It can be used at a trot or canter, but requires a Sliding Stop at a gallop and may be used with reach weapons to allow for the aggressive Melee Pass initiative bonus.
This tactic can be used with the Trample skill or the mount’s attack abilities (if available). A failure results in poor positioning negating additional attacks and/or potentially unseating the rider.
Scenario 3
Beginning as a Melee Pass, this tactic adds a Barrel turn to snap around the combatant and allow for a second Melee Pass on the same opponent. It requires a Riding skill check free action to properly position the initial pass and a Riding skill action to complete the Barrel turn. This maneuver can be performed at a walk (+2) or trot (-0-) at a tight turn, or a canter (-2) or gallop (-4) at a wider turn, and may be used with reach weapons to allow for the aggressive Melee Pass initiative bonus.
A Riding skill check failure results in a poor turn that negates the second Melee Pass.
Scenario 4
An aggressive tactic where the rider aims for a particular defender, allowing the mount to use attack actions and forcing them to make an Evade skill check and take a combat step to avoid being knocked prone. The rider can then make a Melee Pass attack. If the defender has been knocked prone, a reach weapon allows for an attack on a prone target. A Riding skill check action is required to ram the target, with the mount making any available attack actions.
A defender who chooses to stand their ground can choose to attack the steed or set a reach weapon to attack either the steed or the rider. In this instance, the steed’s move rate is applied to the defenders weapon damage in place of BH. Regardless of the attack results, the defender takes attack or trample damage.
While riding, there are a series of maneuvers that characters can perform on their mount. These require Riding skill check actions, which can be reduced to free actions with the use of the Control Mount skill. They are most effective when used in conjunction with the Charging Tactics to get into position to attack.
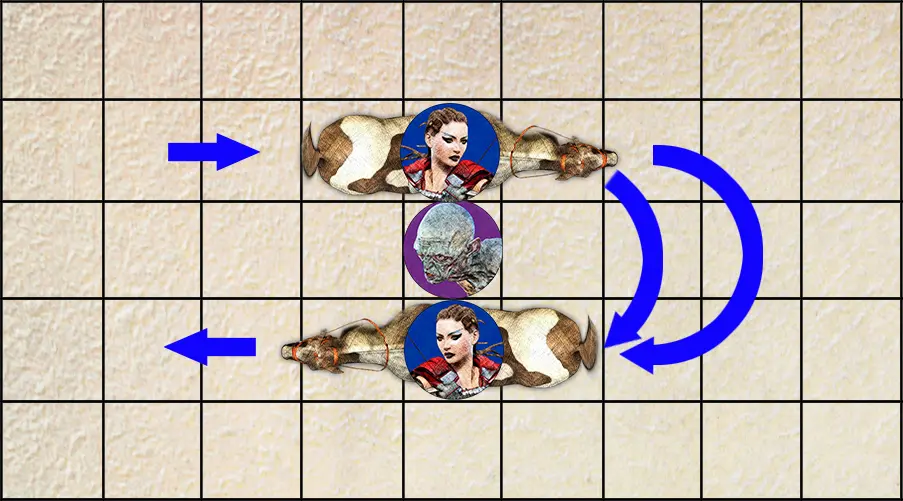
Scenario 1
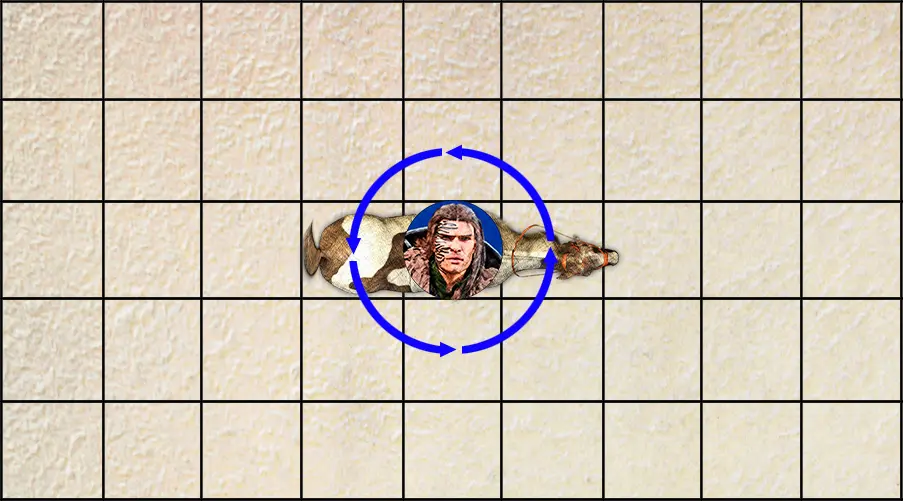
A more challenging maneuver than it seems, riders are required to control and direct the mount to maintain a circular track, with the speed determining the length of the track. It can be performed at a trot (-2) in a tight 3-yard turn and a canter (-4) in a wider 4 yard turn, requiring a new Riding skill check action each round. A failure breaks the track, requiring additional actions to correct.
When used to circle a defender, the rider can establish a track that allows for up to 2 melee attacks on a medium sized opponent, and 3 attacks on a large sized or greater opponent (weapon speed factor rules apply).
Scenario 2
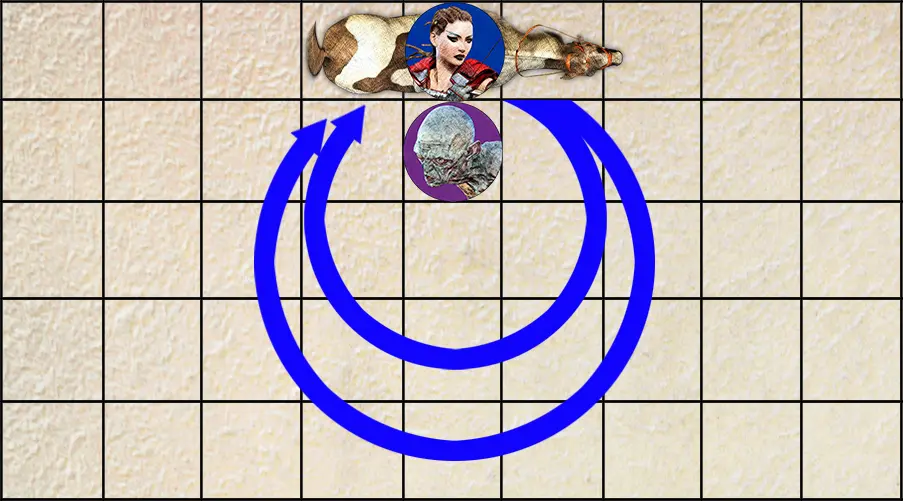
A quick change maneuver that is typically used with other reigning tactics to rapidly change direction. It can be performed from a canter (-0-) or gallop (-2), with the mount moving in a straight line before coming to a sudden stop. A successful Riding skill check action is required to perform the maneuver, with a failure potentially unseating the rider.
Scenario 3
From a stopped position, the rider can immediately reverse the mount’s direction with this maneuver. A successful Riding (-2) skill action is required to perform the maneuver, with a failure leaving the mount in a pivoted position, requiring an additional action to complete the positional reversal.
Scenario 4
From a stopped position, the rider can rotate the mount’s direction by ¼, ½, or ¾, either to move off in a new direction or to put the rider in position to attack. A successful Riding (-0-) skill action is required to perform the maneuver, with a failure leaving the mount in a different pivoted position position, requiring an additional action to complete the pivot.
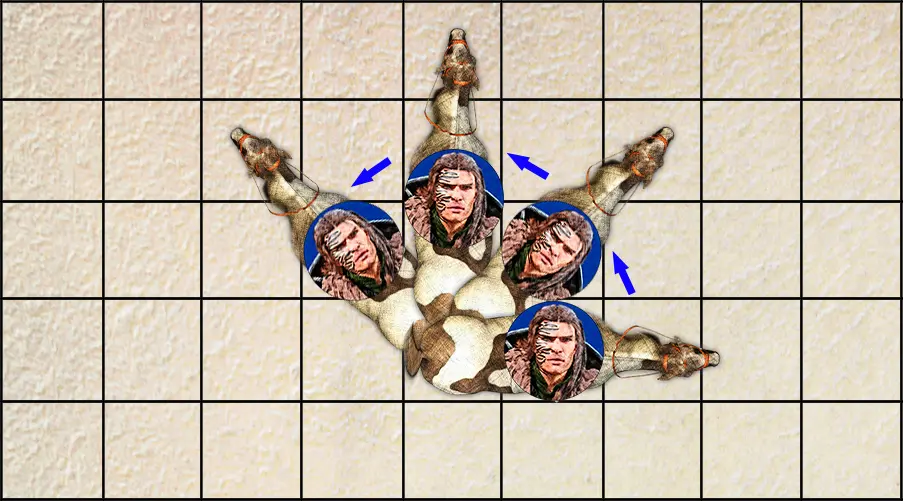
Scenario 5
From a stopped position, the rider can rotate the mount in a complete circle, either on the ground or while rearing. This can be done for show, to bring a mount’s attacks to bear or for the rider to attack surrounding foes. A successful Riding (-0-) skill action is required to perform the maneuver, with a failure leaving the mount in a pivoted position position, requiring an additional action to complete the circle, and potentially unseating the rider.
A good strategy requires combatants to be in the right places, that’s where the Positional Tactics come into play. For those who think tactically, these provide options to gain an advantage or minimize disadvantages, with the ability to adapt to the number of allies or adversaries.
Move actions and combat steps are typically required to maintain these tactics, which can be used to Counter Flank, get the High Ground, or form a Fighting Box.
Scenario 1
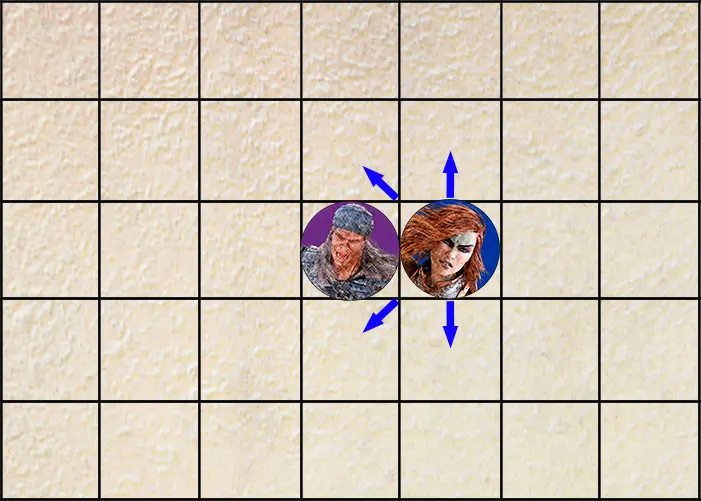
When two combatants can get back-to-back, they can’t be flanked from oppositional positions. Although this might seem like a simple tactic, maintaining a Counter Flank in the face of multiple enemies requires significant coordination between allies to avoid Attacks of Opportunity. The use of combat steps and combining attacks on a single foe are key to this tactic.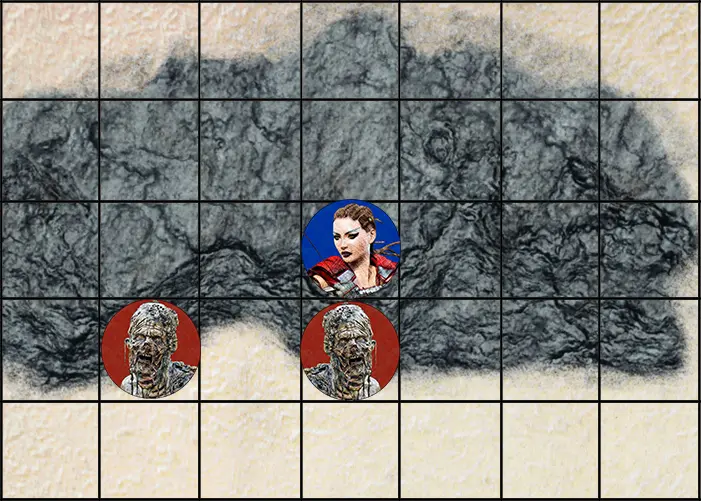
Scenario 2
When it comes to Positional Tactics, there are few as advantageous as gaining the High Ground. Regardless of whether it is in melee or ranged combat, this requires the combatant to have a height advantage over the the opponent, whether atop a wall, on a mound, at the top of the steps, in a tree, or whatever.
The combatant with the High Ground gets a +2 modifier to attack and a +2 modifier to defend against those with whom they are in direct melee combat. Those attempting to advance on combatants with the high ground are unable to use Charge or Rush type attacks, and double the fatigue rate, with two rounds counting towards fatigue for every round fighting up.
In ranged combat, those with the High Ground get a +2 modifier to hit and a degree of cover, depending upon the terrain, height, barriers, etc. Combatants trying to advance on those with the High Ground have the same limitations as above, and ranged combatants have a -2 modifier to attack.
Scenario 3
In combat there are typically those allies who can take damage and those who can’t – whether it is because they aren’t wearing armor, are badly injured, or have no fighting prowess. A Fighting Box is a defensive starting stance where the most heavily armored and healthiest are on the front line, with the most vulnerable directly behind, and an armored ranged combatant lined up behind.
The goal is to allow the most vulnerable the ability to use Combat Steps to stay out of trouble, and the ranged combatant the ability to use Combat Steps to get a Clear Shot. Being mobile without having to spend full actions on movement, leaves those in the back the ability to attack or defend, while giving ranged opponents modifiers to hit when firing through melee.
Some people want to use a hammer to fix everything, but for the rest of us, there are more judicious options. These Canny Tactics offer shrewd combat choices, both offensive and defensive, to those looking to do more than swing a sword at it until it dies.
Using these tactics requires a degree of situational awareness and skills that may not be available to everyone, and include Ambush and Blindsiding attacks, and the chance to Roll With It when you’re out of defensive options.
Scenario 1
There are two parts to setting up a good Ambush, concealment and an abrupt attack. Whether it’s hiding behind an obstacle, blending into the surroundings, or sitting still in cover, the key is that the opponent isn’t aware of the concealed character. Any concealment can be foiled with an Observation, Search, Listening, or other such skill check, so those with Stealth or Camouflage type skills have the best chance of success.
In order to make an abrupt attack, the concealed character must first use a Free Action to hold until the target moves to a specific location. For melee combatants, that location must be within a Combat Step, and for ranged combatants, observational line of sight and a Clear Shot are required.
Targets of the ambush are allowed a base Perception check (or applicable skill check). If successful, they can take defend actions during the Ambush phase and move actions during the Movement phase, otherwise they are considered prone for the round.
Scenario 2
This is a melee tactic that requires the use of Stealth type skills to move into position to make an abrupt attack without being seen. So long as the defender is unaware of the Blindsiding character’s presence, and assuming they are within a Combat Step before attacking, all attacks made by the Blindsiding combatant in that round are considered Attacks of Opportunity.
Any awareness of the Blindsiding combatant’s attack location prior to or during the move actions negates this tactic.
Scenario 3
This tactic may be used in hand-to-hand or ranged combat as a last-ditch effort to minimize the impact damage suffered from a hit. When the combatant is out of actions, or after a failed defend skill check, they can attempt to roll with the impact. In order to Roll With It, they must be able to take a Combat Step and make a base Constitution attribute check.
If successful, the character rolls with the momentum of the attack reducing the amount of damage by half, but whether it is successful or not, the character is stunned for the remainder of the round and the following round.

is a resource for the Legacy of Adventure Tabletop Roleplaying Game

© CSG Copyright 2023, all rights reserved

Attribute: Influence
Type: Defend
Time: One Action
Description: Characters with this skill are protected by their faith and, when communing with their deity, can block attacks with only an upraised palm. They are able to turn away ranged attacks (Novice), melee attacks (Expert), and ranged or melee attacks when On-Guard and magical attacks (Master). The use of this skill begins a communal state.
Specialization: (Required) Deity or entity
Attribute: Strength
Type: Attack
Time: One Action
Description: With this skill, a character can make sweeping attacks with a pole weapon. It can be used to attack all targets in a frontal 180º arc within reach of the weapon at no modifier, make a spinning attack to strike all targets in a 360º arc around the character within reach of the weapon at a difficult (-4) modifier, or strike at the legs (with a called shot modifier) to make a trip attack at targets in a frontal 90º arc (Reaction save to negate the trip attack). Characters can choose to change their facing by spending one free action to take up to a 90º pivot. Because of its aggressive nature, this attack action may not be used with a defensive stance or the On-Guard defense, and the use of it negates any defensive modifiers gained by skill-based stances, i.e. Defensive form, Counter form, etc. On a successful skill check, the target is hit and may defend normally; if the skill check fails or the target makes a successful defend, the attack misses.
Specializations: (Required) Proficient weapon(s) with reach capabilities
Attribute: Strength
Type: Attack
Time: One Action
Description: A character with this skill can make a ferocious, forceful attack with the intent of destroying a foe. For this attack, the Strength modifier for weapon damage is increased by one per two points in the skill tree. Due to its aggressive nature, this attack action may not be used with a defensive stance or the On-Guard defense, and the use of it negates any defensive modifiers gained by skill-based stances, i.e. Defensive form, Counter form, etc. On a successful skill check, the target is hit and may defend normally. It may be used with any Novice attack skill in this tree, with all related and general combat modifiers applied normally. If the skill check fails or the target successfully defends, the attack misses.
Prerequisites: Four points in the skill tree
| Type: | Attack |
| Domain: | Change |
| Range: | Reach |
| Area of Effect: | Individual |
| Duration: | Active |
| Components: | V, S, M |
| Casting Time: | Two Actions |
| Resistance: | Stamina negates |
Description: Those targeted with this spell are magically aged to an elderly state for their particular race. While under the effects of the spell, all attack, defend, and move skills have a difficult (-4) modifier, move rates are cut in half, and all armor ratings are reduced by 2. If the caster fails to maintain the spell or the target moves out of the caster’s spell reach, the effect ends immediately. The material component is a cut of rotting scalp from a corpse dead for at least a year that is held in the palm and consumed in the casting.
| Type: | Utility |
| Domain: | Change |
| Range: | Reach |
| Area of Effect: | Individual |
| Duration: | Passive |
| Components: | V, S, M |
| Casting Time: | One Action |
| Resistance: | Willpower |
Description: This spell is used to shape death energies to camouflage signs of undeath for a period of time. The Death Eater gets a defend save based on Casting Rank to Observation and Search skills to notice the signs of undeath, with the duration based on the Constitution score and character rank, i.e., Novice – minutes, Expert – hours, Master – days. Alternatively, it can be used to create a ghostly image of a specific person, mimicking their voice in the apparition, or allow the caster can take on the image and project the voice of a recently deceased person. Those who choose to disbelieve the illusion will get a Willpower save to see through the ruse. The material component is a strip of death shroud and piece of dead flesh (used up) that is held in the palm while casting.
| Type: | Attack |
| Domain: | Damage |
| Range: | Touch |
| Area of Effect: | Individual |
| Duration: | Instant |
| Components: | V, S, M |
| Casting Time: | One Action |
| Resistance: | Stamina negates |
Description: This spell inflicts the target with death energy and transfers their life energy to the caster. If the target does not make the save, they take up to skill rank damage which is transferred to the caster, healing Health damage first, and then Body damage. Armor is ineffective against the spell. The material component is a humanoid or animal tooth in a small vial of blood, that is consumed upon casting.
| Type: | Attack |
| Domain: | Control |
| Range: | Reach |
| Area of Effect: | Individual |
| Duration: | Instant |
| Components: | V, S, M |
| Casting Time: | One Action |
| Resistance: | Willpower negates |
Description: With this spell, the Death Eater can effectively avert the undead, causing them to stop their current actions and wander away. Undead of a lower character rank get no save and will simply cease whatever actions they are taking and calmly depart the vicinity, while those of equal character rank get a Willpower save to resist. The spell is ineffective against undead of a greater character rank than the Death Eater. So long as there is no contact with them, the undead will ignore everything and everyone in the vicinity of the caster. The material component is a bone wrapped in corpse flesh that is tossed away and consumed during casting.
| Type: | Attack |
| Domain: | Control |
| Range: | Reach |
| Area of Effect: | Individual |
| Duration: | Instant |
| Components: | V, S, M |
| Casting Time: | One Action |
| Resistance: | Willpower negates |
Description: This spell is used to scare a target so badly that they are able to only stand in place and quake at the sight of the Death Eater. The target is allowed a Willpower save to avoid the effect, but those who succumb are overwhelmed with terror and will stand prone staring wide-eyed at the caster for the remainder of the round and the next, in addition to entering a Fatigue condition while in the presence or vicinity of the Death Eater. While in the prone state, they are susceptible to a kill shot, though if the attack fails, the prone effect ends immediately. The second-round prone effect may be broken with assistance from an ally, requiring one action for the target and ally. The material component is a humanoid eye that is held in the palm and consumed during the casting.
| Type: | Attack |
| Domain: | Create |
| Range: | Reach |
| Area of Effect: | Locus |
| Duration: | Active |
| Components: | V, S, M |
| Casting Time: | Two Actions |
| Resistance: | Reaction |
Description: The Death Eater can use this spell to literally suffocate those in the area of effect with death energy. When cast, shadowy wisps with no substance reach out from the caster to engulf the area of effect, requiring a Reaction save for anyone in the area. If the save is successful, the targets may use move actions to escape the AoE. However, anyone who enters the AoE after it is cast but while it is being maintained, is subject to the spell effect. Anyone caught in the area at the end of the round becomes trapped and begins to drown in the death energies, requiring a Stamina save each round, with a progressive -2 modifier each round. A failed save indicates that the target has passed out and, without assistance, will regain consciousness six rounds after the effect ends. If the caster fails to maintain the spell or the target moves out of the caster’s spell reach, the effect ends immediately. The material component is a used death shroud wrapped around the caster’s throat.
| Type: | Attack |
| Domain: | Control |
| Range: | Reach |
| Area of Effect: | Group |
| Duration: | Passive |
| Components: | V, S, M |
| Casting Time: | Two Actions |
| Resistance: | Willpower negates |
Description: With this spell, the Death Eater can horrify a target within the range of the spell that spreads to affect all in the AoE. Any who fail the save run off screaming in a random direction for the duration of the spell without concern for anything but getting away from the caster. The spell has a difficult (-4) modifier to cast, giving the target a difficult (-4) save to resist. After the duration ends, any target affected by the spell is left in a Fatigue condition while in the general vicinity and presence of the Death Eater. The material components are a death mask worn by the caster and a small vial of urine that is poured out and used up during the casting.
| Type: | Utility |
| Domain: | Summon |
| Range: | Personal |
| Area of Effect: | Individual |
| Duration: | Instant |
| Components: | V, S, M |
| Casting Time: | One Action |
| Resistance: | N/A |
Description: With this spell, the Death Eater can cause blood-covered bones to grow out of the flesh of their hands, forming living cestus that can be used to make unarmed melee attacks. Claw attacks are made with the Casting skill (Str+6, magic damage, SF 4, Crit 1, Small Size) and require the caster to have a Weapon Proficiency in Gore Gloves. The gloves can take whatever form the caster desires, so long as they maintain a small size, and once the casting state ends, the gloves and the spell must be recast. The material component is a small amount of the caster’s blood, either stored in a vial or from a small wound.
| Type: | Attack |
| Domain: | Damage |
| Range: | Touch |
| Area of Effect: | Individual |
| Duration: | Instant |
| Components: | V, S, M |
| Casting Time: | Two Actions |
| Resistance: | Stamina negates |
Description: This spell is used to afflict a living being with death energy, disrupting their life force with the chill touch of the grave. The spell causes sixteen (16) points of damage, if the target takes any damage, their flesh immediately turns cool and pallid, putting them in a Fatigue condition until that damage is healed. All damage saves are made against the Magic Armor total (Constitution plus relevant armor plus bonus modifiers) casters add their Basic Hits to the armor total against spells from the same magic foundation. Those who die while under the effect of this spell will immediately rise as a feeder and attack the nearest living being. The material components are a piece of used death shroud (used up) and a chunk of a gravestone or a coffin nail held in the palm during casting.
| Type: | Attack |
| Domain: | Control |
| Range: | Reach |
| Area of Effect: | Individual |
| Duration: | Passive |
| Components: | V, S, M |
| Casting Time: | Two Actions |
| Resistance: | None |
Description: With this spell, Death Eaters can take control of and issue commands to any rotter of lower rank within range, temporarily bringing it into their employ. The effect is instant and there is no save. A rotter will remain under the caster’s influence for the duration of the spell, and while a broken spell may provoke an attack from the undead, most often they will either wander away or remain nearby, docile unless provoked. If trying to usurp control over a rotter that is under the control of another caster, that caster is allowed a Willpower save to retain control and becomes aware of the attempt. The material component is a cut of corpse flesh (used up) and a link from an iron chain that is held in the palm during casting.
| Type: | Utility |
| Domain: | Summon |
| Range: | Touch |
| Area of Effect: | Individual |
| Duration: | Active |
| Components: | V, S, M |
| Casting Time: | Three Actions |
| Resistance: | N/A |
Description: The Death Eater uses this spell to raise and control the skeleton of a corpse with death energy, directing it with simple commands. Any dead humanoid may be raised in this manner, with any remaining flesh dissipating into dust. These skeletons are marionettes, whose threat rating is based on the caster’s Character Rank, i.e., Novice – Brute, Expert – Hunter, Master – Warling, though casters may attempt to animate a more powerful skeleton with a progressive -4 modifier per threat rank increase. Whether moving or standing still, the bones clack but make no other noise. If the caster fails to maintain the spell or the skeleton moves out of the caster’s spell reach, the skeleton collapses into a pile of bones unless the caster collects three bones and wires them together while the spell is being maintained. So long as this bone armature is kept intact and the skeleton remains within the caster’s spell reach, the death energy does not dissipate, and the caster need only hold the armature to issue commands. The material component is an intact atlas vertebrae placed at the base of the skull that is used up in the casting.
Attribute: Strength
Type: Attack
Time: One Action
Description: This skill is used to make a sharp or forceful straight-arm punch attack with a physical shield, based on character rank. At Novice rank, characters may make one shield bash attack after weapon SF with no off-hand attack penalties. At Expert rank, characters can make up to two shield bash attacks after weapon SF (up to shield SF) with no off-hand attack penalties and if the target takes damage from the attack, a Stamina save is required to avoid being stunned for the remainder of the round. At Master rank, if the target takes damage from the attack, a Stamina save is required to avoid being staggered for the remainder of the round and the next round. The number of shield bash attacks cannot exceed the total number of actions in the round. On a successful skill check, the target is hit and may defend normally; if the skill check fails or the target makes a successful defend, the attack misses.
Specializations: (Required) Specific type of physical shield, i.e. small, medium, large, etc.
Attribute: Knowledge
Type: Utility
Time: N/A
Description: A combat style employing two weapons. Imposing and dynamic, it allows the combatant to make a full round of weapon attacks, allowing characters to use the full speed factor of each weapon (within the total number of available actions in the round), and potentially causing two different types of damage. Learners are instructed in two forms that carry specific attack/defend modifiers. The Balanced form offers no modifiers and used to assess threats or in group tactics. The Break Guard form is an assertive stance that offers a greater chance to hit with a +4 modifier to attack, but a -2 modifier to defend; its daunting nature gives opponents a -2 modifier to defend, while the attacker is wielding two proficient melee weapons. During combat the forms can be changed at the start of each round, but may not be changed during the round, carrying over to the next round if no change is announced. It may be used with any attack or defend skills in the tree, and the modifiers stack with all combat modifiers (including off-hand penalties). Only one stance may be purchased during character generation, but others can be selected as the character advances.
Specializations: (Required) Proficient weapon
Form Attack/Defend
Break Guard +4/-2
-defender has –/-2
Attribute: Agility
Type: Attack
Time: One Action
Description: Those with this skill can make damaging or disabling attacks to the upper body causing physical damage equal to [Strength] + [Basic Hits]. All punch attacks have a speed factor of 4, a critical hit range of 1, and the difficulty to hit is based on location and damage type (blunt or disable). While this skill may be advanced normally, it may not be used with any Expert or Master level combat skills.
Specialization: None
Attribute: Agility
Type: Attack
Time: One Action
Description: A character with this skill can make damaging or disabling attacks to the midsection, lower limbs, or those low to the ground or prone, causing damage equal to [Strength] + [Basic Hits] +2. All kick attacks have a speed factor of 2 and a critical hit range of 1, and the difficulty to hit is based on location and damage type (blunt or disable). While this skill may be advanced normally, it may not be used with any Expert or Master level combat skills.
Specialization: None
Attribute: Knowledge
Type: Utility
Time: N/A
Description: This skill is used to protect against spell interrupts. After successfully casting an Active Duration spell with any Casting skill in this tree, the caster can layer the same spell with this skill, maintaining the spell through any disrupt, including dispelling, moving out of range, loss of concentration, failing to use an action to maintain, etc., for one round per layer added. The spell effect ends if the caster does not maintain the original casting after all added spell layers expire. So long as the target is under the effect of the original casting, there is no save against the layered spell, and there is no limit to the number of times a spell can be layered. Spell details can be found in the Core Rules: Magic Users section.
Tactical Use: After a Hold spell is cast and the target fails the Willpower save, the effect is activated. In the next round, a second Hold spell is cast on the same target, adding a layer; if a Dispel is used or the caster fails to maintain the spell, moves out of range, etc., the spell continues into the next round and that layer is lost, leaving only the original casting which must be maintained normally.
Specialization: (Required) Magical Foundation, i.e. Mystic, Land Strider, Wind Rider, Fire Walker, Wave Runner
| Type: | Attack |
| Domain: | Control |
| Range: | Reach |
| Area of Effect: | Locus |
| Duration: | Active |
| Components: | V, S, M |
| Casting Time: | Two Actions |
| Resistance: | Special |
Description: This spell allows the caster to create a hand of shimmering magic of the same color and/or texture as their focus object. When cast, it can be used to make an immediate punch attack, causing twenty (20) points of magic damage, make a push attack to a target prone, or lift or hurl objects up to the caster’s carrying capacity a distance equal to the Influence score in yards, causing ten (10) points of damage plus the weight modifier. While the spell is being maintained, the caster may spend one action (in addition to any active spell maintenance requirements) to take any of the described actions once per round to affect any targets in the locus, though hurling objects requires a casting skill check to hit. A Reaction save and move are required to escape the area of effect, and targets must use a defend action to avoid hurled objects. The spell effect ends immediately if the caster doesn’t maintain the spell or moves away from the locus, past the caster’s spell reach.
| Type: | Attack |
| Domain: | Control |
| Range: | Reach |
| Area of Effect: | Locus |
| Duration: | Active |
| Components: | V, S, M |
| Casting Time: | Two Actions |
| Resistance: | Special |
Description: With this spell, the caster can create a flaming fist in the same color as their focus object, that strikes from above. The fist causes twenty (20) points of elemental damage to all in an area equal to the Influence score /2, which sets the locus area on fire, causing twenty (20) points of elemental damage the next round and for each subsequent round the spell is maintained. A Reaction save and move is required to avoid the flaming fist; afterward, move actions are required to escape the AoE fire. The spell effect ends immediately if the caster doesn’t maintain the spell or moves away from the locus, past the caster’s spell reach.
| Type: | Attack |
| Domain: | Control |
| Range: | Reach |
| Area of Effect: | Locus |
| Duration: | Active |
| Components: | V, S, M |
| Casting Time: | Two Actions |
| Resistance: | Special |
Description: Casters with this spell can fashion a hand of ice of the same color as the focus object. It can be used to make punch attacks, causing 20 points of magic damage, grab opponents and crush them causing 12 points of elemental damage, or lift or hurl objects up to the caster’s carrying capacity a distance equal to the Influence score in yards, causing ten (10) points of impact damage plus the weight modifier. While the spell is being maintained, the caster may spend one action (in addition to any active spell maintenance requirements) to take any of the described actions once per round to affect any targets in the locus, though hurling objects requires a casting skill check to hit and grabbed targets may attempt to escape, requiring two actions to grab and crush. A Reaction save and move are required to escape the area of effect, and targets must use a defend action to avoid hurled objects. The spell effect ends immediately if the caster doesn’t maintain the spell or moves away from the locus, past the caster’s spell reach.
| Type: | Attack |
| Domain: | Control |
| Range: | Reach |
| Area of Effect: | Locus |
| Duration: | Active |
| Components: | V, S, M |
| Casting Time: | Two Actions |
| Resistance: | Special |
Description: A caster with this spell can produce a fist made of powerful winds the color of the focus objects to strike targets in an area equal to the Influence score in yards. Those struck are thrown 10 yards into the air and 10 yards back, taking D20+10 falling damage (Elemental damage) and knocked prone. While the spell is being maintained, the caster may spend one action (in addition to any active spell maintenance requirements) to move the locus and affect any targets in range. Targets must make a Reaction save and take a move action to get out of the AoE. The effect ends immediately if the caster doesn’t maintain the spell.
| Type: | Attack |
| Domain: | Control |
| Range: | Reach |
| Area of Effect: | Locus |
| Duration: | Active |
| Components: | V, S, M |
| Casting Time: | Two Actions |
| Resistance: | Special |
Description: Those with this spell are able to cause a series of stone fists of the same color and/or texture as the focus object to shoot up from the ground, striking those in the AoE. A number of fists equal to the Influence score strikes each target, causing 4 points of impact damage times the number of fists, i.e., 8 stone fists cause 32 impact damage, 9 stone fists cause 36 impact damage, etc., for each round while the spell is maintained A Reaction save and move is required to avoid the initial attack and escape the AoE; afterward, move actions are required to escape the AoE.
| Type: | Attack (L) |
| Domain: | Control |
| Range: | Reach |
| Area of Effect: | Individual |
| Duration: | Active |
| Components: | V, S, M |
| Casting Time: | Two Actions |
| Resistance: | Willpower Negates |
Description: This spell can be used to temporarily immobilize animals, enemies, and monsters. Targets are held in place with a series of chains of the same color and/or texture as the caster’s focus object, remaining aware of their surroundings but unable to move or speak. If the caster fails to maintain the spell or moves out of the spell reach, the effect ends immediately. Anyone who makes contact with an affected target is subject to the spell effects as above, making the effect stronger and increasing its brightness, and adding a progressive -2 save modifier per affected target to others who make contact with an affected individual. In addition, once four or more targets are affected, the brightness of the effect will temporarily blind anyone within the spell reach. When layered, the progressive modifier increases by 2 for each affected target, i.e., one affected target -4, two affected targets -8, etc. Those under the effect of this spell are not subject to a kill shot. If the caster fails to maintain the spell or moves out of the spell’s reach, the effect ends immediately for all affected targets.
| Type: | Attack (L) |
| Domain: | Control |
| Range: | Reach |
| Area of Effect: | Individual |
| Duration: | Active |
| Components: | V, S, M |
| Casting Time: | Two Actions |
| Resistance: | Willpower Negates |
Description: When cast, animals, enemies, or monsters are temporarily trapped in a micro tornado, causing them to rapidly spin around, putting them in a fatigue condition (-2 modifier to all attack, defend, or move actions) that lasts three rounds for each round spent under the spell effect. If the caster fails to maintain the spell or moves out of the spell’s reach, the effect ends immediately. Anyone who makes contact with an affected target immediately breaks the effect, because of this, those under the effect of this spell are not subject to kill shots. When layered, each casting must be interrupted individually to break the effect of the spell.
| Type: | Attack (L) |
| Domain: | Control |
| Range: | Reach |
| Area of Effect: | Individual |
| Duration: | Active |
| Components: | V, S, M |
| Casting Time: | Two Actions |
| Resistance: | Willpower Negates |
Description: Those with this spell are able to trap animals, enemies, and monsters in a fiery band, which causes twelve (12) points of elemental damage each round, on top of the other effects. Targets are bound in fire of the same color as the caster’s focus object, remaining aware of their surroundings but unable to move or speak. When layered, the total amount of elemental damage increases by four (4) per additional casting. If the caster fails to maintain the spell or moves out of the spell’s reach, the effect ends immediately. Anyone who makes contact with an affected target takes the elemental damage and immediately breaks the spell effect. Because of this, those under the effect of this spell are not subject to kill shots.
| Type: | Attack (L) |
| Domain: | Control |
| Range: | Reach |
| Area of Effect: | Individual |
| Duration: | Active |
| Components: | V, S, M |
| Casting Time: | Two Actions |
| Resistance: | Willpower Negates |
Description: With this spell, the caster summons a series of roots, either stone or plant-based, to coil around the target, temporarily immobilizing animals, enemies, or monsters. The roots take on the same color and/or texture as the caster’s focus object, and while remaining aware of their surroundings those affected are unable to move. Anyone who makes contact with an affected target is subject to the spell effects as above, increasing the number of roots, making the effect stronger, and adding a progressive -2 save modifier per affected target to others who make contact with an affected individual, i.e., one affected target -2. two affected targets -4, etc. When layered, the progressive modifier increases by 2 for each affected target, i.e., one affected target -4, two affected targets -8, etc. Those under the effect of this spell are not subject to a kill shot. If the caster fails to maintain the spell or moves out of the spell’s reach, the effect ends immediately for all affected targets.
| Type: | Attack (L) |
| Domain: | Control |
| Range: | Reach |
| Area of Effect: | Individual |
| Duration: | Active |
| Components: | V, S, M |
| Casting Time: | Two Actions |
| Resistance: | Willpower Negates |
Description: This spell engulfs an animal, enemy, or monster in a sheath of water that holds them in place and causes them to begin drowning after two rounds. Targets get a save on their initiative turn each round to avoid the drowning effect. If the caster fails to maintain the spell or moves out of the spell reach, the effect ends immediately, at which point the sheath pops, splashing to the ground and leaving the target soaked. In addition to standard spell interrupts, if the sheath is struck from the outside with a sharp weapon, the caster gets a save against the casting skill. If the check fails, the sheath pops, subjecting those in melee to the water splash. When layered, each casting must be interrupted or popped individually to break the spell. Those under the effect of this spell are not subject to kill shots.
| Type: | Attack (L) |
| Domain: | Damage |
| Range: | Reach |
| Area of Effect: | Individual |
| Duration: | Passive |
| Components: | V, S, M |
| Casting Time: | Two Actions |
| Resistance: | Reaction Negates |
Description: This spell is used to surround the target with a ball of lightning causing sixteen (16) points of damage. The effect lasts four rounds, but on the fourth round, the ball will discharge sheets of lightning in all directions, causing twenty-four (24) points of damage to anyone in an area equal to the Influence score /2, with a Reaction save to reduce the damage by half. The ball of lightning engulfs the target and remains on them for the duration of the spell. All damage saves are made against the Magic Armor total (Basic Hits plus relevant armor plus bonus modifiers).
| Type: | Attack (L) |
| Domain: | Damage |
| Range: | Reach |
| Area of Effect: | Individual |
| Duration: | Passive |
| Components: | V, S, M |
| Casting Time: | Two Actions |
| Resistance: | Reaction Negates |
Description: Those with this spell can engulf a target with a volatile burst of magic that causes sixteen (16) points of damage. The effect lasts four rounds, but on the fourth round, the magic detonates causing twenty-four (24) points of damage to anyone in an area equal to the Influence score /2, with a Reaction save to reduce the damage by half. The spell appears as a colorful, pulsating symbol that grows more complex with each round before finally exploding in a display of light and sound. All damage saves are made against the Magic Armor total (Basic Hits plus relevant armor plus bonus modifiers).
| Type: | Attack (L) |
| Domain: | Damage |
| Range: | Reach |
| Area of Effect: | Individual |
| Duration: | Passive |
| Components: | V, S, M |
| Casting Time: | Two Actions |
| Resistance: | Reaction Negates |
Description: With this spell, the caster can wreath a target in fire, causing sixteen (16) points of damage. The effect lasts four rounds, but on the fourth round, a ring of fire will erupt from the target, causing twenty-four (24) points of damage to anyone in an area equal to the Influence score /2, with a Reaction save to reduce the damage by half. Those engulfed in flame burn for the duration, though it doesn’t cause them to catch on fire; however, when the spell detonates any flammable items worn or carried by anyone in the AoE will catch fire and burn for three rounds or until snuffed. All damage saves are made against the Magic Armor total (Basic Hits plus relevant armor plus bonus modifiers).
| Type: | Attack (L) |
| Domain: | Damage |
| Range: | Reach |
| Area of Effect: | Individual |
| Duration: | Passive |
| Components: | V, S, M |
| Casting Time: | Two Actions |
| Resistance: | Reaction Negates |
Description: When this spell is cast, it causes the target to shudder and shake, taking fourteen (14) points of damage and suffering a-2 modifier to all actions. The effect lasts four rounds, but on the fourth round, the magic will release a powerful shockwave, causing twenty (20) points of damage and knocking prone anyone in an area equal to the Influence score /2, with a Reaction save to reduce the damage by half and resist the knockdown effect. Those affected by this spell appear to strobe in place, while the shockwave appears as a blur of motion. All damage saves are made against the Magic Armor total (Basic Hits plus relevant armor plus bonus modifiers).
| Type: | Attack (L) |
| Domain: | Damage |
| Range: | Reach |
| Area of Effect: | Individual |
| Duration: | Passive |
| Components: | V, S, M |
| Casting Time: | Two Actions |
| Resistance: | Reaction Negates |
Description: With this spell, the caster is able to instantly freeze water in the air around the target, causing sixteen (16) points of damage. The effect lasts four rounds, but on the fourth round, the magic immediately releases an icy wave of cold that causes twenty (24) points of damage to anyone in an area equal to the Influence score /2, with a Reaction save to reduce the damage by half. Those who are afflicted with this spell take on a bluish hue and have fogging breath and a series of tiny ice shards accompany the blast of intense cold when it explodes. All damage saves are made against the Magic Armor total (Basic Hits plus relevant armor plus bonus modifiers).
| Type: | Defend |
| Domain: | Summon |
| Range: | Reach |
| Area of Effect: | Personal |
| Duration: | Instant |
| Components: | V or S |
| Casting Time: | One Action |
| Resistance: | N/A |
Description: With this spell, the caster can call on the winds from the realm of air to instantly travel in any direction, up to the Influence score in yards. It can be used as a defend action (the caster must move at least one yard) or to move tactically. If the caster moves to a point in the air, they’ll fall slowly at a rate of two yards per action. The caster appears as an immaterial blur moving from point to point, though they are visible and can be tracked.
| Type: | Attack |
| Domain: | Damage |
| Range: | Reach |
| Area of Effect: | Locus |
| Duration: | Instant |
| Components: | V, S |
| Casting Time: | Two Actions |
| Resistance: | Reaction |
Description: When this spell is cast, it initiates an eruption of magical energy centered on an area as defined by the caster. Anyone in the defined area must make a Reaction save, if successful, they may use move actions to escape the AoE, and anyone caught in the AoE suffers twenty (20) points of magic damage. The spell effect appears as a colorful circle filled with runes, that explodes into a series of lights and sounds. All damage saves are made against the Magic Armor total (Basic Hits plus relevant armor bonus modifiers).
| Type: | Attack |
| Domain: | Damage |
| Range: | Reach |
| Area of Effect: | Locus |
| Duration: | Instant |
| Components: | V, S |
| Casting Time: | Two Actions |
| Resistance: | Reaction |
Description: Those with this spell are able to rain lightning in an area defined by the caster. Anyone in the defined area must make a Reaction save, if successful, they may use move actions to escape the AoE, and anyone caught in the AoE suffers eighteen (18) points of magic damage. The bolts strike targets in the area and the ground, with each accompanied by a crash of thunder, leaving a thick cloud behind that obscures vision, giving all in the AoE a -2 modifier to all actions for the remainder of the round and the next before dissipating. All damage saves are made against the Magic Armor total (Basic Hits plus relevant armor bonus modifiers).
| Type: | Attack |
| Domain: | Damage |
| Range: | Reach |
| Area of Effect: | Locus |
| Duration: | Instant |
| Components: | V, S |
| Casting Time: | Two Actions |
| Resistance: | Reaction |
Description: With this spell, the caster launches a massive ball of fire, where it will explode in an area defined by the caster. Anyone in the defined area must make a Reaction save, if successful, they may use move actions to escape the AoE, and anyone caught in the AoE suffers twenty (20) points of magic damage. Unless an action is taken to put out the flames, the effect continues to burn into the next round, causing one point of Health damage, plus one per point in the skill tree. It appears as a wide flaming sphere that races at the target area. All damage saves are made against the Magic Armor total (Basic Hits plus relevant armor bonus modifiers).
| Type: | Attack |
| Domain: | Damage |
| Range: | Reach |
| Area of Effect: | Locus |
| Duration: | Instant |
| Components: | V, S |
| Casting Time: | Two Actions |
| Resistance: | Reaction |
Description: This spell can be used to produce a shockwave of energy centered on an area as defined by the caster. Anyone in the defined area must make a Reaction save, if successful, they may use move actions to escape the AoE, and anyone caught in the AoE suffers eighteen (18) points of magic damage. The force of the shockwave causes the ground to crack in front of the caster and knocks all targets in the AoE prone. If used underground or in buildings, it could cause structural damage. All damage saves are made against the Magic Armor total (Basic Hits plus relevant armor bonus modifiers).
| Type: | Attack |
| Domain: | Damage |
| Range: | Reach |
| Area of Effect: | Locus |
| Duration: | Instant |
| Components: | V, S |
| Casting Time: | Two Actions |
| Resistance: | Reaction |
Description: Those with this spell can generate a maelstrom of water that strikes targets in an area as defined by the caster. Anyone in the defined area must make a Reaction save, if successful, they may use move actions to escape the AoE, and anyone caught in the AoE suffers twenty (20) points of magic damage. It appears as a series of powerful water streams that drive through the AoE from various directions and angles, soaking everyone and extinguishing lanterns and torches. All damage saves are made against the Magic Armor total (Basic Hits plus relevant armor bonus modifiers).
| Type: | Attack |
| Domain: | Damage |
| Range: | Reach |
| Area of Effect: | Individual |
| Duration: | Instant |
| Components: | V, S |
| Casting Time: | One Action |
| Resistance: | Reaction Negates |
Description: This spell is used to create a blast of magic from the caster’s hands that strikes an individual target, causing twenty-two (22) points of damage. It appears as a colorful globe or ray and may have an accompanying sound effect. All damage saves are made against the Magic Armor total (Basic Hits plus relevant armor bonus modifiers).
| Type: | Attack |
| Domain: | Damage |
| Range: | Reach |
| Area of Effect: | Individual |
| Duration: | Instant |
| Components: | V, S |
| Casting Time: | One Action |
| Resistance: | Reaction Negates |
Description: When cast, this spell throws a bolt of lightning from the caster’s hands that strikes for twenty-two (22) points of damage. It can appear as a sheet, bolt, ribbon, etc, and may crackle or thunder. All damage saves are made against the Magic Armor total (Basic Hits plus relevant armor bonus modifiers).
| Type: | Attack |
| Domain: | Damage |
| Range: | Reach |
| Area of Effect: | Individual |
| Duration: | Instant |
| Components: | V, S |
| Casting Time: | One Action |
| Resistance: | Reaction Negates |
Description: Those with this spell can generate a lance of fire, striking for twenty-two (22) points of damage. Unless an action is taken to put out the flames, the effect continues to burn into the next round, causing one point of health damage, plus one per point in the skill tree. The spell can appear as a stream, funnel, etc. All damage saves are made against the Magic Armor total (Basic Hits plus relevant armor bonus modifiers).
| Type: | Attack |
| Domain: | Damage |
| Range: | Reach |
| Area of Effect: | Individual |
| Duration: | Instant |
| Components: | V, S |
| Casting Time: | One Action |
| Resistance: | Reaction Negates |
Description: This spell is used to create a directed seism that drives up through the ground, striking for twenty-two (22) points of damage, and knocking the target down. Although the shock wave is not visible, the displaced land and a thunderous rumble from the area are obvious. Use of this spell could cause structural damage if cast in buildings or underground. All damage saves are made against the Magic Armor total (Basic Hits plus relevant armor bonus modifiers).
| Type: | Attack |
| Domain: | Damage |
| Range: | Reach |
| Area of Effect: | Individual |
| Duration: | Instant |
| Components: | V, S |
| Casting Time: | One Action |
| Resistance: | Reaction Negates |
Description: When cast, this spell sends a stream of water at the target, striking for twenty-two (22) points of damage and causing knockback. While there is little actual water in the attack, the force of it is enough to extinguish lanterns or torches. All damage saves are made against the Magic Armor total (Basic Hits plus relevant armor bonus modifiers).
| Type: | Utility |
| Domain: | Divination |
| Range: | Reach |
| Area of Effect: | Locus |
| Duration: | Passive |
| Components: | V, S, M |
| Casting Time: | Two Actions |
| Resistance: | N/A |
Description: This spell allows the caster to see through most types of deceptions, including magic and natural form altering, camouflage, and even verbal deceptions, such as lying. The caster’s focus object must be set in the center of the forehead, whether worn or held, acting as a third eye through which they view the deception. Once cast, the spell will reveal deceptions by enveloping the specified area of effect in a magic aura highlighting the deception. The caster is required to interpret the deception, though often it is obvious from the context of the situation. Deceptions created by magic get an opposed save using the casting skill check to negate the effect of this spell.
| Type: | Attack |
| Domain: | Summon |
| Range: | Personal |
| Area of Effect: | Individual |
| Duration: | Active |
| Components: | V, S, M |
| Casting Time: | Two Actions |
| Resistance: | N/A |
Description: Those with this spell can summon and control an elemental from the realm of Water. The strength of the elemental is based on Character Rank, i.e., Novice – Lesser, Expert – Greater, Master – Primal, though casters may attempt to summon a more powerful elemental with a progressive -2 modifier per threat rating increase, i.e., Lesser to Greater -2, Lesser to Primal -4. Whoever holds the caster’s focus object may command the elemental, though an initial Willpower save is required by the individual to whom the focus object is passed in order to gain control. Water Elementals despise being summoned, and if the elemental’s overall Threat Rating is higher than the Character Rank it will attempt to break free every 3 rounds, requiring the controller to make a Willpower save to retain control. When summoned, it appears adjacent to the caster, and if its Health is reduced to zero, it dissipates in a splash that soaks anyone directly adjacent. Control ends immediately if the caster doesn’t maintain the spell, passed control fails, or the elemental moves out of the spell reach of the focus object. A free elemental may immediately return to the Realm of Water. but will more likely choose to attack, getting a Willpower save to resist the caster’s attempts to regain control.
| Type: | Attack |
| Domain: | Summon |
| Range: | Personal |
| Area of Effect: | Individual |
| Duration: | Active |
| Components: | V, S, M |
| Casting Time: | Two Actions |
| Resistance: | N/A |
Description: With this spell, the caster can summon and control an elemental from the realm of Land. The strength of the elemental is based on Character Rank, i.e., Novice – Lesser, Expert – Greater, Master – Primal, though casters may attempt to summon a more powerful elemental with a progressive -4 modifier per threat rating increase, i.e., Lesser to Greater -4, Lesser to Primal -8. Whoever holds the caster’s focus object may command the elemental. Unless treated poorly, Land elementals typically do not mind being summoned and will go out of their way to aid whoever holds the focus object, though if treated badly, an initial Willpower save is required to gain control, and it will immediately return to the realm of land if the caster fails to maintain the spell or the elemental moves out of the caster’s spell reach. When summoned, it appears adjacent to the caster, and if its Health is reduced to zero, it dissolves into the ground.
| Type: | Attack |
| Domain: | Summon |
| Range: | Personal |
| Area of Effect: | Individual |
| Duration: | Active |
| Components: | V, S, M |
| Casting Time: | Two Actions |
| Resistance: | N/A |
Description: Those with this spell can summon and control an elemental from the realm of Air. The strength of the elemental is based on Character Rank, i.e., Novice – Lesser, Expert – Greater, Master – Primal, though casters may attempt to summon a more powerful elemental with a progressive -4 modifier per threat rating increase, i.e., Lesser to Greater -4, Lesser to Primal -8. Whoever holds the caster’s focus object may command the elemental, though an initial Willpower save is required by the individual to whom the focus object is passed in order to gain control. In addition, if the elemental’s overall Threat Rating is higher than the Character Rank it may attempt to break free, requiring the controller to make a Willpower save to retain control. When summoned, it appears adjacent to the caster, and if its Health is reduced to zero, a series of winds carry its form away in different directions. Control ends immediately if the caster doesn’t maintain the spell, passed control fails, or the elemental moves out of the spell reach of the focus object. A free elemental will choose its own targets and/or return to the Realm of Air as it wishes.
| Type: | Attack |
| Domain: | Summon |
| Range: | Personal |
| Area of Effect: | Individual |
| Duration: | Active |
| Components: | V, S, M |
| Casting Time: | Two Actions |
| Resistance: | N/A |
Description: When cast, this spell summons and controls an elemental from the realm of Fire. The strength of the elemental is based on Character Rank, i.e., Novice – Lesser, Expert – Greater, Master – Primal, though casters may attempt to summon a more powerful elemental with a progressive -4 modifier per threat rating increase, i.e., Lesser to Greater -4, Lesser to Primal -8. Whoever holds the caster’s focus object may command the elemental, though an initial Willpower save is required by the individual to whom the focus object is passed in order to gain control. In addition, if the elemental’s overall Threat Rating is higher than the Character Rank it may attempt to break free, requiring the controller to make a Willpower save to retain control. Fire elementals despise being controlled and will seek every opportunity to break free and kill the caster who summoned them and perhaps their companions out of spite, before returning to the Realm of Fire. When summoned, it appears adjacent to the caster, curses the caster continuously, and if its Health is reduced to zero, it spittles and sparks into oblivion, swearing eternal vengeance on the caster. Control ends immediately if the caster doesn’t maintain the spell, passed control fails, or the elemental moves out of the spell reach of the focus object. A free elemental may immediately return to the Realm of Fire or choose to attack, getting a Willpower save to resist the caster’s attempts to regain control.
| Type: | Attack |
| Domain: | Summon |
| Range: | Personal |
| Area of Effect: | Individual |
| Duration: | Active |
| Components: | V, S, M |
| Casting Time: | Two Actions |
| Resistance: | N/A |
Description: This spell is used to summon an elemental from the Mystic Realm over which the caster has full control. The Arcane Beast appears the same color and general shape as the caster’s focus object, with a power level based on Character Rank, i.e., Novice – Lesser, Expert – Greater, Master – Primal. Casters may direct the monster with free actions, but the directions must be simple and clear, and once both free actions are used, additional actions are required. When summoned, it appears adjacent to the caster and fades back into the Mystic Realm if the caster doesn’t maintain the spell, the elemental moves out of the caster’s spell reach, or its hit points are reduced to zero.
| Type: | Utility |
| Domain: | Change |
| Range: | Touch |
| Area of Effect: | Individual or Object |
| Duration: | Active |
| Components: | V, S, M |
| Casting Time: | Two Actions |
| Resistance: | N/A |
Description: With this spell, a caster can decrease the size scale of an individual or object by up to two size categories. As targets are decreased in scale their weight class is decreased by the same value, reducing the amount of damage they cause and can mitigate. All armors, gear, clothing, and weapons are decreased proportionally, but the effectiveness is not, i.e., a shrunken healing balm will simply require less of it to be as effective. For common items and objects, there is no save and the change affects the durability in that there is less of it, i.e., one inch of steel is not as strong as three inches of steel. A mirror of the talisman remains with the shrunken character, visually linking them to the caster for the duration of the spell. The spell effect ends immediately if the caster doesn’t maintain the spell or the target moves out of the caster’s spell reach.
| Type: | Attack (L) |
| Domain: | Control |
| Range: | Reach |
| Area of Effect: | Individual |
| Duration: | Active |
| Components: | V, S, M |
| Casting Time: | One Action |
| Resistance: | Willpower negates |
Description: When cast, this spell causes the target to become extremely lethargic, reducing their number of actions in the round by three for the duration of the effect. Those under the effect of the spell appear to be hampered by magical bonds in the color and/or texture of the caster’s focus object. In addition to losing three actions, the target’s move rate per action becomes the move rate per round, and the speed factor/rate of fire for all weapons and spell casting is reduced to one. If the caster fails to maintain the spell or the target moves out of the caster’s spell reach, the effect ends immediately.
| Type: | Attack (L) |
| Domain: | Change |
| Range: | Reach |
| Area of Effect: | Locus |
| Duration: | Passive |
| Components: | V, S, M |
| Casting Time: | One Action |
| Resistance: | Willpower negates |
Description: Those with this spell can completely suppress all sound in an area around the target, surrounding them in a soft glow the same color as the focus object. Should the save fail, the target is unable to hear anything or make any sound vocally or with movement, in addition, anyone in an area around the target equal to the Influence score /2, is similarly silenced with no save, though they may step out of the effect by exiting the AoE. The spell may be cast on a willing target without requiring a Willpower save, but the visual display makes the effect fairly obvious in most instances.
| Type: | Attack (L) |
| Domain: | Damage |
| Range: | Reach |
| Area of Effect: | Individual |
| Duration: | Active |
| Components: | V, S, M |
| Casting Time: | One Action |
| Resistance: | Stamina negates |
Description: A damaging spell that escalates as it endures, causing eight (8) points of magic damage in the first round and increasing by four (4) points each round thereafter until the caster fails to maintain the spell or the target moves out of the caster’s spell reach. The agony generated causes those under the effect to enter a fatigue condition (-2 to all actions) for the duration of the spell. To the target, the effect appears to be generated by the caster’s focus object, with any body damage sustained imprinted into the flesh in its shape. All damage saves are made against the Magic Armor total (Constitution plus relevant armor plus bonus modifiers) casters add their Basic Hits to the armor total against spells from the same magic foundation. This spell typically needs to last for multiple rounds to be effective, and due to its vicious nature and the way it often elicits screams from the target, use of it is morally questionable for most schools of magic and among most casters. This spell is ineffective on animals and monsters.
| Type: | Attack |
| Domain: | Create |
| Range: | Reach |
| Area of Effect: | Locus |
| Duration: | Instant |
| Components: | V, S, M |
| Casting Time: | Two Actions |
| Resistance: | Reaction negates |
Description: When cast, this spell creates a bright burst of light that can be used to blind foes, signal a companion, etc. The shape and color of the light is based on the character’s focus object. Targets within the area of effect, friends and foes alike, get a Reaction save to avoid the effect. Those who make the save see spots but suffer no modifiers, but those who fail the save are blinded, suffering a very difficult (-8) modifier to all attack, defend, and move actions for three rounds, reduced to a difficult (-4) modifier for three additional round. If a warning is issued to allies, no save is required, though the warning itself may alert savvy opponents, likely giving them a bonus modifier to the save.
| Type: | Attack |
| Domain: | Control |
| Range: | Reach |
| Area of Effect: | Individual |
| Duration: | Passive |
| Components: | V, S |
| Casting Time: | Three Actions |
| Resistance: | Willpower Negates |
Description: This spell is used to persuade a target to view the caster as an ally for up to one hour per point in the Influence attribute. The target gets a Willpower save initially, and a modified Willpower save if asked to perform any act or action that they would find morally questionable. This spell may be cast upon NPC’s or enemies but is ineffective against animals and monsters. The target is fully aware and will not knowingly engage in a life-threatening activity, in addition, any aggressive action directed at the target will break the spell without requiring a save.
| Type: | Utility |
| Domain: | Change |
| Range: | Touch |
| Area of Effect: | Individual |
| Duration: | Active |
| Components: | V, S, M |
| Casting Time: | Two Actions |
| Resistance: | N/A |
Description: This spell is used to increase the scale of an individual or object by up to two size categories. For items and objects, the change affects the durability in that there is simply more of it, i.e. three inches steel is stronger than one inch of steel. Targets increased to large class increase to a hulking weight class, while those that go to giant class increase to a massive weight class. All armors, gear, clothing, and weapons are increased proportionally, but the effectiveness is not, i.e. a large healing balm requires more of it to be as effective. A mirror of the talisman remains with the enlarged character, linking them to the caster for the duration of the spell. The spell effect ends immediately if the caster doesn’t maintain the spell or the target moves out of the caster’s spell reach.
| Type: | Utility |
| Domain: | Summon |
| Range: | Touch |
| Area of Effect: | Individual |
| Duration: | Active |
| Components: | V, S, M |
| Casting Time: | Three Actions |
| Resistance: | N/A |
Description: This spell is used to raise and control the recently dead by imbuing them with death energy and then issuing simple commands. These rotters are marionettes, whose threat rating is based on the caster’s Character Rank, i.e., Novice – Rotter, Expert – Shambler, Master – Stalker, Epic – Demilich, though casters may attempt to animate a more powerful rotter with a progressive -4 modifier per threat rank increase. Although they lack emotion and personality, they are driven to complete a given task. Eerily silent when still, anytime a rotter moves they make a haunting wail, often leaving a trail of gore, depending on the condition of the corpse. If the caster fails to maintain the spell or the rotter moves out of the caster’s spell reach, the rotter simply stops moving and remains still. The death energy dissipates an hour after the spell effect ends unless the caster collects at least a quarter of the rotter’s heart while the spell is being maintained. So long as the heart is kept intact and the rotter remains within the caster’s spell reach, the death energy does not dissipate, and the caster need only hold the heart to issue commands. The material component required to animate is a quarter of any humanoid heart placed on the chest that is used up in the casting.
| Type: | Attack (L) |
| Domain: | Summon |
| Range: | Reach |
| Area of Effect: | Locus |
| Duration: | Passive |
| Components: | V, S, M |
| Casting Time: | Two Actions |
| Resistance: | Special |
Description: With this spell, the caster can summon a ground covering of thorny foliage in a particular area. The effect of the thorns varies by character rank, those in the AoE become snarled, reducing move actions by half and requiring an action to break free before taking a move action (Novice), while suffering eighteen (18) points of impact damage for each move action taken (Expert), and becoming immobilized after two rounds in the AoE, taking damage from every action (Master). The spell may be cast on any natural terrain, or upon dirt or wood flooring, during which spherules rush to the area and plunge into the surface, instantly growing into the foliage.
Attribute: Influence
Type: Attack
Time: Two Actions
Description: Characters use this skill to call upon the deity or entity to bring their wrath down on an opponent. On a successful skill check, a target within a range of 1 yard per point in the skill tree is knocked prone and inflicted with a fatigue state that lasts for one round per 2 points in the skill tree, beginning immediately and ending at the end of the expiration round. The target gets a Stamina save with a -1 modifier per 3 points in the skill tree to resist the Smite, with the knockdown affecting up to large-sized beings. The use of this skill begins a communal state.
Prerequisites: The rebuke skill and four points in the skill tree
Attribute: Constitution
Type: Utility
Time: Two Actions
Description: Those with this skill can lay on hands to absorb significant wounds, healing the target while taking on their body damage. The character can choose to exchange any number of body points and heal the target at a 1:1 ratio, though upon taking on the damage, they immediately enter a damaged condition (-4 modifier to all actions). The target’s damaged condition is not removed unless all body damage is healed. The use of this skill begins a communal state.
Prerequisites: The Offering skill and four points in the skill tree
| Type: | Utility (L) |
| Domain: | Control |
| Range: | Reach |
| Area of Effect: | Individual |
| Duration: | Active |
| Components: | V, S, M |
| Casting Time: | Two Actions |
| Resistance: | N/A |
Description: When cast, this spell will remove Condition effects, including fatigue and damage, and combat effects, including stun, stagger, and sensory deprivation effects, i.e. blind, deaf, etc. It will also revive those knocked out but have positive health or body points remaining. After the effect ends, targets return to their previous state, but those who have been revived remain conscious. While the spell effect removes modifiers for attacking, defending, and move actions immediately, a target that’s been knocked out must still wait for their initiative turn to stand from prone. If the caster fails to maintain the spell or the target moves out of the caster’s spell reach, the effect ends immediately. A continuous burst of spherules accompanies the effect until the spell ends.
| Type: | Attack (L) |
| Domain: | Control |
| Range: | Touch |
| Area of Effect: | Individual |
| Duration: | Active |
| Components: | V, S, M |
| Casting Time: | Two Actions |
| Resistance: | Willpower negates |
Description: This spell is used on animals, enemies, or monsters providing a degree of calm to counter the fight or flight response. When under the effect of the spell, the target ceases all aggressiveness, anger, hostility, or desire for combat for the duration, allowing for roleplay opportunity to resolve combat. Any aggressive act, including verbal threats, made against the target will negate the spell, and the spell effect ends immediately if the caster doesn’t maintain the spell or the target moves out of the caster’s spell reach. Targets are fully aware of what’s going on around them, and while animals or monsters may lose interest and wander away, enemies will typically interact with the caster. For the duration of the spell effect, slow-moving spherules run between the caster and target, linking them.
| Type: | Utility (L) |
| Domain: | Summon |
| Range: | Reach |
| Area of Effect: | Locus |
| Duration: | Active |
| Components: | V, S, M |
| Casting Time: | Two Actions |
| Resistance: | N/A |
Description: This spell is used to create an exact copy of the caster in the current circumstances, appearing up to a distance away equal to the spell reach, extending the caster’s overall spell reach from each individual projection. The number of projections is based on character rank, i.e., Novice = 1, Expert = 2, Master = 4, with each capable of independent movement, defend actions, and speech. When used with layering, one additional projection may be added per casting. Casters are able to transfer their physical form between the projections by spending one action in the round as a move or defend action, though a casting check is required to transfer the physical form as a defend action, and the transferred projection may not take any defend actions. If a projection is struck, it explodes into spherules, requiring a recasting to be restored. When the caster takes an attack-type action, all projections mimic it, which may make it difficult to determine which is the true physical form, depending on the situation, i.e., a ranged attack can appear to come from all projections at once, but a melee strike from a projection at range will not fool anyone. If the caster fails to maintain the spell or a projection goes beyond the caster’s spell reach, the projection dissipates immediately, requiring a recasting to be restored. During casting, spherules briefly shroud the caster and projections as they appear.
| Type: | Utility (L) |
| Domain: | Change |
| Range: | Reach |
| Area of Effect: | Individual |
| Duration: | Active |
| Components: | V, S, M |
| Casting Time: | Two Actions |
| Resistance: | Stamina neg |
Description: With this spell, the caster can link the life energy of two beings, causing one to endure the effects that are visited on the other. The type of effect endured is based on character rank, one of which is selected by the caster, i.e., impact or elemental damage – Novice; magic damage or healing effects – Expert; recent death or physical location – Master. Multiple effects can be layered onto one target. When cast upon willing targets, no save is required, while unwilling targets are allowed an initial Stamina save. If the caster fails to maintain the spell or one of the targets moves out of the caster’s spell reach, the effect ends immediately. Upon casting, a line of spherules runs between the targets, growing from transfer target to enduring target.
| Type: | Utility (L) |
| Domain: | Control |
| Range: | Reach |
| Area of Effect: | Individual |
| Duration: | Active |
| Components: | V, S, M |
| Casting Time: | Two Actions |
| Resistance: | N/A |
Description: This spell regenerates health or body damage per round based on Character Rank, up to the maximum scores. The healing effect takes place on the caster’s initiative turn, restoring health/body damage (Novice 2/1, Expert 4/2, Master 6/3) depending upon the casting. Only one type of damage may be healed per target per casting, requiring a new casting check to change the type of healing, although a single target can have the effect layered to heal both health and body points. The spell effect ends immediately if the caster doesn’t maintain the spell or the target moves out of the caster’s spell reach. Spherules from the caster will move to the target and crawl or roll over them for the duration of the spell.
| Type: | Attack |
| Domain: | Summon |
| Range: | Reach |
| Area of Effect: | Locus |
| Duration: | Active |
| Components: | V, S, M |
| Casting Time: | Two Actions |
| Resistance: | Willpower |
Description: When cast, this spell summons life energy from the surrounding area and concentrates it in a particular location. Living creatures in the area of effect are overwhelmed with a radiant energy that suppresses all negative actions and emotions, trapping them in a peaceful trance-like state so long as the spell is maintained. Targets are not subject to an attack of opportunity while in the trance and an attack breaks the effect, though if the effect is broken or the target makes the initial save, they must move out of the area of effect before the end of the round or become trapped. Any undead beings in the area of effect become trapped within the barrier of life energy and suffer sixteen (16) points of magic damage each round, though they may escape the area of effect by using a full round of move actions to push out of it. All damage saves are made against the Magic Armor total (Constitution plus relevant armor plus bonus modifiers), and undead casters add their Basic Hits to the armor total against spells from the same magic foundation. The spell effect ends immediately if the caster doesn’t maintain the spell or the target moves out of the caster’s spell reach. When cast, spherules rush in from the surrounding area and flitter through the area of effect so long as the spell is maintained.
| Type: | Defend |
| Domain: | Control |
| Range: | Reach |
| Area of Effect: | Individual |
| Duration: | Active |
| Components: | V, S, M |
| Casting Time: | Two Actions |
| Resistance: | N/A |
Description: This spell fills the target with mystical adrenaline, temporarily increasing their effectiveness, based on Character Rank. Targets may be granted a bonus modifier to the Constitution score to resist damage (Novice +1, Expert +3, Master +5), a bonus modifier to the Strength score to cause damage (Novice +2, Expert +4, Master +6), or a per action movement increase (Novice +3, Expert +6, Master +9). These do not stack with similar effects, targets get the better modifier. When the effect of the spell effect ends, the target is left physically drained and is immediately subject to the normal effects of fatigue (-2 modifier to all actions) for a period of time based on Character Rank, i.e. Novice 1 hour, Expert 30 minutes, Master 10 minutes. If the caster fails to maintain the spell or the target moves out of the caster’s spell reach, the effect ends immediately. The spherules dance excitedly about the target for the duration of the spell, mimicking the effect.
| Type: | Attack (L) |
| Domain: | Damage |
| Range: | Touch |
| Area of Effect: | Individual |
| Duration: | Active |
| Components: | V, S, M |
| Casting Time: | Two Actions |
| Resistance: | Stamina negates |
Description: The Death Eater can use this spell to afflict the target with a virulent disease that puts them in a fatigue state and causes sixteen (16) points of magic damage each round. All damage saves are made against the Magic Armor total (Constitution plus relevant armor plus bonus modifiers) and casters add their Basic Hits to the armor total against spells from the same magic foundation. If the target takes damage, their flesh begins to swell and blister, growing puss-leaking abscesses for as long as the spell is maintained. If the caster fails to maintain the spell or the target moves out of the caster’s spell reach, the effect ends immediately. The material component is a cut of maggot-ridden flesh that is held in the palm and used up in casting.
| Type: | Attack (L) |
| Domain: | Control |
| Range: | Reach |
| Area of Effect: | Individual |
| Duration: | Active |
| Components: | V, S, M |
| Casting Time: | Two Actions |
| Resistance: | Stamina negates |
Description: Those targeted by this spell suffer a magical fatigue, giving them a -2 modifier to all attack, defend, and move-based skills and reducing the number of available actions by one (1). In addition, Expert level castings reduce the number of the target’s available actions by 2, and Master level Castings by 3. Targets of this spell are outwardly weary, appearing out of breath with a constant burn in their muscles with every action. The spell effect ends immediately if the caster doesn’t maintain the spell or the target moves out of the caster’s range.
| Type: | Utility |
| Domain: | Divination |
| Range: | Touch |
| Area of Effect: | Individual |
| Duration: | Active |
| Components: | V, S, M |
| Casting Time: | Four Actions |
| Resistance: | Special |
Description: With this spell, the Death Eater can gather the death energies surrounding a corpse to animate it enough to communicate. The spell doesn’t recall the spirit, rather it collects memory imprinted on the remains, allowing the corpse to intelligently answer questions and offer details about its life without the rage against the living that comes with animate dead. The target may choose to refuse to answer questions by making a difficult Willpower save, but most often will require a favor of some type before answering. This will often be a message to be delivered, though it may be far more complex, and those who do not honor the promise will typically find themselves haunted. Once the spell effect ends, the remains decompose rapidly and turn to dust. If the caster fails to maintain the spell or moves out of the spell reach, the effect ends immediately. The material component is a humanoid tongue placed into the mouth of the skull, that is consumed on casting.
| Type: | Attack (L) |
| Domain: | Control |
| Range: | Reach |
| Area of Effect: | Group |
| Duration: | Active |
| Components: | V, S, M |
| Casting Time: | One Action |
| Resistance: | Willpower negates |
Description: This spell is used to evoke panic in a target within the range of the spell that spreads to affect all in the AoE. Any who fail the save are overwhelmed with a wave of panic and may take only defensive actions for the remainder of the round. In each subsequent round that the spell is active, targets suffer a modifier to all attack, defend, and move actions based on the caster’s Character Rank, i.e., Novice -2, Expert -4, Master -6, Epic -8. The spell effect ends immediately if the caster doesn’t maintain the spell or the target moves out of the caster’s spell reach, and the material component is a skeletal vertebra that is held in the palm and used up during casting.
| Type: | Attack |
| Domain: | Control |
| Range: | Reach |
| Area of Effect: | Individual |
| Duration: | Active |
| Components: | V, S, M |
| Casting Time: | Two Actions |
| Resistance: | Willpower negates |
Description: Death Eaters can use this spell to enact their will over any existing undead being and force them to serve. If the target’s save fails, they remain under the caster’s control until the spell is released, though a feeder with a higher Threat Rating than the caster’s Character Rank may attempt to break free, requiring the caster to make a successful Willpower save to maintain control. If trying to usurp control over a feeder that is under the control of another caster, the controlling caster is allowed a Willpower save to retain control and becomes aware of the attempt. While dominated undead are subject to the will of the caster, the moment the magic is dispelled, they regain their autonomy. If the caster fails to maintain the spell or the target moves out of the caster’s spell reach, the effect ends immediately. The material component is a severed finger (used up) in a small wrought iron cage that is dangled before the target.
| Type: | Utility |
| Domain: | Summon |
| Range: | Touch |
| Area of Effect: | Individual |
| Duration: | Passive |
| Components: | V, S, M |
| Casting Time: | Four Actions |
| Resistance: | N/A |
Description: Used to raise and control the dead, the creation of a feeder comes with the risk of losing control over it. Unlike the other animations, so long as they feed, the death energy will sustain them until the body is destroyed by weapon or time. In addition, they maintain a degree of independence and awareness, possibly requiring additional spell casting to properly control. When imbued with death energy, remnants of the person they were, including personality traits, are rekindled along with a bitter hatred for all living things. The type of sustenance the feeder requires is based on character rank, i.e., Novice – living flesh, Expert – blood, Master – life energy, Epic – emotion, as is their threat rating, i.e., Novice – Feeder, Expert – Ghoul, Master – Vampire, Epic – Lich, though casters may attempt to animate a more powerful feeder with a progressive -4 modifier per threat rating increase. Feeders whose overall Threat Rating is lower than the caster’s Character Rank are compelled to obey, however, those of an equal rating or higher may attempt to break free (typically in moments of distraction), requiring the caster to make a Willpower save to maintain control. So long as they are able to feed to maintain and restore themselves, feeders will generally follow the will of the caster. The material component is a high-value black onyx gem encased in brain matter, that is placed in the mouth and consumed upon casting.
| Type: | Attack (L) |
| Domain: | Control |
| Range: | Reach |
| Area of Effect: | Individual |
| Duration: | Active |
| Components: | V, S, M |
| Casting Time: | Two Actions |
| Resistance: | Willpower negates |
Description: With this spell, the Death Eater causes the target to become enraged, acting without concern for their own well-being or that of their allies. While under the influence of the spell, the target takes no defend actions, will not retreat from combat, and refrains from any action that aids another. The spell effect ends immediately if the caster doesn’t maintain the spell or the target moves out of the caster’s spell reach. The material component is a vial of blood (used up) that is held in the palm and boils away during casting.
| Type: | Attack (L) |
| Domain: | Damage |
| Range: | Reach |
| Area of Effect: | Individual |
| Duration: | Active |
| Components: | V, S, M |
| Casting Time: | Two Actions |
| Resistance: | Stamina negates |
Description: When this spell is cast, a bloody gash opens on the target’s flesh, causing sixteen (16) points of magic damage for each round the caster maintains the effect. In addition, a new wound is opened each subsequent round, adding a progressive two (2) points of damage to the damage total. All damage saves are made against the Magic Armor total (Constitution plus relevant armor plus bonus modifiers) casters add their Basic Hits to the armor total against spells from the same magic foundation. If the caster fails to maintain the spell or the target moves out of the caster’s spell reach, the effect ends immediately. The material component is a small vial of blood that is poured into the open palm and used up during casting.
| Type: | Attack |
| Domain: | Control |
| Range: | Reach |
| Area of Effect: | Individual |
| Duration: | Active |
| Components: | V, S, M |
| Casting Time: | Two Actions |
| Resistance: | Reaction negates |
Description: This spell allows the caster to raise the target off the ground a number of yards equal to the Influence score, negating the ability to take move or defend actions or engage in melee combat. Targets are engulfed in a colorful display resembling the caster’s focus object for the duration of the spell. While levitating, any movement the target takes will cause them to tumble in place, giving them a very difficult (-8) modifier to cast spells, make ranged attacks, or perform virtually any other attack or utility action. The spell effect ends immediately if the caster doesn’t maintain the spell or moves out of the spell reach, causing the target to fall, suffering normal falling damage.
| Type: | Attack |
| Domain: | Control |
| Range: | Reach |
| Area of Effect: | Individual |
| Duration: | Active |
| Components: | V, S, M |
| Casting Time: | Two Actions |
| Resistance: | Reaction negates |
Description: With this spell, the caster can raise the target off the ground a number of yards equal to the Influence score within a mini-tornado the color of their focus object. Targets inside this mini-tornado are spun continuously, negating the ability to take any action, and requiring a Stamina save to avoid becoming ill, entering a fatigue state for 1 minute per round spent under the spell effect. The spell effect ends immediately if the caster doesn’t maintain the spell or moves out of the spell reach, causing the target to fall, suffering normal falling damage.
| Type: | Attack |
| Domain: | Control |
| Range: | Reach |
| Area of Effect: | Individual |
| Duration: | Active |
| Components: | V, S, M |
| Casting Time: | Two Actions |
| Resistance: | Reaction negates |
Description: This spell is used to create a hand of dirt the same color and/or texture as the caster’s focus object that throws the target a number of yards into the air equal to the Influence score, negating the ability to take any action. Targets are tossed into the air and caught four times per round, causing them to drop items they are holding (Reaction save each round) and may cause any loose gear to fall away. The spell effect ends immediately if the caster doesn’t maintain the spell or moves out of the spell reach, causing the hand of dirt to make a final toss straight up a distance in yards equal to the Influence score x2 and then dissipates into the ground allowing the target to fall, suffering normal falling damage.
| Type: | Attack |
| Domain: | Control |
| Range: | Reach |
| Area of Effect: | Individual |
| Duration: | Active |
| Components: | V, S, M |
| Casting Time: | Two Actions |
| Resistance: | Reaction negates |
Description: Those with this spell can create a small geyser the color of the caster’s focus object that sends a target up off the ground a number of yards equal to the Influence score, negating the ability to take move or defend actions or engage in melee combat. While the spell is maintained, targets will bounce up and down on a foaming column of water, causing them to become completely soaked and giving them a very difficult (-8) modifier to cast spells, make ranged attacks, or perform virtually any other attack or utility action. The spell effect ends immediately if the caster doesn’t maintain the spell or moves out of the spell reach, causing the target to fall, suffering normal falling damage.
| Type: | Attack (L) |
| Domain: | Control |
| Range: | Reach |
| Area of Effect: | Individual |
| Duration: | Active |
| Components: | V, S |
| Casting Time: | Three Actions |
| Resistance: | Willpower negates |
Description: This spell is used to take control of humanoid beings, bending their will to act at the whim of the caster. The controlled being will attack, defend, and move per the instructions of the caster, and may be made to perform acts such as attacking an ally or walking off a ledge. Those controlled carry a magic replica of the caster’s focus object, appear placid at all times, do not react to external stimuli, and speak in a slow monotone, often in the caster’s voice. While under control, the target is aware of every action, but they can do nothing but go along for the ride. Commands will be taken literally and the caster may be required to spend actions to direct the target in complex tasks. If the caster fails to maintain the spell or the target moves out of the caster’s spell reach, the effect ends immediately. This spell is ineffective on animals and monsters.
| Type: | Attack (L) |
| Domain: | Change |
| Range: | Touch |
| Area of Effect: | Individual |
| Duration: | Active |
| Components: | V, S |
| Casting Time: | Three Actions |
| Resistance: | Willpower Negates |
Description: This spell is used to change the form of the target to make them combat ineffective. All armors, weapons, and items the target is carrying on their person are affected by the change, which takes the form of a small fantastic creature, i.e., jackalope, wolpertinger, etc. The form is never immediately fatal, and the spell is broken if the target is struck, whether or not they sustain any damage, because of that, those affected by this spell are not susceptible to a kill shot. The target is aware of the change but is left extremely disoriented, allowing for limited movement within the capabilities of the form, and an inability to perform any aggressive act. If the caster fails to maintain the spell or the target moves out of the caster’s spell reach, the effect ends immediately.
| Type: | Attack (L) |
| Domain: | Change |
| Range: | Touch |
| Area of Effect: | Individual |
| Duration: | Active |
| Components: | V, S |
| Casting Time: | Three Actions |
| Resistance: | Willpower Negates |
Description: This spell is used to change the form of the target to make them combat ineffective. All armors, weapons, and items the target is carrying on their person are affected by the change, which takes the form of a small flying animal, i.e., birds, bats, etc. The form is never immediately fatal, and the spell is broken if the target is struck, whether or not they sustain any damage, because of that, those affected by this spell are not susceptible to a kill shot. The target is aware of the change but is left extremely disoriented, allowing for limited movement within the capabilities of the form, and an inability to perform any aggressive act. If the caster fails to maintain the spell or the target moves out of the caster’s spell reach, the effect ends immediately.
| Type: | Attack (L) |
| Domain: | Change |
| Range: | Touch |
| Area of Effect: | Individual |
| Duration: | Active |
| Components: | V, S |
| Casting Time: | Three Actions |
| Resistance: | Willpower Negates |
Description: This spell is used to change the form of the target to make them combat ineffective. All armors, weapons, and items the target is carrying on their person are affected by the change, which takes the form of a small animal, i.e., salamander, imp, etc. The form is never immediately fatal, and the spell is broken if the target is struck, whether or not they sustain any damage, because of that, those affected by this spell are not susceptible to a kill shot. The target is aware of the change but is left extremely disoriented, allowing for limited movement within the capabilities of the form, and an inability to perform any aggressive act. If the caster fails to maintain the spell or the target moves out of the caster’s spell reach, the effect ends immediately.
| Type: | Attack (L) |
| Domain: | Change |
| Range: | Touch |
| Area of Effect: | Individual |
| Duration: | Active |
| Components: | V, S |
| Casting Time: | Three Actions |
| Resistance: | Willpower Negates |
Description: This spell is used to change the form of the target to make them combat ineffective. All armors, weapons, and items the target is carrying on their person are affected by the change, which takes the form of a small forest animal, i.e., rabbit, squirrel, etc. The form is never immediately fatal, and the spell is broken if the target is struck, whether or not they sustain any damage, because of that, those affected by this spell are not susceptible to a kill shot. The target is aware of the change but is left extremely disoriented, allowing for limited movement within the capabilities of the form, and an inability to perform any aggressive act. If the caster fails to maintain the spell or the target moves out of the caster’s spell reach, the effect ends immediately.
| Type: | Attack (L) |
| Domain: | Change |
| Range: | Touch |
| Area of Effect: | Individual |
| Duration: | Active |
| Components: | V, S |
| Casting Time: | Three Actions |
| Resistance: | Willpower Negates |
Description: This spell is used to change the form of the target to make them combat ineffective. All armors, weapons, and items the target is carrying on their person are affected by the change, which takes the form of a small swimming animal, i.e., frog, muskrat, etc. The form is never immediately fatal and the spell is broken if the target is struck, whether or not they sustain any damage, because of that, those affected by this spell are not susceptible to a kill shot. The target is aware of the change but is left extremely disoriented, allowing for limited movement within the capabilities of the form, and an inability to perform any aggressive act. If the caster fails to maintain the spell or the target moves out of the caster’s spell reach, the effect ends immediately.
| Type: | Move |
| Domain: | Control |
| Range: | Touch |
| Area of Effect: | Individual |
| Duration: | Active |
| Components: | V, S, M |
| Casting Time: | Two Actions |
| Resistance: | N/A |
Description: When cast, this spell enhances the target, allowing them to move and think faster than normal, gaining one additional action per round for the duration of the effect (additional actions do not stack with similar effects). While under the effect of the spell, the target leaves brief after images in the color and/or texture of the caster’s focus object. The additional action can be used to attack, defend, or move, increasing the speed factor for spells or medium and large melee or ranged weapons by one, and doubling the speed factor for tiny or small weapons. This magical enhancement has a downside, once the effect wears off the target is left physically drained and immediately enters a fatigue state (-2 modifier to all actions). The spell effect ends immediately if the caster doesn’t maintain the spell or the target moves out of the caster’s spell reach.
| Type: | Attack (L) |
| Domain: | Control |
| Range: | Reach |
| Area of Effect: | Individual |
| Duration: | Active |
| Components: | V, S |
| Casting Time: | One Action |
| Resistance: | Stamina Negates |
Description: A vicious spell that afflicts the target with either gnarled hands, leg cramps, or a twisted tongue. The caster may choose the effect during casting, and all three effects may be applied to one target with three separate casts. Each effect uses a unique mechanic. Those afflicted by gnarled hands have a difficult (-4) modifier to attack and defend actions with a melee weapon, requiring a Reaction save each round to maintain their grip. Leg cramps reduce the target’s move rate by half and adds a difficult (-4) modifier to move skills. Those affected by twisted tongue are unable to communicate, this includes giving orders or casting spells. The spell effect ends immediately if the caster doesn’t maintain the spell or the target moves out of the caster’s range.
Attribute: Strength
Type: Utility
Time: N/A
Description: A character with this skill understands the dynamics of moving heavy objects and has received training in hoisting, heaving, or hauling objects that exceed their normal carrying capacity. When calculating the character’s Carrying Capacity and Lifting Capacity, this skill rank is used in place of the Strength attribute score, and when lifting something that exceeds the Lifting Capacity, they know how to improvise a fulcrum and lever, assuming available materials. The actual amount of weight that can be moved depends on the length and tensile strength of the lever and the stability of the fulcrum. In addition, when trying to break a grapple or pin, the character can use this skill in place of the Strength attribute score, though normal modifiers apply.
Tactical Use: Move crates to make a barrier, carry a companion, or pry open a stuck gate
Specialization: None
Attribute: Agility
Type: Attack
Time: One Action
Description: Characters with this skill are able to make devastating strikes against unaware foes. With a successful skill check, the target is hit with an attack that doesn’t allow for a defend action (like an Attack of Opportunity); the attack results in a critical hit causing body damage, and carries an additional stun effect, normal saves apply. The target must be unaware of the attack, typically with the use of Stealth or a blindsiding attack, though it may also be used on flanked opponents. Those with this skill may choose to act one segment faster in the round, i.e., make melee attacks during the Ambush segment, make ranged attacks during the Melee segment, etc. This attack may only be used once against a particular target in a round, as the attack will make them aware of the attacker. If the skill check fails, the attack misses.
Prerequisites: The Stealth skill and eight points in the skill tree
Attribute: Constitution
Type: Attack
Time: One Action
Description: This skill is used to make a jaw-grinding Bite attack, causing disabling damage, while pinning a specific limb. With a successful skill check, the target takes physical damage equal to the normal Bite attack +2, suffering that damage with each shake of the head, requiring an action but no skill check, so long as the hold is maintained. The target is required to save against the appropriate disabling effect based on the body part struck and damage taken, and suffers damage to their health and/or body as is appropriate each time damage is caused. Escape attempts are made at a difficult (-4) modifier, -1 per two points in the skill tree. Both the attacker and defender are considered to be prone for the duration of the attack. If the skill check fails the attack is unsuccessful.
Prerequisites: The Biting skill and eight points in the skill tree
Attribute: Constitution
Type: Attack
Time: One Action
Description: Characters with this skill can leverage their strength and mass to compress a prone or pinned target with the intent to destroy. With a successful skill check, the attacker causes physical damage equal to Strength plus basic hits directly to Body points. The attack may be attempted up to two times per round. Due to the aggressive nature of the attack, the defender is allowed an escape attempt (assuming available actions), if successful, no damage is suffered from the attack, though this does not free them from the prone or pin position. If the skill check fails the attack is unsuccessful.
Prerequisites: Eight points in the skill tree
Attribute: Constitution
Type: Attack
Time: One Action
Description: Characters with this skill have a reinforced cranium, horns, or other such head protrusions used to strike an opponent in melee combat. On a successful skill check, the attack succeeds causing physical damage equal to the Strength score (forehead plate, horns, etc.) damage +2, + 1 per three skill points in the tree. It may be used as a strike to the head to attempt a knockout, with a -4 modifier to hit. Targets get a Stamina save to avoid the knockout effect, -1 per two points in the skill tree. If the skill check fails or the target successfully defends, the attack misses.
Specialization: None
Attribute: Strength
Type: Attack
Time: One Action
Description: This skill is used to hold a target prone while causing damage. It may only be used on a foe that has been grabbed. With a successful skill check, the attacker wraps their arms around a defender’s torso with the hands locked, causing physical damage equal to the attacker’s Strength plus basic hits, with a speed factor of two. One action must be spent each round to maintain the hold. Once in the hold, the defender has a -1 modifier per two points in the skill tree for any break or escape attempt. This skill can be used to counter a break or escape, assuming available actions. Both the attacker and defender are prone during the move and this skill cannot be used to defend against attacks made by the target. If the skill check fails, the move has not been applied correctly and the opponent gets a simple (+4) modifier to break the grapple.
Specialization: None
Attribute: Knowledge
Type: Utility
Time: N/A
Description: Characters who select this path are continually looking for ways to increase the effectiveness of their spell casting. With this skill, they can store a number of unmodified instant or passive spells (casting time of two actions or less) on the talisman based on Character Rank – Novice 2, Expert 4, Master 6, Epic 8. Stored spells are cast with a free action, requiring a skill check at this skill tree rank and using this skill tree rank for all relevant spell factors. One spell may be cast off the talisman per round, and a particular spell may only be cast once per encounter, but the number of spells that can be cast in an encounter is based on Character Rank – Novice 1, Expert 2, Master 3, Epic 4. In addition, at Expert level, those taking this path may choose to cast one segment faster in the round with stored spells, i.e., make melee casts during the Ambush segment, make ranged casts during the Melee segment, etc., and continue any available casting or attack actions in a later segment. The talisman must be large enough for the spells to be crafted on it (medium size), a spell can be crafted on it multiple times, and the talisman must be modified in order to make changes, per the Talisman Construction rules.
Specialization: (Required) Magic Foundation, i.e. Mystic, Land Strider, Wind Rider, Fire Walker, Wave Runner
Attribute: Constitution
Type: Attack
Time: Two Action
Description: This skill is used to make a Bite attack, pulling the target down and hauling them across the ground. With a successful skill check, the target takes damage equal to the Bite +2, plus one per two points in the skill tree, and is yanked down into a prone position to be dragged, causing physical damage equal to the move rate plus the attacker’s basic hits. As a move-type skill, this may be used to strike a foe in the Movement segment after other attack actions are used and allows any remaining attack actions to be used after this attack, or the remaining action may be used to continue dragging the target. Due to the aggressive nature of the attack, the defender is allowed an escape attempt (assuming available actions), before being dragged, if successful, they are freed from the bite and not knocked prone. While being dragged, the target is considered prone. If the skill check fails the attack is unsuccessful.
Prerequisites: The Biting skill and eight points in the skill tree
Attribute: Agility
Type: Utility
Time: N/A
Description: A character with this skill can add an attack as part of any ground-based move skill in this tree as part of their attack actions in Initiative. Only tiny or small weapons can be used for this attack, and all speed factor rules apply. Attack actions are used during the Movement segment, continuing from attack actions used in previous segments and allowing any remaining attack actions to be used after the movement. It may be used with any novice attack skill that the character has, with all related and general combat modifiers applied normally.
Prerequisites: The (E) Gymnastics skill and eight points in the skill tree
Attribute: Agility
Type: Utility
Time: N/A
Description: A character with this skill can add an attack as part of any aerial-based move skill in this tree. Only tiny or small weapons can be used for this attack, and all speed factor rules apply. Attack actions are used during the Movement segment, continuing from attack actions used in previous segments and allowing any remaining attack actions to be used after the movement. It may be used with any novice attack skill that the character has, with all related and general combat modifiers applied normally.
Prerequisites: The (E) Parkour skill and eight points in the skill tree
Attribute: Constitution
Type: Move
Time: One Action
Description: A character with this skill can maintain a stable longitudinal and latitudinal position, while holding a particular orientation, in mobile combat (assuming that the technology or racial ability has this capability). With a successful skill check, the character may attack, defend, or use any relevant skill with no modifier while hovering. In addition, movement from a hover position may be initiated as a free action, moving a number of yards equal to the number of points in this skill tree. If the skill check fails, all normal move modifiers apply, with a possible loss of control that could lead to a collision or crash.
Prerequisites: The Combat Maneuvers skill and four points in the skill tree
Attribute: Agility
Type: Move
Time: One Action
Description: Those with this skill can make a diving action in mobile combat to make an attack. It can be used as a rush attack with a melee weapon using move rate instead of Strength for damage, a strafing attack with a ranged weapon, etc. Any attack and defend actions taken during the swoop have a -2 modifier regardless of type due to velocity. During a melee pass a single target can be attacked once. As a move-type skill, this may be used to strike a foe in the Movement segment after other attack actions are used, but no further attacks may be made unless all attack actions are held for the Movement segment. If the skill check fails, the character may suffer a loss of control that could lead to a collision or crash.
Specialization: (Required) Method of mobility, i.e. wings, technology, vehicle, etc.
Attribute: Perception
Type: Move
Time: One Action
Description: Those with this skill are able to make a ranged attack during a mobile move. All speed factor and movement rules still apply. This skill may be used with any Novice ranged attack skill and move skill in this tree (assuming that the character has the skill), with all related and general combat modifiers applied normally. As a move-type skill, this may be used to strike a foe in the Movement segment after other attack actions are used and allows any remaining attack actions to be used after this attack. If the skill check fails or the target successfully defends, the attack misses, with a possible loss of control that could lead to a collision or crash.
Prerequisites: The Combat Maneuvers skill and four points in the skill tree
Attribute: Agility
Type: Move
Time: One Action
Description: Those with this skill are able to make a melee attack during a mobile move. This includes moving through or out of a foe’s threat range, without drawing an Attack of Opportunity. All speed factor and movement rules apply. This skill may be used with any Novice melee attack skill and move skill in this tree (assuming that the character possesses the skill), with related and general combat modifiers applied normally. As a move-type skill, this may be used to strike a foe in the Movement segment after other attack actions are used and allows any remaining attack actions to be used after this attack. If the skill check fails or the target successfully defends, the attack misses and leaves the character open to an attack of opportunity if they are moving out of or through an opponent’s threat range which may result in loss of control that could lead to a collision or crash.
Prerequisites: The Combat Maneuvers skill and four points in the skill tree
Attribute: Constitution
Type: Move
Time: One Action
Description: This skill is used to make a controlled collision, with the intent to control the opponent’s course, while causing damage. With a successful skill check, this maneuver disrupts any move action currently being taken and forces the target to move in a particular direction. Because it is a controlled collision, the ramming damage is reduced by one level for combatants (see Flight-to-Flight and Flight-to-Ground rules for more information). As a move-type skill, this may be used to strike a foe in the Movement segment after other attack actions are used, and allows any remaining attack actions to be used after this attack. If hit, the defender is allowed a Piloting skill check to maintain their course, with a -1 modifier per point in the skill tree. If the skill check fails or the target makes a successful defend, the attack misses.
Tactical Use: Force an opponent to land, crash into a solid object, or collide with another vehicle
Prerequisites: The Combat Gambits skill and eight points in the skill tree
Attribute: Constitution
Type: Move
Time: One Action
Description: Those with this skill can use momentum to make a devastating melee attack against an opponent. For this attack, the damage of the weapon is increased by one per point in the skill tree and current the single action flight move rate is used in place of strength when calculating damage. On a successful skill check, the target is hit and may defend normally. It may be used as a Hack, Stab, or Swing attack (assuming the character has the skill), though a single target may only be struck once during a pass, with all related and general combat modifiers applied normally. As a move-type skill, this may be used to strike a foe in the Movement segment after other attack actions are used and allows any remaining attack actions to be used after this attack. If the skill check fails or the target makes a successful defend, the attack misses; in addition, on a failed skill check, the character may experience a loss of control that could result in a collision.
Prerequisites: The Swoop skill and eight points in the skill tree
Attribute: Influence
Type: Move
Time: One Action
Description: A character with this skill can overrun and stomp an opponent who is at least one size class smaller than the mount. With a successful skill check, the target is knocked down and run over, taking damage from half the total number of legs, with each leg attack saved against independently. Damage sustained is considered physical damage. The mount must be moving and must be fast enough to overrun the opponent and as a move-type skill, this may be used to strike a foe in the Movement segment after other attack actions are used, allowing any remaining attack actions to be used after this attack. On a successful skill check, the target is hit and may defend normally; if the skill check fails or the target successfully defends, the attack misses.
Prerequisites: Four points in the skill tree
Attribute: Agility
Type: Move
Time: One Action
Description: Characters with this skill can make amazingly long leaps in a vehicular suit. A standing jump is equal to one move action in distance, plus two yards per point in the skill tree, and a running jump is equal to two move actions in distance, plus two yards per point in the skill tree. mech combat. It can be used as an attack, landing on a foe to cause ramming damage. As a move-type skill, this may be used to strike a foe in the Movement segment after other attack actions are used and allows any remaining attack actions to be used after this attack. If the skill check fails, a misstep causes the leap to fail, with possible side effects, or the attack misses. The difficulty is based on distance, terrain, and encumbrance.
Prerequisites: The Hopping skill and four points in the skill tree
Attribute: Strength
Type: Move
Time: One Action
Description: This skill is used to strike an opponent with a melee weapon from the back of the mount while in motion. When calculating damage from a hit, add the mount’s single action move rate at the time of attack to the weapon damage, plus one per point in the skill tree. It may be used with any Novice attack skill in this tree, with all related and general combat modifiers applied normally, though a single target may only be struck once during a pass. As a move-type skill, this may be used to strike a foe in the Movement segment after other attack actions are used and allows any remaining attack actions to be used after this attack. If the skill check fails or the target successfully defends, the attack misses.
Prerequisites: Four points in the skill tree
Attribute: Strength
Type: Move
Time: One Action
Description: Characters use this skill to leap, vault, or hurdle something in a vehicular suit. It can spring forward from a standstill equal to one move action, plus one yard per two points in the skill tree or with a running start leap a distance equal to one move action x2, plus one yard per point in the skill tree. In addition, it can be used as an attack, landing on an opponent to cause ramming damage. As a move-type skill, this may be used to strike a foe in the Movement segment after other attack actions are used, but no further attacks may be made unless all attack actions are held for the Movement segment. If the skill check fails, a misstep causes the leap to fail, with possible side effects, or the attack misses. The difficulty is based on distance, terrain, and encumbrance.
Specialization: (Required) the type of vehicular suit or mech, i.e. walker, crawler, tumbler, gambol
Attribute: Strength
Type: Move
Time: N/A
Description: This skill can be is used to make amazingly long standing or running jumps. With a successful skill check, the character can make a standing jump equal to one move action, plus 1 yard per 2 points in eth skill tree, and a running jump equal to two move actions, plus 1 yard per 2 points in the skill tree. In addition, it can be used as an attack to bodily land on a target, causing damage equal to the attacker’s Constitution score plus basic hits, and carries a knockdown effect. As a move-type skill, this may be used in the Movement segment after other attack actions are used and allows any remaining attack actions to be used after this action. If hit, the target gets a Reaction save to negate the knockdown. A failed skill check indicates that the character missed the jump, as well as the target, and possibly lands prone. The difficulty is based on distance and encumbrance.
Prerequisites: The Jumping skill and eight points in the skill tree
Attribute: Constitution
Type: Per Spell
Time: Per Spell
Description: Characters with this skill can cast a spell during or after a move action. Characters carrying an active Focus Component can cast while moving at no modifier, those requiring spell components have a difficult (-4) modifier. The spellcasting takes place during the move phase and the time required is determined by the number of total actions the spell requires (maximum of 2), but only allows the caster to cover a distance equal to a single move action. As a move-type skill, this may be used to cast in the Movement segment after other attack or casting actions are used, and allows any remaining attack or casting actions to be used after this cast.. Using this skill begins the casting state. Spell details can be found in the Core Rules: Magic Basics section.
Prerequisites: The Running skill, and four points in the skill tree
Attribute: Constitution
Type: Attack
Time: One Action
Description: Those with this skill are able to move and attack in the same action. This includes moving through or out of a single foe’s threat range, without drawing an Attack of Opportunity (-4 modifier per additional threat zone). All speed factor and movement rules apply. Moving through or out of a threat range may be countered by a readied action by the opponent, which will force the attacker to stop and defend or else suffer an Attack of Opportunity. It may be used with any Novice attack skill in this tree, with all related and general combat modifiers applied normally. As a move-type skill, this may be used to strike a foe in the Movement segment after other attack actions are used and allows any remaining attack actions to be used after this attack. If the skill check fails or the target successfully defends, the attack misses and leaves the character open to an attack of opportunity if they are moving out of or through an opponent’s threat range, unless they stop to take defend actions.
Tactical Use: Escape melee combat and fire a weapon, run past a foe while tossing a grenade, etc.
Prerequisites: The Retreat skill and four points in the skill tree
Attribute: Constitution
Type: Move
Time: One Action
Description: A character with this skill can move and attack in the same action. This is a disciplined move, not a rush-type attack. It includes moving into, through, and/or out of a single foe’s threat area, without penalty modifiers or drawing an attack of opportunity (-4 modifier per additional threat zone). All speed factor and movement rules apply, and it may be countered by a readied action, forcing the attacker to stop and defend or suffer an attack of opportunity. It may be used with any Novice attack skill in this tree, with all related and general combat modifiers applied normally. As a move-type skill, this may be used to strike a foe in the Movement segment after other attack actions are used and allows any remaining attack actions to be used after this attack. If the skill check fails or the target makes a successful defend, the attack misses and leaves the character open to an attack of opportunity, unless they stop to take defend actions.
Tactical Use: Make an attack and escape a flanked position; run past a foe while attacking; move through a threat area to set up a flank; etc.
Prerequisites: The Running skill and four points in the skill tree
Attribute: Strength
Type: Move
Time: Two Actions
Description: Characters with this skill can make a series of quick leaps over a short distance in the vehicular suit. A running jump is required, moving a distance equal to two move actions, plus one yard per point in the skill tree, making a total of four leaps. It can be used as an attack to bodily land on up to four foes in range, causing ramming damage, with a single skill check at a difficult (-4) modifier. As a move-type skill, this may be used to strike a foe in the Movement segment after other attack actions are used and allows any remaining attack actions to be used after this attack. Each target gets an individual defend against the attack. If the skill check fails, a misstep causes the initial leap to fail, with possible side effects, or the attack misses. The difficulty is based on distance, terrain, and encumbrance.
Prerequisites: The (E) Bounding skill and eight points in the skill tree
| Vessel: | Object or Individual |
| Sigil: | Enhancement |
| Material: | Crafted or Derma |
| Craft Skill: | Artistry or Tattooing |
| Duration: | Active |
| Casting Time: | One Action |
Description: These runes can be used to temporarily increase either the target’s swimming or ground move rates, or allow them to act one segment faster in the round, i.e., make melee attacks during the Ambush segment, make ranged attacks during the Melee segment, etc. For swimming, a piece of crafted fish leather, dyed with the sigil and worn around a leg serves as the rune vessel, alternately the individual may be tattooed with the sigil on the leg, within the shape of a fish. For ground movement, a preserved feather, dyed with the sigil, and worked into clothing serves as the rune vessel, alternately, the individual may be tattooed with the sigil, within the shape of a feather. When activated, the appropriate per-action move rate is increased by six. Moving faster in the round requires sigils to be painted or tattooed on each limb.
Attribute: Agility
Type: Per Spell
Time: Per Spell
Description: Characters with this skill have become so proficient at moving through the casting process swiftly and accurately, that they can cast more spells in a round than most others. It does not increase the number of actions in the round, rather it increases the speed factor of any Novice casting skills in the tree. In addition, those with skill may choose to act one segment faster in the round with the casting skill, i.e., make melee casts during the Ambush segment, make ranged casts during the Melee segment, etc. This skill does not change the number of actions a spell requires to cast, rather it directs the effects of known spells (as they are defined) at a target. Spell details can be found in the Core Rules: Magic Basics section.
Prerequisites: The (E) Quick Cast skill and eight points in the skill tree
Attribute: Agility
Type: Utility
Time: N/A
Description: This skill represents a greater weapon expertise, increasing the speed factor of all proficient weapons in this tree. It does not increase the number of actions gained in a round, rather it allows characters to extend the number of attacks that can be made with proficient weapons during the round. At Expert character rank, the speed factor of the weapons is increased by one, and at Master character rank the speed factor is increased by two. In addition, at Master level, those with skill may choose to act one segment faster in the round, i.e., make melee attacks during the Ambush segment, make ranged attacks during the Melee segment, etc.
Prerequisites: Four points in the skill tree
Attribute: Constitution
Type: Move
Time: Two Actions
Description: This skill is used in conjunction with a move to make an attack that does damage and knocks an opponent prone in a rush attack. One action is spent on a move, the other to attack, which does physical damage equal to the Strength attribute score plus modifiers and the distance of the move in yards (to a maximum of six), and includes a stun effect. Normal rush rules apply to the attacker and defender (difficult (-4) modifier to all defend actions for both, defender gets a Stamina save to avoid being stunned for the remainder of the round). As a move-type skill, this may be used to strike a foe in the Movement segment after other attack actions are used, but no further attacks may be made unless all attack actions are held for the Movement segment. Each move has modifiers to the attacker and defender actions. On a successful skill check, the target is hit and may defend normally; if the skill check fails or the target successfully defends, the attack misses.
Specialization: None
Clothesline – driving an extended arm into the defender’s torso to knockdown.
Modifiers: Attack: +2 Damage: — Save: — Escape: —
Crossbody Block – leaping horizontally into the defender’s torso; both the attacker and defender are prone at the end of this move..
Modifiers: Attack: — Damage: +2 Save: -2 Escape: +2
Forearm Smash – fast strike to the chest with the forearm to knockdown (Reaction save).
Modifiers: Attack: +1 Damage: — Save: -1 Escape: —
Shoulder Block – lower the shoulder and slam bodily into target to knockdown (Reaction save).
Modifiers: Attack: — Damage: — Save: -2 Escape: —
Attribute: Constitution
Type: Move
Time: Two Actions
Description: Characters with this skill can rush a foe without suffering the normal difficult (-4) modifier to defend actions in that round and strike bodily or with a natural attack ability (horns, forehead plate, etc.) to knock an opponent backward. Normal rush rules still apply to the target, i.e., difficult (-4) modifier to defend actions for the round, and a Stamina save to avoid being stunned for the remainder of the round. On a hit, the attack does damage equal to the Strength score plus basic hits or attack ability, and the move rate for a single move action, and the target is knocked backward one yard per point in the skill tree and may take falling damage. Defenders are allowed a Stamina save or related defend skill to remain standing. At least one move action is required to use this skill, and if the skill check fails or the target successfully defends, the attack misses. As a move-type skill, this may be used to strike a foe in the Movement segment after other attack actions are used, and allows any remaining attack actions to be used after this attack. Hit or miss, if the attacker moves through an opponent’s threat range, the attacker is subject to an attack of opportunity.
Prerequisites: The Charge skill and four points in the skill tree
Attribute: Agility
Type: Move
Time: One Action
Description: A character with this skill can rush a foe without suffering the normal difficult (-4) modifier to defend actions in that round. Normal rush rules still apply to the target, i.e. difficult (-4) modifier to defend actions for the round, and a Stamina save to avoid being stunned for the remainder of the round, and the attack causes physical damage equal to the attacker’s Strength plus basic hits. In addition, when used with a blunt weapon or physical shield, the target’s reaction save to avoid being stunned is reduced by one per two points in the skill tree. As a move-type skill, this may be used to strike a foe in the Movement segment after other attack actions are used, but no further attacks may be made unless all attack actions are held for the Movement segment. If the skill check fails, the character is subject to the normal Rush modifiers.
Specializations: None
Attribute: Constitution
Type: Move
Time: One Action
Description: Characters use this skill to launch themselves at an opponent, with the intent of landing on them and knocking them down. With a successful skill check, the character springs forward from a standstill equal to a half-move action plus 1 yard per 2 points in the skill tree, and a running start equal to one move action, plus one yard per point in the skill tree. The attack does damage equal to the Strength score plus the distance of the move in yards. As a move-type skill, this may be used to strike a foe in the Movement segment after other attack actions are used, but no further attacks may be made unless all attack actions are held for the Movement segment. The defender gets a Reaction save, with a -1 modifier per 2 points in the skill tree, to avoid being knocked down. If the skill check fails or the target successfully defends, the attack misses.
Specialization: None
Attribute: Constitution
Type: Utility
Time: Two Actions
Description: Those with this skill can temporarily channel outsider powers into their physical form to change their material qualities. This exotic form must maintain the same proportional size, but can be defined by the character based on their otherworldly associations, i.e., angelic, demonic, tentacle encrusted, etc., that grants a natural armor rating, gaining a +4 to their physical rating (does not stack with natural or worn armor), and an Impact Rating: 13, Magic Rating: 9, and Elemental Rating: 3; plus Basic Hits. When additional armor is worn, ratings do not stack, rather the higher rating is used, and the chosen form cannot grant additional abilities, i.e. extra limbs, elongated limbs, etc. In addition, due to the exotic nature of the form, they gain immunity to critical hits. The ability to maintain the form ends if the character is rendered unconscious or a number of rounds equal to the number of points in the skill tree elapse. This skill may only be used one time per encounter and it takes two actions to complete the transformation.
Prerequisites: The (E) Manifestation skill and eight points in the skill tree
Attribute: Constitution
Type: Utility
Time: Two Actions
Description: A character with this skill can temporarily exchange their physical form to become a transient spiritual force at will. Appearing as a shifting phantasm that is aesthetically similar to their physical form, the character is able to interact with the world in a transient state wherein portions of touched objects or picked up items briefly take on the spiritual force properties. In this form, they have a natural armor rating, gaining a +4 to their physical rating (does not stack with natural or worn armor), and an Impact Rating: 13, Magic Rating: 9, and Elemental Rating: 6; plus Basic Hits. When additional armor is worn, ratings do not stack, rather the higher rating is used, and the character is unable to wear non-magical armor. The ability to maintain the form ends if the character is rendered unconscious or a number of rounds equal to the number of points in the skill tree elapse. This skill may only be used one time per encounter and it takes two actions to complete the transformation. All clothing and gear transforms with the character and is usable by them in this transient spiritual force form, but when removed from their person immediately regains its material qualities.
Prerequisites: The Spirit Touch skill and eight points in the skill tree
Attribute: Constitution
Type: Utility
Time: N/A
Description: Those who take this skill have transcended the physical world to exist as beings of pure magic. Although they appear aesthetically similiar, except for the occasional transient phasing shift, it is the magic that provides them with the substance that allows them to interact with the physical world. As such, these characters no longer have Heath points, adding half that score to the Body points and granting an immunity to critical hits, though these Body points are restored with the Mystic Sustenance skill rather than rest. While in this form, the caster gains a +3 modifier to their Physical Rating (does not stack with natural or worn armor), and an Impact Rating: 9, Magic Rating: 11, and Elemental Rating: 9; plus Basic Hits. The armor rating does not stack with natural or worn armor, and the character is unable to wear non-magical armor. Additionally, the caster is able to walk upon transient surfaces such as water or snow as if they were solid, and they no longer need to eat, drink, or breathe, drawing all of their sustenance through the realm of magic. Losing all Body points causes their form to lose cohesion, trapping them in the Mystic realm for one hour per Body point. Exposure to an anti-magic field causes 10 points of damage per round (no save) and will destroy their form once all Body points are lost.
Prerequisites: The Mystic Sustenance skill and eight points in the skill tree
Attribute: Constitution
Type: Utility
Time: Two Actions
Description: A character with this skill can temporarily become an aspect of their Magic Foundation, taking on the physical qualities of their element. While in this form, the caster automatically gains the novice rating of their foundation armor spell, however, the armor spell must be cast to gain the Expert and Master effects. When additional armor is worn, ratings do not stack, rather the higher rating is used. In addition, all Health points are removed with half that number applied to the Body points, providing an immunity to critical hits. This form can be maintained for up to one hour per point in the skill tree, so long as the character is conscious. Characters who have the Elemental Dominion skill may choose from any of the foundations.
Prerequisites: Eight points in the skill tree and the Elemental Magic Foundation
Attribute: Constitution
Type: Utility
Time: N/A
Description: Those with this skill can alter their form to take on the shape of a specific animal common to the area that they protect or patrol. In this shape, the character can pass as a common animal, including size, behavior, and general mannerisms. While they may use attack, defend, or move abilities specific to the animal type at the skill tree rank and their armor rating (defined before play begins), however the character may not use any of their native skills while in this form. All clothing and gear transforms with the character and the size of the animal must be within 25% of the character’s actual size. It takes a full round to complete the transformation and lasts up to 1 hour per point in the skill tree, so long as the character is conscious.
Specialization: (Required) Magic Foundation, i.e., Mystic, Land Strider, Wind Rider, Fire Walker, Wave Runner
Attribute: Constitution
Type: Utility
Time: N/A
Description: Characters with this skill can alter their form to become a dire version of a specific animal common to the area they protect or patrol. Growing to a large size of the animal, often with aesthetically intimidating additions such as quills, spikes, tusks, etc, the Druid is able to use the attack, move, and defend abilities of the animal type at the skill tree rank, as well as gaining its natural armor rating (this must be defined before play begins), as well as their own full range of skills. Although the character is able to speak normally, this is not a humanoid form, requiring them to physically interact with the world as the animal type while in this form. All clothing and gear transforms with the character, requiring a full round to complete the transformation, and lasts so long as the character is conscious or a number of rounds equal to the points in the skill tree elapse.
Prerequisites: The (E) Iron Fur skill and eight points in the skill tree
Attribute: Constitution
Type: Utility
Time: N/A
Description: Characters who select this skill have fully embraced the natural world, permanently becoming a living embodiment of the plant life they protect. Composed of an amalgamation of plant types shaped to appear aesthetically similar to their physical form, with various colorations and natural pockets in which to carry things, they are able to move and interact with the physical world normally. Due to the elemental nature of the form, they no longer have Health points, making them immune to critical hits, increasing their Body points by a .5 multiplier, restoring lost points with the Photosynthetic skill rather than rest, which also provides all nutritional needs. This form offers a natural armor rating, gaining a +5 to their Physical rating (does not stack with natural or worn armor), and an Impact Rating: 13, Magic Rating: 9, and Elemental Rating: 3; plus Basic Hits. When additional armor is worn, ratings do not stack, rather the higher rating is used. Losing all Body points causes their form to unravel, and must be regenerated. If the form is completely burned to ash, the character is destroyed.
Prerequisites: The Photosynthetic skill and eight points in the skill tree
Attribute: Constitution
Type: Utility
Time: N/A
Description: Those with this skill can alter their form to become living stone at will. They may appear as stacked or faceted stone that is aesthetically similar to their physical form, but with a lack of fine details, in which they may use any of their existing skills. Due to the elemental nature of the form, they gain immunity to critical hits and a natural armor rating, gaining a +6 to their Physical rating (does not stack with natural or worn armor), and an Impact Rating: 12, Magic Rating: 7, and Elemental Rating: 8; plus Basic Hits. When additional armor is worn, ratings do not stack, rather the higher rating is used. The ability to maintain the form ends if the character is rendered unconscious or a number of rounds equal to the number of points in the skill tree elapse. This skill may only be used one time per encounter and it takes two actions to complete the transformation. All clothing and gear transforms with the character and is usable by them in this stone form, but when removed from their person it will transform back the following round.
Prerequisites: The (E) Bedrock skill and eight points in the skill tree
Attribute: Strength
Type: Utility
Time: One Action
Description: Characters with skill are able to enhance their ability to absorb damage with a thick magical pelt. When activated, the Druid’s flesh is covered with fur, adding a +2 durability modifier to physical damage and +3 durability modifier to Impact damage. This effect does not stack with similar modifiers and lasts for a number of rounds equal to the skill tree rank.
Prerequisites: The Animal Shape skill and four points in the skill tree
Attribute: Influence
Type: Per Spell
Time: Per Spell
Description: A character with this skill can add a specific factor to amplify an aspect of a spell variant during casting. These factors may only be added to Change, Control, or Damage spells, and may include one of the Adaptive Cast factors at the caster’s option. The available factor is specific to the Magic Foundation spell variant that is cast. Using this skill begins the casting state. Spell details can be found in the Core Rules: Magic Basics section.
Prerequisites: Adaptive Cast and eight points in the skill tree
| Factor | Description |
| Strafe | Mystic spells. A repetitive strike of magic accompanies the spell and causes damage equal to one per point in the skill tree a number of times equal to 1 per two points in the skill tree. |
| Vacuity | Air spells. Briefly draw all air from the spell’s target, causing them to blackout for three rounds, save vs. Stamina with a -1 modifier per two points in the skill tree. |
| Smolder | Fire spells. A searing effect that accompanies the spell, adding one per two points in the skill tree of damage that burns three rounds – damage is reduced by half each successive round. |
| Corrode | Land spells. A corrosive that does biological (body) or object damage (durability save) equal to one per four points in the skill tree and continues each round until washed off. |
| Frost | Water spells. A cold effect that reduces the number of actions available to the target equal to one per four points in the skill tree. |
Attribute: Influence
Type: Per Spell
Time: Per Spell
Description: A character with this skill can modify specific factors to enhance some aspect of a spell during casting. Any one of the below factors can be added to a Casting skill check at Expert character rank, up to two at Master character rank, up to four at Epic character rank. Using this skill begins the casting state. Spell details can be found in the Core Rules: Magic Basics section.
Prerequisites: Four points in the skill tree and a Magic Foundation, i.e., Mystic, Land Strider, Wind Rider, Fire Walker, Wave Runner
| Factor | Description |
| Bounce | The magic hops to one additional target per two points in the skill, within the spell’s range. |
| Elongate | Increase the range of a spell by up to one yard per point in the skill tree. All range steps must be accounted for, i.e., personal to touch to distance in yards. |
| Inflate | Increase the area of effect of a spell by one yard per two points in the skill tree. All range steps must be accounted for, i.e., personal to touch to distance in yards. |
| Prolong | Increase the duration of a spell by one round per two points in the skill tree. |
| Resistance | Add a -1 modifier per two points in the skill tree to the target’s save against the spell. |
Attribute: Strength
Type: Utility
Time: One Action
Description: Those with skill are able to enhance their ability to absorb damage, by increasing the durability of their flesh. When activated, the Druid’s flesh takes on a rough, bark-like appearance, gaining a +3 durability modifier to physical, impact, and elemental damage, though the modifier doesn’t apply to clefting or fire damage. This effect does not stack with other durability modifiers, taking the higher modifier for the damage type, and lasts for a number of rounds equal to the skill tree rank.
Prerequisites: The Plant Mimicry skill and four points in the skill tree
Attribute: Strength
Type: Attack
Time: One Action
Description: Characters with this skill can temporarily transform forearms and hands into a broad, flat chunk of stone to make a smashing attack. With a successful skill check, the character causes physical damage equal to Strength +4, plus one per two points in the skill tree, with a critical hit range of 1, and causes stun damage – lose any actions for the remainder of the round and allowed only two defend actions in the following round. Targets must take at least one point of damage and get a Stamina save to avoid the stun effect. If the skill check fails or the target successfully defends, the attack misses. Characters can choose to transform for a single attack, retain the stoney appearance for the encounter, or use any combination thereof.
Specialization: (Required) Land Strider Magic Foundation
Attribute: Strength
Type: Utility
Time: One Action
Description: Characters with this skill are able to transform their dermis to stone to enhance their ability to take damage. When activated, the Druid’s flesh takes on the durability and aesthetic properties of stone, gaining a +4 durability modifier to physical and impact damage (durability modifiers do not stack). This effect lasts a number of rounds equal to the skill tree rank.
Prerequisites: The Slab skill and four points in the skill tree
| Type: | Defend (L) |
| Domain: | Create |
| Range: | Personal |
| Area of Effect: | Individual |
| Duration: | Passive |
| Components: | V, S, M |
| Casting Time: | One Action |
| Resistance: | N/A |
Description: This spell provides the caster with a personal barrier of protective mystic energies that appears as a visible manifestation of colorful light. At Novice level, the caster gains a +3 modifier to their Physical Rating (does not stack with natural or worn armor), and an Impact Rating: 9, Magic Rating: 11, and Elemental Rating: 9; the rating plus Basic Hits provides the armor save for the duration of the spell. When additional armor is worn, ratings do not stack, rather the higher rating is used. Upon reaching Expert level, the caster’s form is imbued with mystic energy taking on a colorful light aesthetic and providing additional durability that reduces impact damage and magic damage by 2 points (durability modifiers do not stack). And at Master level, the caster can partially move their form into the mystic realm, becoming intangible at will during the spell’s duration – an action is required to move into or out of the Mystic realm, and for every action spent in the Mystic realm, there is a progressive 5% chance (1 in 20) of drawing the attention of a being of that ream at the end of the round.
| Type: | Defend (L) |
| Domain: | Change |
| Range: | Reach |
| Area of Effect: | Individual |
| Duration: | Passive |
| Components: | V, S, M |
| Casting Time: | Two Actions |
| Resistance: | N/A |
Description: This protective spell is used to aid in a target’s survivability during combat situations. Upon casting at Novice level, the target’s flesh toughens for the duration of the spell, providing 2 points of Physical damage durability and 4 points of Impact damage durability. The Durability modifiers do not stack with similar modifiers, instead taking the higher number. At Expert level, the magic grants an additional Poison immunity for the duration of the spell, though this does not negate the effect of current poisons. Upon reaching Master level, the target also gains Critical Hit immunity for the duration of the spell. When cast, the spherules hover around the target, rushing to and hovering about areas protected by the spell.
| Type: | Defend (L) |
| Domain: | Create |
| Range: | Personal |
| Area of Effect: | Individual |
| Duration: | Passive |
| Components: | V, S, M |
| Casting Time: | One Action |
| Resistance: | N/A |
Description: Those with this spell are able to draw upon the incredible forces of the Realm of Air to intensify their physical form. At Novice level, the caster gains a +4 modifier to their Physical Rating (does not stack with natural or worn armor), and an Impact Rating: 11, Magic Rating: 9 (13 against Air magic), and Elemental Rating: 7; the rating plus Basic Hits provides the armor save for the duration of the spell. When additional armor is worn, ratings do not stack, rather the higher rating is used. Upon reaching Expert level, the skill of manipulating these magics grants Knockback immunity in addition to the armor effect. And at Master level, anyone who enters the character’s threat zone suffers a Knockback effect equal in yards to the number of skill points in the tree (Reaction save to negate), that regenerates each round. In addition, so long as the spell is active, the caster has a continuous windblown effect, billowing clothes, hair, etc., that increases in intensity with character rank.
| Type: | Defend (L) |
| Domain: | Summon |
| Range: | Reach |
| Area of Effect: | Individual |
| Duration: | Passive |
| Components: | V, S, M |
| Casting Time: | One Action |
| Resistance: | N/A |
Description: A defensive spell that the caster may use for personal protection or to protect an ally within range. When cast it creates a protective barrier in the same color as the caster’s focus object that provides frontal cover in a full 90° arc scaled precisely to the individual. When the shield is attacked, the caster is required to make a skill check against the magic skill used to cast it. If successful the attack is deflected in a bright display, however, if the skill check fails the shield shatters dramatically and the attack succeeds – because the shield is directly in front of the protected target, unless they are specifically holding actions to defend, no further defend actions are permitted The barrier moves with the target and always faces front. This shield protects against Physical, Impact, and directed Elemental damage.
| Type: | Defend (L) |
| Domain: | Summon |
| Range: | Reach |
| Area of Effect: | Individual |
| Duration: | Passive |
| Components: | V, S, M |
| Casting Time: | One Action |
| Resistance: | N/A |
Description: This defensive spell may be used to create an electrical barrier for personal protection or to protect an ally within range. When cast it creates a protective barrier in the same color as the caster’s focus object that provides frontal cover in a full 90° arc scaled precisely to the individual. When the shield is attacked, the caster is required to make a skill check against the magic skill used to cast it. If successful the attack is deflected with an electrical charge, however, if the skill check fails the shield fizzles and the attack succeeds – because the shield is directly in front of the protected target, unless they are specifically holding actions to defend, no further defend actions are permitted. The barrier moves with the target and always faces front. This shield protects against Physical, Impact, and directed Elemental damage.
| Type: | Defend (L) |
| Domain: | Summon |
| Range: | Reach |
| Area of Effect: | Individual |
| Duration: | Passive |
| Components: | V, S, M |
| Casting Time: | One Action |
| Resistance: | N/A |
Description: Those with this defensive spell are able to create a fiery barrier that may use for personal protection or to protect an ally within range. When cast it creates a protective barrier in the same color as the caster’s focus object that provides frontal cover in a full 90° arc scaled precisely to the individual. When the shield is attacked, the caster is required to make a skill check against the magic skill used to cast it. If successful the attack is deflected in a gout of flame, however, if the skill check fails the shield shatters into embers and the attack succeeds – because the shield is directly in front of the protected target, unless they are specifically holding actions to defend, no further defend actions are permitted The barrier moves with the target and always faces front. This shield protects against Physical, Impact, and directed Elemental damage.
| Type: | Defend (L) |
| Domain: | Summon |
| Range: | Reach |
| Area of Effect: | Individual |
| Duration: | Passive |
| Components: | V, S, M |
| Casting Time: | One Action |
| Resistance: | N/A |
Description: When cast, a series of stones rise out of the ground to create a barrier of personal protection or to protect an ally within range. When cast it creates a protective barrier in the same color as the caster’s focus object that provides frontal cover in a full 90° arc scaled precisely to the individual. When the shield is attacked, the caster is required to make a skill check against the magic skill used to cast it. If successful the attack is deflected with rocks falling away and reforming, however, if the skill check fails the shield collapses into sand and the attack succeeds – because the shield is directly in front of the protected target, unless they are specifically holding actions to defend, no further defend actions are permitted The barrier moves with the target and always faces front. This shield protects against Physical, Impact, and directed Elemental damage
| Type: | Defend (L) |
| Domain: | Summon |
| Range: | Reach |
| Area of Effect: | Individual |
| Duration: | Passive |
| Components: | V, S, M |
| Casting Time: | One Action |
| Resistance: | N/A |
Description: This defensive spell is used to create an icy barrier for personal protection or to protect an ally within range. When cast it creates a protective barrier in the same color as the caster’s focus object that provides frontal cover in a full 90° arc scaled precisely to the individual. When the shield is attacked, the caster is required to make a skill check against the magic skill used to cast it. If successful the attack is deflected in a spray of snow, however, if the skill check fails the shield melts away and the attack succeeds – because the shield is directly in front of the protected target, unless they are specifically holding actions to defend, no further defend actions are permitted The barrier moves with the target and always faces front. This shield protects against Physical, Impact, and directed Elemental damage.
Attribute: Constitution
Type: Attack
Time: One Action
Description: This skill is used on a prone target on the ground to cause damage and leave them unable to act. With a successful skill check, the attacker drops bodily onto the target, leading with an elbow, knee, or shoulder, doing physical damage equal to the Strength attribute score plus basic hits, and leaves them stunned. The defender is allowed a base Stamina save to resist the stun effect. On a successful skill check, the target is hit and may defend normally; if the skill check fails or the target successfully defends, the attack misses. Regardless of success or failure, both the attacker and defender are prone at the end of this action.
Specialization: None
Attribute: Strength
Type: Attack
Time: One Action
Description: Characters with this skill are able to toss an opponent a short distance. It may only be used on a target that has been grabbed. With a successful skill check, the attacker is able to throw the target a number of yards equal to the number of skill points in Wrestling, causing normal falling damage and landing prone. The defender can use Tumbling or a related skill to avoid taking damage and/or falling prone. If the skill check fails, the character cannot get the leverage to toss the opponent and they get a simple (+4) modifier to break the grapple.
Specialization: None
Attribute: Agility
Type: Attack
Time: One Action
Description: This skill is used to immobilize a grabbed opponent. The hold is applied with a successful skill check, causing physical damage equal to the Strength attribute score plus modifiers. Each hold has modifiers to attacker and defender actions. One action must be spent each round to maintain the hold and this skill may be used to oppose any break or escape attempt, cause damage, or defend against an attack by the target, assuming available actions. The attacker and defender are prone for the duration of the move. If the skill check fails, the move is not applied correctly, and the target gets a simple (+4) modifier to break the grapple.
Specialization: None
Wristlock – twisting the hand to put pressure on the joint; it may be used as a disabling attack (Stamina save) or pain compliance (Morale save).
Modifiers: Apply: +2 Damage: — Save: -2 Escape: +2
Elbowlock – push the wrist and elbow to cause hypertension; it can be used as a disabling attack (Stamina save) or pain compliance (Morale save).
Modifiers: Apply: — Damage: +2 Save: -2 Escape: +2
Shoulderlock – flex the arm away at the wrist and elbow; it can be used as a disabling attack (Stamina save), or pain compliance (Morale save).
Modifiers: Apply: -2 Damage: +4 Save: — Escape: —
Armbar – rotate the arm to put pressure on the wrist, elbow, and shoulder joints; this move is used for pain compliance (Morale save), or as a disabling attack (Stamina save).
Modifiers: Apply: -2 Damage: +2 Save: -4 Escape: +2
Attribute: Strength
Type: Attack
Time: One Action
Description: This skill is used to pick up a foe and drive them bodily onto a surface. It may only be used on a target that is grappled. With a successful skill check, the attacker picks up and drives the target onto an immediately adjacent surface, i.e. the ground, a table, a wall, etc, causing physical damage equal to the Strength score plus the target’s basic hits, and leaves them prone, with a Stun effect – Stamina save to resist. If the skill check fails, the character cannot get the leverage to pick up the target and they get a simple (+4) modifier to break the grapple.
Specialization: None
Attribute: Strength
Type: Attack
Time: One Action
Description: Characters with this skill make violent attacks that cause damage and leave the opponent unable to act. On a hit, the attack does physical damage equal to the Strength attribute score plus modifiers and includes a stun effect. At least one point of damage must be taken, and the defender gets a Stamina save to resist the stun. On a successful skill check, the target is hit and may defend normally; if the skill check fails or the target successfully defends, the attack misses.
Specialization: None
Dropkick – jumping up and kick the foe with the soles of both feet
Modifiers: Attack: — Damage: +2 Save: — Escape: —
Elbow Smash – a punching motion, tucking the hand to the chest so the elbow makes contact; or a pivot that swings the elbow back
Modifiers: Attack: +1 Damage: — Save: -1 Escape: —
Headbutt – strike the opponent with the forehead (front) or occipital bone (back), usually in the face
Modifiers: Attack: — Damage: — Save: -2 Escape: —
Stomp – used on a prone target, stamping the foot down on the opponent
Modifiers: Attack: — Damage: +1 Save: -1 Escape: —
Attribute: Strength
Type: Attack
Time: One Action
Description: Those with this skill are able to make damaging moves to specific parts of the body for devastating effects, on targets that have been grabbed. On a hit, the attack does physical damage equal to the Strength attribute score plus modifiers, leaves them prone, and includes a stun effect. At least one point of damage must be taken, and the defender gets a Stamina save to resist the stun. If the skill check fails, the character cannot perform the move.
Prerequsites: The Slam skill and four points in the skill tree
Backbreaker – lift the defender into a horizontal position, face up, and drive them down onto the attacker’s knee or other solid object
Modifiers: Attack: +2 Damage: +4 Save: — Escape: —
Neckbreaker – lift the target, turn them in air and drive the head to the ground or other solid object
Modifiers: Attack: — Damage: +2 Save: -4 Escape: —
Gutbuster – lift the target and slam them onto their back, landing on top with a knee or shoulder driving into the stomach; both the attacker and defender are prone after this move
Modifiers: Attack: +2 Damage: +2 Save: -2 Escape: —
Spinebuster – lift the target and drive downward face first, landing on top of them with a shoulder in their back; both the attacker and defender are prone at the end of this move
Modifiers: Attack: — Damage: +3 Save: -3 Escape: —
Attribute: Constitution
Type: Attack
Time: One Action
Description: This skill is used to apply one of four advanced holds that immobilize targets that have been grabbed. One action must be spent each round to maintain the hold, and this skill may be used to oppose a break or escape attempt, cause damage, or defend against an attack from the target, assuming actions are available. Damaging holds require one action, may be applied up to twice per round, and cause physical damage. The attacker and defender are prone for the duration of the move. If the skill check fails, the target remains in the grapple, but the move is not applied correctly.
Prerequsites: The Joint-Hold skill and four points in the skill tree
Headlock – encircling the target’s head with the arm; it is used as a disabling attack (Stamina save) to keep the target from attacking
Modifiers: Attack: +3 Damage: — Save: — Escape: -3
Hammerlock – pulling the target’s arms behind and bending up the back to disable (Stamina save) or for pain compliance (Morale save)
Modifiers: Attack: — Damage: +2 Save: -2 Escape: -2
Leglock – hyperextending a target’s knee or hip, while leveraging the legs; it is used to disable (Stamina save) or for pain compliance (Morale save)
Modifiers: Attack: -2 Damage: +4 Save: -2 Escape: -2
Ab-Lock – link the arms from behind and bend to stretch and expose the midsection; it is used for pain compliance (Morale save), or to immobilize, holding the target prone until released or broken
Modifiers: Attack: -2 Damage: +2 Save: -2 Escape: -4
Attribute: Constitution
Type: Utility
Time: N/A
Description: Characters with this skill can perform moves from an elevated position with specific attack skills, i.e. Body Drops, Rush Moves, Slam, Smash Moves, Breakers, and Power Slams. Falling damage is applied to the attack, with no damage suffered to the attacker up to a number of yards equal to the number of skill points in the tree. A difficult (-4) modifier is applied to the hit chance, and the total damage that is sustained is considered physical damage to resist. If the fall exceeds the number of points in the tree, the attacker suffers falling damage for the difference in distance. There must be a logical path to the fall without requiring movement beyond what is allowed in the attack skill.
Tactical Use: Make a dropkick attack from a boulder; dive off a wall to clothesline a target, perform a powerbomb from a flying vehicle, etc
Prerequisites: The (E) Rolling Strike skill and eight points in the tree
Attribute: Strength
Type: Attack
Time: One Action
Description: This is a signature fighting style in which the attacker maintains an upright stance with the legs shoulder-width apart and the rear foot a half step back; the dominant fist is held back protecting the body, and the lead fist is held up at eye level. It is a methodical punching technique, using six strikes that have specific attack, damage, and/or critical hit modifiers aimed at vulnerable areas, causing physical damage. The Jab is a quick straight punch with the lead hand; Cross is a powerful straight punch with the dominant hand; Overhand is a dominant hand over-the-shoulder punch with a looping arc; Hook is a semi-circular punch with the lead hand; Uppercut is a vertical rising punch from the dominant hand; Combo is two punches in quick succession. Strikes may be used at will. If the skill check fails or the target makes a successful defend, the attack misses.
Specialization: (Optional) Specific combat style, technique, or system based on roleplay
Strike Att. Dam. Crit.
Jab +3 -1 1
Cross +1 — 1-2
Overhand — +2 1
Hook -1 +1 1-3
Uppercut -2 +2 1-3
Combo -2 +4 1
Attribute: Agility
Type: Attack
Time: One Action
Description: A practiced combat style where the attacker faces forward with the feet shoulder width apart and slightly turned out, both fists are held vertically at waist level in a ready position. It emphasizes focus and control with a combination of punches and kicks that have specific attack, damage, and/or critical hit modifiers aimed at vulnerable areas, causing physical damage. A Heel Jab is an open handed punch with the heel of the hand; a Chop is a quick open-handed, hewing stroke hitting with either the pinky or thumb side of the hand; a Snap Kick is executed by raising the knee, extending the leg to hit with the ball of the foot, and quickly retracting the leg; a Hammer Fist is a multi-directional, hewing stroke that hits with the bottom of a clenched fist; a Jump Kick is executed by kicking one leg forward to gain momentum, and pushing off with other, raising the knee and extending that leg to hit with the ball of the foot; a Spin Kick begins with a tight rotation to build momentum, after which the leg is extended to strike with the shin or the front of the foot. Strikes may be used at will. If the skill check fails or the target makes a successful defend, the attack misses. Only one striking technique may be purchased during character building, additional techniques may be selected as they advance.
Specialization: (Optional) Specific combat style, technique, or system based on roleplay
Strike Att. Dam. Crit.
Heel Jab +3 -1 1
Chop — — 1-3
Snap Kick — +1 1-2
Hammer Fist -2 +2 1-3
Jump Kick -3 +3 1-3
Spin Kick -4 +6 1
Attribute: Agility
Type: Attack
Time: One Action
Description: A fighting style where attackers maintain an upright stance with the dominant leg back, and both fists held vertically in front of the face. This style uses six strikes with specific attack, damage, and/or critical hit modifiers aimed at vulnerable areas, causing physical damage. A Jab is a straight punch with the lead hand; a Cross is a straight punch from the back hand; a Front Kick is executed by lifting the knee and straightening the leg; a Hook is a semi-circular punch thrown with either hand; a Side Kick is a back leg pivot lifting the front leg in a stomping motion; a Circle Kick is a ball of the foot twist, swinging the leg to strike with the front of the foot. Strikes may be used at will. If the skill check fails or the target makes a successful defend, the attack misses.
Specialization: (Optional) Specific combat style, technique, or system based on roleplay
Strike Att. Dam. Crit.
Jab +3 -1 1
Cross +1 — 1-2
Front Kick -1 +2 1-2
Hook -1 +1 1-3
Side Kick -2 +3 1-2
Circle Kick -3 +5 1
Attribute: Agility
Type: Attack
Time: One Action
Description: A vicious combat style with the attacker facing forward, the dominant leg up on the ball of the foot and a step back, and both arms held vertically in front of the head, palms out. It is aggressive with brutal counterattacks, mixing punches, elbows, and kicks aimed at vulnerable areas, causing physical damage. A Pivot Jab is a punch and step-back, without extending the arm; the Straight Punch is a forward strike by rotating the shoulders and hips; a Hook Kick is a side stance strike across the target with the heel; an Elbow Strike is multi-directional and close range, made by stepping into the target; an Axe Kick is made by raising the leg vertically and bringing the heel down onto the target; a Switch Kick is a forward kick made while jumping off the standing leg and rotating the hips in a second, near simultaneous kick. Strikes may be used at will. If the skill check fails or the target makes a successful defend, the attack misses.
Specialization: (Optional) Specific combat style, technique, or system based on roleplay
Strike Att. Dam. Crit.
Pivot Jab +1 +1 1
Straight Punch — +2 1
Hook Kick -2 +4 1
Elbow Strike -2 +3 1-2
Axe Kick -3 +5 1
Switch Kick -4 +6 1
Attribute: Strength
Type: Attack
Time: One Action
Description: A free form fighting style where the attacker assumes a hunched position with the dominant leg a step back, the dominant arm held back, and the lead hand out front. It is technique with minimal shifts using a mix of close-quarter strikes aimed at vulnerable areas, causing physical damage. A Back Fist is quick strike with the back of the knuckles; a Headbutt is a forceful thrust with forehead while stepping into a target; a Hammer Fist is a multi-directional, hewing stroke that hits with the bottom of a clenched fist; an Elbow Strike is multi-directional and close range attack made by stepping into the target; a Bolo Punch utilizes a distracting move with the lead hand and vertical rising punch with the dominant fist; a Haymaker is wild swing where the arm is whipped from the shoulder with a minimal elbow bend. If the skill check fails or the target makes a successful defend, the attack misses.
Specialization: (Optional) Specific combat style, technique, or system based on roleplay
Strike Att. Dam. Crit.
Back Fist — +1 1-2
Headbutt -1 +2 1-2
Hammer Fist -2 +2 1-3
Elbow Strike -2 +3 1-2
Bolo Punch -3 +4 1-2
Haymaker -4 +5 1-2
| Type: | Defend |
| Domain: | Change |
| Range: | Personal |
| Area of Effect: | Individual |
| Duration: | Passive |
| Components: | V, S, M |
| Casting Time: | One Action |
| Resistance: | N/A |
Description: This spell is used to enhance combat ability by protecting the caster’s physical form with death energy, giving them the appearance of the undead. At Novice level, the caster gains a +5 modifier to their Physical Rating (does not stack with natural or worn armor), and an Impact Rating: 13, Magic Rating: 8 (12 against Death magic), and Elemental Rating: 6; the rating plus Basic Hits provides the armor save for the duration of the spell. When additional armor is worn, ratings do not stack, rather the higher rating is used. Upon reaching Expert level, the caster’s flesh takes on the properties of the undead, providing additional durability that reduces sharp damage by 4 points (durability modifiers do not stack). And at Master level, the caster’s internal organs take on the properties of the undead, granting immunity to Critical Hits. The material component is a piece of bone wrapped in rotting flesh that is held in the palm and used up during casting.
| Type: | Defend (L) |
| Domain: | Create |
| Range: | Personal |
| Area of Effect: | Individual |
| Duration: | Passive |
| Components: | V, S, M |
| Casting Time: | One Action |
| Resistance: | N/A |
Description: When cast, this spell surrounds the caster in flames – appearing anywhere from a glow of embers to fully immersed in flame – to protect their physical form. At Novice level, the caster gains a +3 modifier to their Physical Rating (does not stack with natural or worn armor), and an Impact Rating: 11, Magic Rating: 9 (13 against Fire magic), and Elemental Rating: 7; the rating plus Basic Hits provides the armor save for the duration of the spell. When additional armor is worn, ratings do not stack, rather the higher rating is used. Upon reaching Expert level, the caster’s control over the element grants immunity from normal fire damage and allows bright illumination up to a 4-yard radius. And at Master level, anyone who enters the character’s threat zone suffers elemental fire damage equal to the number of skill points in the tree, which regenerates each round.
| Type: | Defend (L) |
| Domain: | Create |
| Range: | Personal |
| Area of Effect: | Individual |
| Duration: | Passive |
| Components: | V, S, M |
| Casting Time: | One Action |
| Resistance: | N/A |
Description: This spell causes the caster’s flesh to take on the consistency of soil, unworked minerals (ore, gems, etc.), or plants (bark, burls, periderm, etc.) to protect their physical form. At Novice level, the caster gains a+6 modifier to their Physical Rating (does not stack with natural or worn armors), and an Impact Rating: 12, Magic Rating: 7 (11 against Land magic), and Elemental Rating: 8; the rating plus Basic Hits provides the armor save for the duration of the spell. When additional armor is worn, ratings do not stack, rather the higher rating is used. Upon reaching Expert level, the caster’s connection to land grants them Knockdown immunity in addition to the armor effect. And at Master level, the caster’s body becomes the selected consistency (soil, unworked, mineral, or plant), gaining the ability to regenerate – a full round is required with the character either in contact with natural land (soil or unworked mineral) or exposed to sunlight (plant), gaining the healing rate +1 per 4 points in the skill tree. This is a magical effect and does not affect the character’s mobility, weight, or move rate.
| Type: | Defend (L) |
| Domain: | Create |
| Range: | Personal |
| Area of Effect: | Individual |
| Duration: | Passive |
| Components: | V, S, M |
| Casting Time: | One Action |
| Resistance: | N/A |
Description: With this spell, the caster is coated in a viscous liquid that provides protection by dampening attacks. At Novice level, the caster gains a +3 modifier to their Physical Rating (does not stack with natural or worn armor), and an Impact Rating: 11, Magic Rating: 7 (11 against Water magic), and Elemental Rating: 9; the rating plus Basic Hits provides the armor save for the duration of the spell. When additional armor is worn, ratings do not stack, rather the higher rating is used. Upon reaching Expert level, the caster’s form becomes viscous, providing additional durability that reduces blunt damage by 4 points (durability modifiers do not stack) and allowing for melee or touch attacks at up to two yards distant. And at Master level, the caster is able to manipulate their shape to flow through virtually any tight space, expand to block a passage or doorway of roughly their size, etc. – this is considered a move, and could require multiple actions depending on type, i.e., it will take longer to flow through a keyhole or crack than a grating or pipe. While the spell is active, the caster appears to shimmer and will sparkle in direct light, and when hit, their form rippling at the point of impact.
| Vessel: | Object or Individual |
| Sigil: | Protection |
| Material: | Crafted or Derma |
| Craft Skill: | Engraving or Tattooing |
| Duration: | Active |
| Casting Time: | One Action |
Description: The vessel of this rune is dried bone crafted into a pentagonal shape with sigils carved on each edge with the Lapidary skill and worn on the chest, alternately, an individual may be tattooed with the sigils, requiring the Tattoo skill. It offers an additional two points of armor protection against physical, impact, and magical damage, but does not stack with similar types of magical protection.
Attribute: Knowledge
Type: Utility
Time: N/A
Description: Those with this skill can mix magic with a fluid substance to create bombs and extracts. Production takes about ten minutes and requires preparing a container (typically a small jar), the addition of liquid, spell casting, and sealing the jar with a stopper covered in wax. Characters are required to make a skill check, can produce 1 per 2 points in the skill tree per day, may not create duplicates, and the magic fades after 1 day per 3 points in the skill tree. If the skill check fails, that one is lost for the day. Bombs are for spells used against opponents, while extracts are for spells that aid the caster or allies.
Specialization: (Required) Magical Foundation, i.e. Mystic, Land Strider, Wind Rider, Fire Walker, Wave Runner
| Type | Description | |
| Bomb | Requires an oil-type liquid (-4 modifier to the casting for others). It can be used by anyone with the Throw skill and has a splash effect covering an area of three yards. All in the area must save against the spell normally, though, area of effect spells supersedes the splash. All other factors work per the spell. | |
| Extract | Requires an alcohol liquid (-4 modifier to the casting for others). Anyone who drinks the extract gains the effect as if cast. Those who want to resist the effect get a save per usual. All other effects work per the spell. |
| Type: | Defend (L) |
| Domain: | Create |
| Range: | Reach |
| Area of Effect: | Locus |
| Duration: | Passive |
| Components: | V, S, M |
| Casting Time: | Two Actions |
| Resistance: | N/A |
Description: This spell is used to create a thin barrier of magic that covers a vertical area from the ground equal to the Influence score. It is up to the caster to determine the height and width of the wall (in yards), within the area allotment, noting that it has no discernable depth. The wall is able to absorb a hundred points of damage before it shatters and shimmers in the same color as the caster’s focus object, making it visible and obvious.
| Type: | Defend (L) |
| Domain: | Create |
| Range: | Reach |
| Area of Effect: | Locus |
| Duration: | Passive |
| Components: | V, S, M |
| Casting Time: | Two Actions |
| Resistance: | N/A |
Description: When cast, this spell creates a barrier of wind that covers a vertical area from the ground equal to the Influence score. It is up to the caster to determine the height and width of the wall (in yards), within the area allotment, noting that it has no discernable depth. The wall appears as a vortex of wind that picks up debris, is able to absorb a hundred points of damage before it shatters, and shimmers in the same color as the caster’s focus object.
| Type: | Defend (L) |
| Domain: | Create |
| Range: | Reach |
| Area of Effect: | Locus |
| Duration: | Passive |
| Components: | V, S, M |
| Casting Time: | Two Actions |
| Resistance: | N/A |
Description: With this spell, the caster can create a blazing barrier that covers a vertical area from the ground equal to the Influence score. It is up to the caster to determine the height and width of the wall (in yards), within the area allotment, noting that it has no discernable depth. Anyone who comes in contact with the wall suffers eight (8) points of elemental damage. It is able to absorb a hundred points of damage before it shatters and shimmers in the same color as the caster’s focus object.
| Type: | Defend (L) |
| Domain: | Create |
| Range: | Reach |
| Area of Effect: | Locus |
| Duration: | Passive |
| Components: | V, S, M |
| Casting Time: | Two Actions |
| Resistance: | N/A |
Description: A caster with this spell can create a barrier of stone that covers a vertical area from the ground equal to the Influence score. It is up to the caster to determine the height and width of the wall (in yards), within the area allotment, noting that it has no discernable depth. The wall is opaque, of the same color and texture as the caster’s focus object, and able to absorb a hundred points of damage before it shatters.
| Type: | Defend (L) |
| Domain: | Create |
| Range: | Reach |
| Area of Effect: | Locus |
| Duration: | Passive |
| Components: | V, S, M |
| Casting Time: | Two Actions |
| Resistance: | N/A |
Description: When cast, this spell creates a barrier of ice that covers a vertical area from the ground equal to the Influence score. It is up to the caster to determine the height and width of the wall (in yards), within the area allotment, noting that it has no discernable depth. The wall is a sheet of ice that takes on the color of the caster’s focus object. It shatters after taking twenty-five points of damage and immediately reforms (three times), giving it a regenerative appearance.
Attribute: Agility
Type: Attack
Time: Two Free Actions
Description: Characters with this skill move rhythmically in an aesthetically pleasing manner. On a successful skill check, they are able to make purposely mocking or provocative movements to incite or enrage foes. Targets get a Willpower or related defend to resist, with a -1 modifier per 2 points in the skill tree. Those with this skill are better able to move, gaining a +1 modifier per 2 points in the skill tree for move-based attack and defend actions. If the check fails, the foe ignores the character or the bonus modifier is not applied.
Tactical Use: Proactively draw an opponent away from an ally, turn graceful spins to be more difficult to hit, cause a foe to attack recklessly, etc.
Specialization: None
Attribute: Influence
Type: Attack
Time: Two Free Actions
Description: Characters with this skill can project their voice to resonate with those in the area. On a successful skill check, they can deliver an inspirational speech to give allies a +1 modifier per three skill points in the tree to either attack skill checks (to victory), defend skill checks (hold the line), or move skill checks (chase them down / run away). It can also be used to increase NPC reactions by one level, i.e. hostile to unfriendly, neutral to friendly, etc., stir up a gathering of NPCs and encourage them into action, etc. NPCs may get a morale save at a -1 modifier per two skill points in the skill tree to resist. If the check fails, additional attempts may be made at a progressive difficult (-4) modifier, but after three fails, additional attempts may not be made again during that encounter.
Tactical Use: Encourage a group to march against a local politician, sway the patrons of a bar to help with a task, help to turn the tide of a battle by shouting a vicious battle cry, etc.
Specialization: None
Attribute: Agility
Type: Attack
Time: One Action
Description: A character with this skill is able to continuously hold, catch, carry, manipulate, and/or balance multiple objects at once. With a successful skill check, a character at Novice level can draw tiny or small weapons or objects with free actions and juggle a number of them equal to the number of points in the skill tree. At Expert level, the character can throw up to two juggled objects per action at targets within a 3-yard range – targets get a single defend action to avoid both objects, but if hit, a damage save is required for each. Those who achieve Master level can attempt to catch items thrown or fired at them with a bow as a defend action. Regardless of how the skill is used, those who are moving suffer a difficult (-4) modifier to the skill check, and an additional skill check is required to maintain a juggle whenever they start or stop moving. If the skill check fails or the target makes a successful defend, the attack misses. When defending, if the skill check fails, the target is hit and takes damage normally; if the initial check fails, the character fails to begin the juggle.
Specialization: None
Attribute: Knowledge
Type: Utility
Time: N/A
Description: A defensive combat style used to gain a psychological advantage over a foe in combat. Pompous and grandstanding, this style focuses on using melee defends to frustrate and annoy opponents, driving them to make reckless mistakes. Learners are instructed in two forms that carry specific attack/defend modifiers. The Balanced form offers no modifiers and is used to assess threats or in group tactics. The Counter form is a passive stance that has a -2 modifier to hit but offers a +4 modifier to defend using the Block or Parry skill with a proficient weapon or a +2 modifier to other defend skills. Part of the skill involves verbal challenges and mocking that can be played out. During combat the forms can be changed at the start of each round, but may not be changed during the round, carrying over to the next round if no change is announced. It may be used with any attack or defend skills in the tree, and the modifiers stack with all combat modifiers. Only one stance may be purchased during character generation, but others can be selected as the character advances.
Specializations: (Required) Proficient weapon
Form Attack/Defend
Balanced –/–
-Counter -2/+4
Attribute: Agility
Type: Utility
Time: One Action
Description: Those with this skill are flexible, able to twist themselves in a variety of positions. This provides them with an additional +1 bonus modifier per three points in the skill tree to any Dance, Escape Artist, Dodge, or Evade skill checks, assuming the character has the skills. In addition, it allows for Tumbling move actions during the character’s attack actions in Initiative, rather than waiting for the Movement phase, and, with a successful skill check, they can dislocate a shoulder and hip joints to squeeze into and move through tiny places. If the check fails, additional attempts to dislocate the joints may be made at a progressive difficult (-4) modifier, but after three fails the character takes disable damage equal to the skill rank to the target joint (normal damage saves apply), and may not try again during that encounter.
Prerequisites: The Tumbling skill and four points in the skill tree
Attribute: Constitution
Type: Defend
Time: One Action
Description: This skill is used to withdraw from melee combat or take cover from ranged combat. The intent to retreat must be announced at the start of the round. When withdrawing from melee combat, with a successful skill check the defender disengages from a single threat zone one yard without drawing an Attack of Opportunity (-4 modifier per additional threat zone) or can take immediate move actions during the attackers initiative phase to remain out of melee range (limited to remaining actions in the round and the characters move rate capability). While seeking cover, with a successful skill check the character is able to move out of line of sight during the attacker’s initiative. Available cover must be within the defender’s single-action move rate and must be durable enough to withstand attack. If the skill check fails, the character is left exposed and may defend normally, assuming additional actions are available and except in the case of an Attack of Opportunity.
Tactical Use: If being charged, the character backs away to remain out of melee range; moving into a doorway to get out of an attacker’s range of sight; drawing back to a hillock for cover, etc.
Specialization: None
Attribute: Perception
Type: Utility
Time: N/A
Description: This specialty includes the ability to make and assemble musical instrument parts, tune instruments, repair damage, etc. Although it is defined as one skill, because instruments require different tools and materials based on type, those who select this skill must select from brass, keyboard, percussion, string, or woodwind instruments, but may take the skill multiple times to pick up more than one type. The appropriate tools and raw materials related to the specialty are required to use this skill. At Expert Character Rank, masterwork quality work can be created from masterwork quality raw materials, and at Master Character Rank, masterwork quality work can be made from common raw materials.
Skill Trees: Cunning, Guile, Performance, Sorcery, Statecraft, Talisman
Attribute: Knowledge
Type: Per Spell
Time: Per Spell
Description: Those with this skill possess the talent and knowledge needed to channel, control, and manipulate magic. It’s used to direct the effects of known spells (as they are defined) at a target and begins the casting state. Spell details can be found in the Core Rules: Magic Basics section.
Specialization: (Required) Magical Foundation, i.e. Mystic, Land Strider, Wind Rider, Fire Walker, Wave Runner
Attribute: Perception
Type: Per Spell
Time: Per Spell
Description: Those with this skill know how to channel, manipulate, and control magic with whispered words, subtle gestures, and hidden components. In addition to directing the effects of known spells (as they are defined) at a target, this skill is used to make any saves against opposed Observation and Search attempts. These saves do not require characters to spend any additional actions. Spell details can be found in the Core Rules: Magic Basics section.
Specialization: (Required) Magical Foundation, i.e. Mystic, Land Strider, Wind Rider, Fire Walker, Wave Runner
Attribute: Perception
Type: Utility
Time: N/A
Description: This skill is used to add a sensory quality to the target of a cast spell. These effects are aesthetic in nature and do not enhance the spell but may be used to add a unique signature to castings, indicate a specific order or school, enhance a roleplay scenario, etc. Any one of the below effects can be added to a Casting skill at Novice character rank, up to two at Expert character rank, up to four at Master character rank. Spell details can be found in the Core Rules: Magic Basics section.
Specialization: (Required) Magical Foundation, i.e. Mystic, Land Strider, Wind Rider, Fire Walker, Wave Runner
[table]
[tr][td]Effects[/td] [td]Description[/td][/tr]
[tr][td]Audial[/td] [td]Only sounds the caster has heard before sounded at a normal level, i.e., chimes, lute, animal sound, etc.[/td][/tr]
[tr][td]Olfcatory[/td] [td]A scent familiar to the character, emitting only a slight fragrance, i.e., fresh hewn grass, dung, etc.[/td][/tr]
[tr][td]Tactile[/td] [td]Sensations felt on the flesh that causes no more than awareness, i.e., tingling, tapping, crawling, etc.[/td][/tr]
[tr][td]Visual[/td] [td]A display of color or light, in a normal spectrum of brightness, with no area of effect, i.e., red glow, pink sparkles, rainbow aura, etc.[/td][/tr]
[/table]
Attribute: Agility
Type: Per Spell
Time: Per Spell
Description: Character with this skill are adept at swiftly moving through the casting process to reduce the amount of time it takes to cast complex spells. The casting time of known spells (as they are defined), requiring more than one action to cast, is decreased based on the character rank, Expert = 1 action, Master =2 actions, Epic = 3 actions. The number of actions a spell takes to cast may never be reduced below one. Spell details can be found in the Core Rules: Magic Basics section.
Prerequisites: Four points in the skill tree
Attribute: Influence
Type: Per Spell
Time: Per Spell
Description: A character with this skill can add specific factors to intensify a spell’s effect during casting. Any one of the below factors can be added to a Casting skill check at Expert character rank, up to two at Master character rank, up to four at Epic character rank. These factors may only be added to Change, Control, or Damage spells, and the factor is treated as part of the spell effect – if the save fails, the factor is applied, with any applicable damage saves. Using this skill begins the casting state. Spell details can be found in the Core Rules: Magic Basics section.
Prerequisites: Four points in the skill tree and a Magic Foundation, i.e., Mystic, Land Strider, Wind Rider, Fire Walker, Wave Runner
[table]
[tr][td]Factor[/td] [td]Description[/td][/tr]
[tr][td]Blister[/td] [td]Add a concentrated surge of magic to the spell causing additional damage based on Character Rank – Expert 4, Master 8, Epic 12.[/td][/tr]
[tr][td]Blare[/td] [td]Add a booming sound to the spell causing temporary deafness for a number of rounds based on Character Rank – Expert 4, Master 8, Epic 12.[/td][/tr]
[tr][td]Glare[/td] [td]Add a dazzling effect to the spell causing temporary blindness for a number of rounds based on Character Rank – Expert 2, Master 4, Epic 6.[/td][/tr]
[tr][td]Swat[/td] [td]Add a push effect to the spell that knocks the target prone a distance in yards based on Character Rank – Expert 0, Master 12, Epic 24.[/td][/tr]
[tr][td]Scatter[/td] [td]Add a force effect that knocks away held or loose objects a distance in yards based on Character Rank – Expert 4, Master 8, Epic 16.[/td][/tr]
[/table]
Attribute: Influence
Type: Per Spell
Time: Per Spell
Description: A character with this skill can add a combination of range and damaging factors to intensify a spell’s effect during casting. One of the below factors can be added to a Casting skill check based on the character’s primary Magic Foundation. These factors may only be added to Change, Control, or Damage spells, and the factor is treated as part of the spell effect – if the save fails, the factor is applied, with any applicable damage saves. The area of effect listed Using this skill begins the casting state. Spell details can be found in the Core Rules: Magic Basics section.
Prerequisites: The Surging Cast skill and eight points in the skill tree
[table]
[tr][td]Factor[/td] [td]Description[/td][/tr]
[tr][td]Geyser[/td] [td]Mystic. The spell strikes as a literal fountain of magic, affecting everyone in an area of yards based on Character Rank – Master 3, Epic 6, while adding 2 points of damage per point in the skill tree.[/td][/tr]
[tr][td]Tornado[/td] [td]Air. A violent microburst of wind accompanies the spell, affecting everyone in an area of yards based on Character Rank – Master 3, Epic 6, while tossing them 1 yard per 2 points in the skill tree, causing falling damage.[/td][/tr]
[tr][td]Firestorm[/td] [td]Fire. A shower of tiny fireballs accompanies the spell, affecting everyone in an area of yards based on Character Rank – Master 3, Epic 6, while adding 1 point of damage per two points point in the skill tree that burns for 3 rounds.[/td][/tr]
[tr][td]Quake[/td] [td]Land. A violent tremor accompanies the spell, affecting everyone in an area of yards based on Character Rank – Master 6, Epic 9, and knocking them prone.[/td][/tr]
[tr][td]Hurricane[/td] [td]Water. A massive wave accompanies the spell, affecting everyone in an area of yards based on Character Rank – Master 3, Epic 6, while adding 1 point of damage per 2 points in the skill tree, and knocking them prone.[/td][/tr]
[/table]
Attribute: Agility
Type: Per Spell
Time: Per Spell
Description: Those with this skill possess the talent and knowledge needed to channel, control, and manipulate magic while in melee combat, without the normal modifiers or drawing an attack of opportunity. This type of casting adds a melee touch component as part of the spell cast for adjacent targets, and this skill is used to make any saves against attempts to disrupt the casting. Saves do not require characters to spend additional actions. The skill is used to direct the effects of known spells (as they are defined) at a target and begins the casting state. Spell details can be found in the Core Rules: Magic Basics section.
Specialization: (Required) Magic Foundation, i.e. Mystic, Land Strider, Wind Rider, Fire Walker, Wave Runner
Attribute: Agility
Type: Attack
Time: Per Spell
Description: Characters with this skill can combine an attack spell effect with a melee weapon strike. The weapon must be of at least medium size and activated as the Focus Component for the encounter. It’s used to direct the effects of known spells (as they are defined) at a melee target, using the spell casting time to determine how many actions the attack takes. This skill is used to make the combined spell cast and melee strike. Although the combined actions are counted as a single attack, a defender who is hit by the attack saves against the spell effect and weapon damage separately. Using this skill begins the casting state. Spell details can be found in the Core Rules: Magic Basics section.
Prerequisites: The Focus Component skill and four points in the skill tree
Attribute: Knowledge
Type: Attack
Time: Per Spell
Description: A character with this skill can combine the effects of two attack spells in a single casting. It’s used to direct the effects of known spells (as they are defined) at a target, using the higher spell casting time to determine how many actions the attack takes. The character must be carrying an active Focus Component to use this skill. This skill is used to make the combined spell cast. Although the combined spells are counted as a single attack, a defender saves against each spell effect separately. Using this skill begins the casting state. Spell details can be found in the Core Rules: Magic Basics section.
Prerequisites: The Focus Component skill, (E) Quick Cast skill, and eight points in the skill tree
Attribute: Knowledge
Type: Per Rune
Time: Per Rune
Description: This skill represents the ability to channel magical energies to power rune vessels. It combines sigil creation and empowerment and is divided into the three prime characteristics of Divination, Enhancement, and Protection that form the basis of this type of magic. This skill is used to both create and cast all runes, regardless of their type or purpose. Use of this skill begins the casting state. Rune details can be found in the Core Rules: Magic Basics section.
Specialization: (Required) Mystic Magical Foundation
Attribute: Perception
Type: Utility
Time: N/A
Description: This skill is used to change the aesthetic value of the spell to be theriomorphic. The effect is aesthetic in nature, with an ethereal quality, and does not enhance the spell but does fundamentally change how they are perceived. Before casting, the character chooses one of the listed forms for the spell, i.e. a Fire Walker casts a Hold spell which appears as a huge fiery bear hugging the target. Any one of the forms can be added to any Casting skill the character knows. Spell details can be found in the Core Rules: Magic Basics section.
Specialization: (Required) Magical Foundation, i.e. Mystic, Land Strider, Wind Rider, Fire Walker, Wave Runner
[table]
[tr][td]Form[/td] [td]Description[/td][/tr]
[tr][td]Bear[/td] [td]A magic foundation outline of the animal, typically of large scale, used for area of effect and damaging type spells, i.e. Burst, Detonate, Shatter, etc.[/td][/tr]
[tr][td]Wolf[/td] [td]A magic foundation embodiment of the animal, used for delivering spell effects, i.e., Find, Alter Other, Dispel Magic, etc.[/td][/tr]
[tr][td]Serpent[/td] [td]A magic foundation shadow of the animal, used for duration type spells, i.e., Imprison, Curse, Pain, etc.[/td][/tr]
[tr][td]Owl[/td] [td]A magic foundation animation of the animal, used for transporting enhancements and ally effects, i.e., Light, Haste, Enlarge, etc.[/td][/tr]
[/table]
| Vessel: | Object |
| Sigil: | Enhancement |
| Material: | Mundane |
| Craft Skill: | Artistry |
| Duration: | Active |
| Casting Time: | One Action |
Description: When this rune is activated, the Runecaster becomes a non-target that is ignored by all targets in the immediate vicinity, assuming that there is someone or something else in that vicinity to draw their focus. The effect moves with the Runecaster and all targets get a Willpower save to negate the effect. Those affected cannot be convinced that the Runecaster is present in the vicinity unless the caster attacks the target. The rune vessel is a square of material that matches the surroundings, i.e., wood for forest, brick for cities, glass for desert, etc., with the sigil drawn on with charcoal or chalk. Once the effect ends, the sigil fades from the item and must be redrawn.
Attribute: Constitution
Type: Move
Time: One Action
Description: Characters with this skill can move at twice their normal move rate for a number of actions equal to the total skill rank. Exceeding the total number of actions will require at least one minute of rest afterward to avoid entering a fatigue state. The difficulty is based on terrain type and the amount of weight that is being carried.
Prerequisites: The Running skill and four points in the skill tree
Attribute: Strength
Type: Attack
Time: One Action
Description: Those with this skill can smash bodily into a melee target to drive them to the ground. The attack causes Strength plus basic hits damage, knocking the target prone and causing a stun effect – lose all actions for the remainder of the round and allowed only two actions in the following round, which may be used for defend or move actions. Defenders get a Stamina save (-1 modifier per two points in the skill tree) to resist the stun effect. If the skill check fails or the target successfully defends, the attack misses.
Prerequisites: The Lunge skill and four points in the skill tree
Attribute: Constitution
Type: Attack
Time: One Action
Description: This skill is used against an opponent moving to engage in melee or making a charging type attack. Feigning a defensive position, the character stabs forward and sets the back end of the weapon in the ground as the target approaches, using the target’s forward motion to turn it into an impale type attack. The attacker is required to hold their actions in the round and wait for the target to advance before making the attack. On a successful skill check the attack hits, and because of the deceptive nature of the attack, the defender is required to make a Reaction save or related skill, with a -1 modifier per 2 points in the skill tree in order to take a defend action. If the target’s save is successful, they may defend normally. Any damage from the attack is taken from remaining body points, putting the target in a fatigue state. If the skill check fails or the target successfully defends, the attack misses.
Prerequisites: The Forbear and Forestall skills and four points in the skill tree
Attribute: Constitution
Type: Defend
Time: One Action
Description: Those with this skill can use a reach weapon to turn away a charging attack in a forward-facing arc. The goal of the defensive action is to force an opponent making a rush or charge type attack, whether mounted or not, to divert from the opponent maintaining a distance along the reach of the pole weapon. Opponents may choose to turn away from charging or take damage and continue the attack. Those who choose to take damage suffer normal weapon damage plus their move rate and are allowed an armor check to resist damage, but it is otherwise treated as an attack of opportunity. Characters can choose to change their forward face by spending one free action to take up to a 90º pivot.
Specializations: (Required) Proficient weapon(s) with reach capabilities
Attribute: Agility
Type: Defend
Time: One Action
Description: This skill is used with reach weapons to keep opponents in a forward-facing arc from moving into melee combat, and may be used in two ways. As a defensive action, the character can halt an individual approach within reach of the weapon with a successful skill check. Opponents may turn away from their approach or take damage and continue into melee, though the character can choose to take a move action to retreat, maintaining the distance (assuming a similar move rate). While potentially a damage-causing action, this does not count against the speed factor of the weapon and is not treated as an attack action. Alternately, the character can assume a purely defensive posture. Announced at the start of the round and requiring four actions, the character can guard against the approach of multiple opponents within reach of the weapon, getting a defend check for each attempt to approach. Opponents may turn away from the attack or take damage from it. Those who choose to take damage break the defend action, giving the character back two actions for the remainder of the round. Characters can choose to change their forward face by spending one free action to take up to a 90º pivot. Opponents who choose to take damage to enter melee are allowed an armor check to resist damage, but it is otherwise treated as an attack of opportunity.
Specializations: (Required) Proficient weapon(s) with reach capabilities
| Type: | Utility |
| Domain: | Summon |
| Range: | Touch |
| Area of Effect: | Object |
| Duration: | Instant |
| Components: | V, S, M |
| Casting Time: | One Action |
| Resistance: | N/A |
Description: When cast, the Death Eater creates a blade made from their own blood that may be used to make melee attacks. A hilt crafted from bone serves as the focus, with the blade rising out of it (Str+10, magic damage, SF 2, Crit 1, Med Size), and requires the caster to have a Weapon Proficiency in Blood Blade. The blade can take whatever form the caster desires, so long as it maintains a medium size, and once the hilt is released or the casting state ends, the blade vanishes and the spell must be recast. The material component is a small amount of the caster’s blood, either stored in a vial or from a small wound.
| Type: | Attack |
| Domain: | Control |
| Range: | Reach |
| Area of Effect: | Individual |
| Duration: | Passive |
| Components: | V, S, M |
| Casting Time: | Two Actions |
| Resistance: | Willpower negates |
Description: With this spell, the Death Eater can force a target to stop what they are doing, silently walk over, and stand before the caster with hands clasped at the back and head bowed. The target gets an initial save, if it fails the effect lasts a number of rounds equal to the Constitution score, and remain aware of their actions but are unable to communicate for the duration of the spell. Any attack made against the target breaks the spell, while they are considered prone for the attack, this prone position does not make them susceptible to a kill shot. The material component is a small marble figurine wrapped in a braid of hair (used up) that is held in the palm during casting.
| Type: | Attack |
| Domain: | Damage |
| Range: | Reach |
| Area of Effect: | Group |
| Duration: | Instant |
| Components: | V, S, M |
| Casting Time: | Two Actions |
| Resistance: | Stamina negates |
Description: With this spell, the Death Eater can create a link of death energy between themselves and two targets, causing damage to one by transferring their life energy to the other, while taking at least one (1) point for themselves. When cast, the target suffers nineteen (19) points of damage – all damage saves are made against the Magic Armor total (Constitution plus relevant armor plus bonus modifiers) casters add their Basic Hits to the armor total against spells from the same magic foundation, and any damage actually sustained by the target is transferred to the ally, healing Health damage first, and then Body damage. Affected targets must be within a range of yards equal to the Influence score from the caster, with the Death Eater linking them. The material component is a pair of humanoid or animal teeth from different mouths in a small vial of blood, that is consumed upon casting.
| Type: | Utility |
| Domain: | Change |
| Range: | Touch |
| Area of Effect: | Locus |
| Duration: | Instant |
| Components: | V, S |
| Casting Time: | One Action |
| Resistance: | N/A |
Description: The caster causes the ground immediately around them to take on the dank and slightly fetid quality of an open grave. This area combines the feel and odor of freshly turned dirt with that of old stone and a day-old corpse while maintaining a consistent temperature in harsh conditions. The effect ends when the caster leaves the area.
| Type: | Utility |
| Domain: | Summon |
| Range: | Reach |
| Area of Effect: | Locus |
| Duration: | Active |
| Components: | V, S |
| Casting Time: | One Action |
| Resistance: | N/A |
Description: When cast, this cantrip summons a pair of shadowy mitts that can hold things for the caster. Lacking the dexterity to do much more than support a weight of up to twenty (20) pounds, the hands are extremely steady even in rough conditions and will turn with the caster, but are not mobile and lack the ability to adjust to threats, e.g., avoid being hit.
| Type: | Utility |
| Domain: | Create |
| Range: | Personal |
| Area of Effect: | Individual |
| Duration: | Passive |
| Components: | V, S |
| Casting Time: | One Action |
| Resistance: | N/A |
Description: This cantrip can be used to create a field of magical darkness over the face that shadows the features making them indiscernible even in direct lighting. The caster must be wearing a hat or hood for the cantrip to be effective.
| Type: | Utility |
| Domain: | Change |
| Range: | Touch |
| Area of Effect: | Object |
| Duration: | Instant |
| Components: | V, S |
| Casting Time: | One Action |
| Resistance: | N/A |
Description: With this cantrip, the caster can taint, spoil, or whither small size objects, i.e. wilt flowers, spoil meat or milk, make a single item of clothing musty, etc. While objects are not damaged or destroyed by the cantrip, they take on an unpleasant or unappealing quality.
| Type: | Utility |
| Domain: | Summon |
| Range: | Touch |
| Area of Effect: | Object |
| Duration: | Passive |
| Components: | V, S |
| Casting Time: | One Action |
| Resistance: | N/A |
Description: When cast upon a cut of flesh and bone, small shadowy worms flow from the caster’s palm and begin peeling away any remaining muscles, dermis, or other debris, depositing it around the object. When finished, the bone is completely clean, with a slight ivory sheen.
| Type: | Utility (L) |
| Domain: | Create |
| Range: | Touch |
| Area of Effect: | Locus |
| Duration: | Passive |
| Components: | V, S, M |
| Casting Time: | One Action |
| Resistance: | N/A |
Description: This spell can be used on the caster or an ally, providing light in an area equal to the Influence score that always remains one (1) yard ahead of and above the target. Consisting of a tight grouping of spherules that flitter like insects, the light has a soft glow that belies its luminescent range. Unwilling targets get a Reaction save to resist the spell effect.
| Type: | Utility |
| Domain: | Change |
| Range: | Touch |
| Area of Effect: | Individual |
| Duration: | Instant |
| Components: | V, S, M |
| Casting Time: | Two Actions |
| Resistance: | Willpower neg |
Description: When this spell is cast, the target is filled with life energy and feels temporary relief from the pangs of some discomfort. The caster may remove one source of unpleasantness based on character rank, i.e., physical discomfort such as hunger, thirst, allergies, etc. – Novice; emotional discomfort such as grief, panic, rage, etc. – Expert; response discomfort such as revenge, spite, vindication, etc. – Master. Because the source of discomfort is not permanently resolved, the underlying feelings will return, e.g., after a little while the target will get hungry or thirsty again, but their relief will typically last a few hours, though roleplay could escalate that situation. Unwilling targets are allowed a save to negate the effect. Spherules explode flow from the caster to the target, hovering around the target for the remainder of the round and the next.
| Type: | Attack |
| Domain: | Change |
| Range: | Reach |
| Area of Effect: | Individual |
| Duration: | Instant |
| Components: | V, S, M |
| Casting Time: | Two Actions |
| Resistance: | Willpower neg |
Description: With this spell, the caster infuses the target with life energy, bolstering their physical presence and causing them to become the central focus of the encounter, immediately drawing all attention. When cast on an ally in combat, any opponent engaged in combat with them will hesitate, and those that fail the save may not use any of their next four actions to attack. In addition, all opponents in the immediate vicinity will turn their focus to the target, allowing them to be drawn away from their current target. In non-combat situations, the attention of everyone in the vicinity is immediately drawn to the target, raising or lowering their perceived reputation rank by two levels per character rank based on their actions, i.e., being positive or inspirational gains an increased rank, while those being negative or deceitful suffer a lowered rank. Unwilling targets are allowed a save to negate the effect. Spherules engulf the target, giving them a healthy, vibrant, or menacing glow for the remainder of the round and the next.
| Type: | Utility |
| Domain: | Control |
| Range: | Reach |
| Area of Effect: | Individual |
| Duration: | Instant |
| Components: | V, S, M |
| Casting Time: | Special |
| Resistance: | N/A |
Description: This spell allows the caster to draw on the surrounding life energy and focus it on an ally to help them to successfully achieve an action. It may be used to aid in a defend or utility action (Novice), saving throw (Expert), or attack action (Master), by making a die roll for each action spent channeling at the same time as the target, with the highest result used for the action. The spell may only be cast on an individual target one time per round. Spherules rush at and surround the target for the remainder of the round and the next.
| Type: | Utility |
| Domain: | Change |
| Range: | Touch |
| Area of Effect: | Object |
| Duration: | Passive |
| Components: | V, S, M |
| Casting Time: | Three Actions |
| Resistance: | Special |
Description: With this spell, the caster is able to grant humanoid characteristics, intelligence, and behaviors to inanimate objects and simple organisms. The target must be touched and can be given traits that include speech, locomotion, sensory awareness, independent thought, and emotional portrayal. The caster can affect plants, simple animals, crafted objects (toys, puppets, gear, armor, weaponry, etc.), and drawings or paintings (animated within the frame only), of up to a size based on character rank, i.e., Novice – small, Expert – medium, Master – large. Objects that take on humanoid characteristics are not able to attack or cause damage, but can get in the way and be bothersome, and can shift back and forth between their original form and the anthropomorphized form at any time so long as the spell is in effect. When cast upon standalone objects, no save is required, but when cast on held or worn objects, the wearer is allowed a Stamina save to negate the spell effect. The spell lasts a number of rounds (Novice), minutes (Expert), or hours (Master) equal to the skill rank. When cast, a burst of spherules engulfs the target object, continuing to surround it for the duration of the spell.
Attribute: Perception
Type: Attack
Time: One Action
Description: Characters with this skill can make devastating strikes at vulnerable points to cause body damage. For this attack, the crit range for the weapon is increased by one per two points in the skill tree. On a successful skill check, the target is hit and may defend normally. This attack may be used with any Novice attack skill in this tree, with all related and general combat modifiers applied normally. If the skill check fails or the target successfully defends, the attack misses.
Prerequisites: Four points in the skill tree
| Type: | Utility |
| Domain: | Control |
| Range: | Reach |
| Area of Effect: | Locus |
| Duration: | Instant |
| Components: | V, S |
| Casting Time: | One Action |
| Resistance: | N/A |
Description: With this cantrip, the caster part natural foliage, small branches, or other inhibitive greenery in a one-yard area, allowing the caster to pass without hindrance. After the caster passes, the affected area slowly falls back into place within three rounds.
| Type: | Utility |
| Domain: | Control |
| Range: | Touch |
| Area of Effect: | Locus |
| Duration: | Instant |
| Components: | V, S |
| Casting Time: | One Action |
| Resistance: | N/A |
Description: The caster can magically request natural foliage or small branches of up to a one-yard area to close together to inhibit movement. Those moving through the area add three yards to the total for the move, while prone targets require two actions to stand. A round after casting, the affected begins loosens and falls back into place within three rounds.
| Type: | Utility |
| Domain: | Change |
| Range: | Reach |
| Area of Effect: | Locus |
| Duration: | Instant |
| Components: | V, S |
| Casting Time: | One Action |
| Resistance: | N/A |
Description: When cast, this cantrip will reinvigorate plant life, restoring moisture and color to those wilted, repairing small broken branches, raising crushed greenery, spontaneously blooming of flowers, etc. Refreshed plant life is treated as freshly watered, and while it can be used to mask immediate passage, a one-yard area requires a full round of casting.
| Type: | Utility |
| Domain: | Summon |
| Range: | Reach |
| Area of Effect: | Locus |
| Duration: | Passive |
| Components: | V, S |
| Casting Time: | One Action |
| Resistance: | N/A |
Description: Using this cantrip, the caster can ask the natural world to collect small amounts of one thing from a natural resource, e.g., kindling from surrounding foliage, berries from a bush, fruit from a tree, etc. The objects subtly move into a small pile next to the caster, providing enough for a single use.
Attribute: Influence
Type: Attack
Time: One Action
Description: Characters with this skill can focus their mind to pull unanchored people or objects to them, without causing damage. With a successful skill check, a target up to a number of yards away equal to the Influence score plus 1 per 2 points in the skill tree, is pulled to the character. Defenders get a base damage save to resist the effect, while held objects get a Reaction or other appropriate save, and anchored objects get a structural strength save. If the save is successful, the distance is reduced by the difference between the attacker’s skill rank and defender’s save score. It can affect up to medium-sized targets or up to four hundred pounds, with a -4 modifier per size category increase or a -2 modifier per additional two hundred pounds, based on the situation. It appears as a blur of motion (the color and shape of which is defined by the character) between the attacker and target. If the skill check fails, there is no effect on the target’s position.
Specialization: None
Attribute: Influence
Type: Attack
Time: One Action
Description: Characters with this skill can focus their mind to repel unanchored people or objects a distance away, without causing damage. With a successful skill check, the target is pushed backwards a number of yards equal to Influence plus 1 yard per 2 points in the skill tree. Defenders get a base damage save and anchored objects get a structural strength save, if the save is successful the distance is reduced by the difference between the attacker’s skill rank and defenders save score. It can affect up to medium-sized targets or up to four hundred pounds, with a -4 modifier per size category increase or a -2 modifier per additional two hundred pounds, based on the situation. It appears as a blur of motion (the color and shape of which is defined by the character) between the attacker and target. If the skill check fails, there is no effect on the target’s position.
Specialization: None
Attribute: Knowledge
Type: Utility
Time: N/A
Description: Those with this skill can increase the amount of time a Passive Duration spell affects the target. After successfully casting a Passive Duration spell with any Casting skill in this tree, the caster can then layer the same spell atop of it with another casting, adding the spell duration to the existing duration. The casting time for additional layers is reduced by one action, and a number of layers may be added based on the Character Rank – Novice 1, Expert -2 Master -3, Epic -4. So long as the target is under the effect of the original casting, there is no save against the layering effect. Spell details can be found in the Core Rules: Magic Users section.
Tactical Use: After an Imprison spell is cast (3 actions) and the target fails the Stamina save, the effect lasts a number of rounds based on the character’s Constitution score /2 (example: 4). In the next round, a second Imprison spell is cast (2 actions) on the same target, adding the spell duration (4 rounds) to the remaining number of rounds in the existing duration (3 rounds), for a total of 7 rounds.
Specialization: (Required) Magical Foundation, i.e. Mystic, Land Strider, Wind Rider, Fire Walker, Wave Runner
Attribute: Perception
Type: Move
Time: One Action
Description: This skill includes training in dangerous and risky maneuvers that are used to gain a positional advantage. They can be used for an angular advantage relative to a target to make attacks, to make countermoves to hold, maintain, or break a positional advantage, or to disengage and make an escape. Each maneuver has a set of variables that effects position or carries modifiers to attack, defend, or move skills (see Flight-to-Flight and Flight-to-Ground rules for more information). If the skill check is successful, the maneuver succeeds and the variable is applied, otherwise there is an action of movement and a likely loss of control that could lead to a collision or crash. This skill is specific to a method of mobility and it can be taken multiple times.
Prerequisites: The Combat Gambits skill and eight points in the skill tree
Attribute: Perception
Type: Move
Time: One Action
Description: This skill includes training in advanced tactical maneuvers that are used to gain a positional advantage. They can be used for an angular advantage relative to a target to make attacks, to make countermoves to hold, maintain, or break a positional advantage, or to disengage and make an escape. Each maneuver has a set of variables that effects position or carries modifiers to attack, defend, or move skills (see Flight-to-Flight and Flight-to-Ground rules for more information). If the skill check is successful, the maneuver succeeds and the variable is applied, otherwise there is an action of movement and possible loss of control that could lead to a collision or crash. This skill is specific to a method of mobility and it can be taken multiple times.
Prerequisites: The Combat Maneuvers skill and four points in the skill tree
Attribute: Strength
Type: Attack
Time: One Action
Description: With this skill, the character can make a coordinated damaging attack with the unarmed or grasping appendages of a vehicular suit. The attack is made by striking with two appendages at the same time, causing additional damage equal to the number of points in the skill trees. This can be a punching strike, lashing strike, chopping motion, or crushing squeeze, depending on the appendage and its capabilities, with all related and general combat modifiers applied normally. If the skill check fails or the target successfully defends, the attack misses.
Prerequisites: The Clobber skill plus four points in the skill tree
Attribute: Constitution
Type: Move
Time: N/A
Description: Those with this skill can move at their full normal rate for up to one hour per skill point in the skill tree, without suffering fatigue modifiers. Exceeding the total number of rounds will require at least one minute of rest afterwards to avoid entering a fatigue state. All carrying capacity modifiers are applied normally. The difficulty is based on the type of terrain and amount of weight being carried.
Specialization: None
Attribute: Influence
Type: Utility
Time: Four Actions
Description: Characters use this skill to ask the entity to whom they have devoted themselves to absolve their sacrifice. With a successful skill check, they are healed of one effect based on Character Rank, including, cleansing of a poison or disease (Novice), restoring full Health (Expert), or healing all lost body points (Master). If the skill check fails, the plea goes unheard. Three consecutive failures will require further liturgy after the communal state ends before trying again. The use of this skill begins a communal state.
Specialization: (Required) Deity or entity
| Vessel: | Sharpening Stone |
| Sigil: | Enhancement |
| Material: | Mundane |
| Craft Skill: | Sculpting |
| Duration: | Passive |
| Casting Time: | Special |
Description: This sigil is carved into a common sharpening stone and is activated before being used to grind and hone a sharp-edged weapon. Once complete, the sigil fades from the stone and appears along the sharpened edge of the weapon, increasing the critical strike range by three (3) for a number of days equal to Runecaster’s Constitution score, after which time the sigil fades from the weapon. This rune may not be used with blunt weapons.
| Vessel: | Fire Opal |
| Sigil: | Protection |
| Material: | Crafted |
| Craft Skill: | Lapidary |
| Duration: | Passive |
| Casting Time: | One Action |
Description: This rune is used to provide heat and warmth without the need for a fire. The vessel is a polished Fire Opal shaped into an oval with the sigil cut into one side. When activated it provides heat in a two (2) yard area around the rune vessel for a number of hours equal to the Ruinecaster’s Constitution score. The vessel gives off a soft orange glow and is warm to the touch, but is not visible at a distance.
| Vessel: | Weapon Effigy or Individual |
| Sigil: | Tempest |
| Material: | Crafted or Dermis |
| Craft Skill: | Engraving or Tattooing |
| Duration: | Active |
| Casting Time: | One Action |
Description: This rune is used to inflict damage the Runecaster takes back on the attacker. The vessel is a weapon effigy inset with the sigil, that is typically worn as a broach or belt buckle, alternately, an individual may be tattooed with the image of a bladed weapon, with the sigil inside the blade. When activated, half of the total amount of damage that is actually sustained by the Runecaster (after any damage resistance checks) is transferred back to the attacker. If it is an odd number, the Runecaster will take the leftover point. There is no damage resistance save against this rune.
| Vessel: | Object or Individual |
| Sigil: | Enhancement |
| Material: | Crafted or Derma |
| Craft Skill: | Engraving or Tattooing |
| Duration: | Active |
| Casting Time: | One Action |
Description: Few things are more impressive than a brawny Runecaster covered in tattoos, charging into battle, but watching as their rippling musculature expands in size certainly qualifies. The vessel is a bent iron bar secured around the neck on a chain and engraved with the sigil, alternately, an individual may have the sigil tattooed on the chest, with related decoration extending to the arms. When active, it increases their Strength attribute score by four for the purposes of causing damage and making Strength based skill checks. The rune has no effect on damage resistance, hit points, or other such attribute factors.
| Vessel: | Flawless Rare Gem |
| Sigil: | Tempest |
| Material: | Crafted |
| Craft Skill: | Lapidary |
| Duration: | Active |
| Casting Time: | Special |
Description: This taboo rune is used to draw the spirit from a living being and bind it into a rare flawless uncut gem for use in creating permanent effects, such as magic items. The process takes several hours, during which the sigil must be repeatedly and perfectly craft into the gem, requiring a minimum of eight (8) skill points in the Crafting skill tree. Once the spirit is housed in the gem, it could be cut and crafted into items or armaments. Due to the moral implication of spiritual transference, this rune is known to exist, but anyone seeking to learn it must locate a source from which it can be learned.
| Vessel: | Object or Individual |
| Sigil: | Enhancement |
| Material: | Crafted or Derma |
| Craft Skill: | Lapidary or Tattooing |
| Duration: | Active |
| Casting Time: | One Action |
Description: This rune offers the Runecaster the ability to see through doors, walls, and most other such structures. The vessel is a single-shaped glass lens housed in a precious metal frame, with the sigil cut into the lens, alternately, the individual may be tattooed with the sigil around one eye. When activated, and the object is held up to the eye, the Runecaster can observe the activity adjacent to a wall, door, etc., within their normal field of vision assuming there is sufficient available light.
| Vessel: | Object |
| Sigil: | Tempest |
| Material: | Crafted |
| Craft Skill: | Engraving |
| Duration: | Active |
| Casting Time: | One Action |
Description: Very effective in times of war, this sigil is engraved onto rams and other battering devices, but may also be used on blunt weapons. When activated, it can be used to effectively smash inanimate objects, such as walls or doors, ignoring their structural strength to resist damage. The sigil must be carved near the head, and it will fade once the effect ends or is interrupted.
| Vessel: | Variable |
| Sigil: | Tempest |
| Material: | Crafted |
| Craft Skill: | Engraving |
| Duration: | Passive |
| Casting Time: | Four Actions |
Description: A total of four sigils are engraved within a decorative pattern on a door, coffer, chest, or other types of closing container, creating a magic seal that may only be opened with a Freedom rune. Without this runic key, all attempts to open the lock by normal means will fail, though if the sigils are marred by time or damage the magic will fade, and it does nothing to prevent the door or container from being destroyed. So long as one sigil remains intact, the lock remains in place.
| Vessel: | Weapon |
| Sigil: | Protection |
| Material: | Crafted |
| Craft Skill: | Engraving |
| Duration: | Passive |
| Casting Time: | One Action |
Description: Once the sigil has been crafted onto a weapon, no one other than the Runecaster can wield it. Targets suffer a very difficult (-8) modifier to any skill attempt with the weapon, finding that it is difficult to grip, unwieldy, off-balanced, and will turn as it strikes to cause half weapon damage. The sigil must be engraved near handholds, within in a decorative pattern, and inset with precious metal.
| Vessel: | Iron Link or Individual |
| Sigil: | Protection |
| Material: | Crafted or Derma |
| Craft Skill: | Engraving or Tattooing |
| Duration: | Active |
| Casting Time: | One Action |
Description: A powerful protective rune that has gone a long way in promoting the tales of resilient Runecasters, once cast the wielder may ignore up to four points of impact damage. The rune vessel is a single black iron chain link with the sigil carved into the inside edge and is secured around the neck or wrist on a leather strap, alternately, the individual may be tattooed with the image of a chain, with the sigil inside one link. This rune does not stack with similar types of magical protection.
| Vessel: | Malachite |
| Sigil: | Tempest |
| Material: | Crafted |
| Craft Skill: | Engraving |
| Duration: | Active |
| Casting Time: | One Action |
Description: This rune may be dropped into a pool or stream of contaminated water to make it suitable for drinking. The vessel is a rounded piece of polished malachite, with the sigil engraved into its surface. Water up to a one (1) yard area around the vessel will remain drinkable so long as the sigil is active, even in moving water.
| Vessel: | Small Corked Bottle |
| Sigil: | Tempest |
| Material: | Crafted |
| Craft Skill: | Artistry, Lapidary |
| Duration: | Passive |
| Casting Time: | One Action |
Description: This rune is used to send a message by speaking both the name of the target and the message into the bottle, replacing the cork, and tossing it into the air. The bottle is magically transported to the target, sitting in plain view. If not opened, the bottle will continue to follow the target, always just sitting in plain view. When the cork is opened, the message is clearly relayed in the Runecaster’s voice. The sigil must be drawn on a piece of paper within the bottle and carved onto the surface of the bottle. After delivery, both sigils fade away.
| Vessel: | Skeleton Key |
| Sigil: | Tempest |
| Material: | Crafted |
| Craft Skill: | Engraving |
| Duration: | Active |
| Casting Time: | One Action |
Description: This rune is used to loosen bindings, release shackles, open locks, etc, simply by touching the key to the object. The key must be forged from iron or silver with sigils engraved onto both sides. When used against magical locks or devices, the object is allowed a save to resist the effect. The magic fades after each individual use and must be recast.
| Vessel: | Gemstone |
| Sigil: | Tempest |
| Material: | Crafted |
| Craft Skill: | Lapidary |
| Duration: | Active |
| Casting Time: | One Action |
Description: The sigil is cut into a perfectly round, opaque gem of moderate worth that may be crafted into jewelry or stand on its own. The rune aids in negotiation, bluff, and related skills by enthralling the target, and making them susceptible to suggestion. The rune vessel must be in plain sight and the target gets a Willpower save to negate the effect, but if it fails the target will go along with non-life-threatening suggestions.
| Vessel: | Melee Weapon |
| Sigil: | Tempest |
| Material: | Crafted |
| Craft Skill: | Engraving |
| Duration: | Active |
| Casting Time: | One Action |
Description: A vicious sigil that is engraved into a weapon, based on Character Rank, i.e., Novice – small, Expert – Medium, Master – large. When imbued with magic and tossed into the air, the weapon will attack on its own as verbally directed by the Runecaster. The casting skill is used to hit, causing weapon damage plus the Influence score, and attacking up to twice per round, with other factors per the weapon. The caster may use a number of weapons in this manner based on Character Rank, i.e., Novice 1, Expert 2, Master 3, though each must be directed individually.
| Vessel: | Small stone |
| Sigil: | Divination |
| Material: | Mundane |
| Craft Skill: | Sculpting |
| Duration: | Passive |
| Casting Time: | One Action |
Description: The sigil is carved into the stone. When activated, a specific destination is whispered to the stone and it is set down onto the ground, and it will then begin to hop in the most direct route to that location at a speed of 5/20, and will not stop until it arrives. When the magic ends, whether by arriving at the destination or being interrupted, the stone crumbles to dust.
| Vessel: | Object |
| Sigil: | Tempest |
| Material: | Crafted |
| Craft Skill: | Artistry |
| Duration: | Passive |
| Casting Time: | One Action |
Description: This sigil is used to change the shape of some tiny, small, or medium-sized object for the purpose of disguise or deception. Rather than carved, the sigil is drawn onto the object with ash or chalk, and when activated the object is changed into some other form. While the texture and composition may be altered, its size and weight will remain proportional. The change is literal, not illusional, so it will survive any degree of non-magical scrutiny, though the drawn sigil will remain on the object. The effect is broken if the sigil is marred, or the magic is dispelled. Although this rune may be used on magic items, for these the sigil must be drawn in precious metal dust and it may get one a save to resist the change effect, depending on the nature and power of the item.
| Vessel: | Gemstone |
| Sigil: | Tempest |
| Material: | Crafted |
| Craft Skill: | Lapidary |
| Duration: | Active |
| Casting Time: | One Action |
Description: Crafted from a bright and colorful multifaceted gem with a sigil cut into opposing sides. Once activated the rune may be thrown at an opponent, requiring a Thrown Weapons or similar skill check to hit the target. On a hit, the gem will shatter into dust, blinding them for three rounds (very difficult -8 modifier to all attack, defend, and move actions). If it does not hit, the magic fades and it may be collected and used again.
| Vessel: | Statue |
| Sigil: | Tempest |
| Material: | Crafted |
| Craft Skill: | Engraving |
| Duration: | Active |
| Casting Time: | Four Actions |
Description: Although the vessel is listed as a statue, virtually any crafted humanoid or animal form can be animated. The caster is required to place four sigils, inset with a precious metal (typically gold), onto the torso near the limbs, and activate each individually. Once all runes have been activated, the statue will obey the verbal orders of the Runecaster and remain active for up to one hour per point in the Constitution score. While it does not have the reflexes to effectively attack, it can be used to break down doors or even walls, and carry loads equal to its weight at a move rate of 4/20.
| Vessel: | Mug |
| Sigil: | Divination |
| Material: | Crafted |
| Craft Skill: | Engraving |
| Duration: | Passive |
| Casting Time: | One Action |
Description: The sigil for this rune can be carved unto any mug, though Runecasters typically carry their own. Once activated, this rune detects and alerts the Runecaster to the presence of poisons or toxins placed within by causing the mug to shatter. This rune can be used on bowls, plates, pots, etc, with the same effect, and will remain active in a dormant state for up to one hour per point in the Constitution score after a successful cast, after which time the effect ends.
| Vessel: | Stone |
| Sigil: | Divination |
| Material: | Mundane |
| Craft Skill: | Sculpting |
| Duration: | Passive |
| Casting Time: | Three Rounds |
Description: The vessel is typically a small notched circular stone with the sigil sculpted at the center. After casting, the rune must be carried around the perimeter of the campsite or other locale that covers an area up to the Influence score in yards and then is set on the ground near the Runecaster. The casting state ends after six rounds and the vessel lies dormant until a being passes through the walked perimeter with a minimum size based on character rank, i.e., Novice – medium size, Expert – small size, Master – Tiny size, at which point the rock will strike the Runecaster repeatedly until they awaken. Once the Runecaster picks up the stone, the effect ends.
| Type: | Utility |
| Domain: | Control |
| Range: | Touch |
| Area of Effect: | Individual |
| Duration: | Instant |
| Components: | V, S, M |
| Casting Time: | Two Actions |
| Resistance: | N/A |
Description: This spell is used to heal severe hindering physical effects. The caster is required to touch the target and may choose to restore a number of body points equal to the Healing Rate plus 1 Novice, 2 Expert, 3 Master, remove the effects of poisons, cure those afflicted with a disease, or restore the recently dead to life – this may only be attempted one time, a system shock Stamina save is required, and if successful the target gains one (1) body point. Those knocked out from taking damage are revived upon being healed, though the character must wait until their initiative turn to stand from prone. When cast, a burst of spherules engulfs the target, fading at the end of the round.
| Type: | Defend |
| Domain: | Change |
| Range: | Reach |
| Area of Effect: | Individual |
| Duration: | Passive |
| Components: | V, S, M |
| Casting Time: | Three Actions |
| Resistance: | Special |
Description: Using the caster’s knowledge of the natural world, this spell camouflages the target in nature. It allows for an opposed save to any Observation or Search skill checks based on the magic skill rank used in the casting (it is used as a saving throw and doesn’t require an action). The target is ignored by living beings and doesn’t leave a trace of their passage. Spherules accompany the target for the duration of the spell.
| Type: | Utility |
| Domain: | Control |
| Range: | Touch |
| Area of Effect: | Individual |
| Duration: | Instant |
| Components: | V, S, M |
| Casting Time: | One Action |
| Resistance: | N/A |
Description: This spell is used to heal a number of health points based on Character Rank. The caster is required to touch the target, restoring the Healing Rate plus 2 Novice, 4 Expert, 6 Master. Those knocked out from taking damage are revived upon being healed, though the character must wait until their initiative turn to stand from prone.
| Type: | Attack |
| Domain: | Control |
| Range: | Reach |
| Area of Effect: | Individual |
| Duration: | Instant |
| Components: | V, S, M |
| Casting Time: | Two Actions |
| Resistance: | Willpower negates |
Description: Useful against the undead, this spell focuses the life energy on locating the bound spirit and releasing it from the rotting prison of the body. While it will effectively destroy rotters, once under the effect of the spell feeders must choose to be free of the body and cannot be forced from it. The shock of potential release will, however, leave them stunned for a period of time, based on Character Rank, i.e., Novice 1, Expert 3, Master 5, though the stun effect immediately ends if the target is struck. When the spell is cast, the spherules engulf the undead, if the initial save is successful the spherules will fall lifeless to the ground, but if it fails, they explode outward with the release and the corpse crumples to the ground.
| Type: | Attack (L) |
| Domain: | Change |
| Range: | Reach |
| Area of Effect: | Individual |
| Duration: | Passive |
| Components: | V, S, M |
| Casting Time: | Two Actions |
| Resistance: | N/A |
Description: Useful against the undead, this spell draws on the living essence of nature to temporarily restore life to the undead. Once cast, the target is transformed into a living being, negating the damage resistance and immunity to critical hits abilities that the undead gain for the duration of the spell. This spell does not change the nature of the undead nor does it restore their living mental state, rather it is a temporary physical transformation that makes them more vulnerable to attack, however, it can be used against some feeders for roleplaying purposes. When cast, spherules will engulf the target to trigger the transformation, remaining as a halo around them for the duration of the spell.
| Type: | Attack |
| Domain: | Divination |
| Range: | Personal |
| Area of Effect: | Locus |
| Duration: | Passive |
| Components: | V, S, M |
| Casting Time: | Two Actions |
| Resistance: | None |
Description: When cast, spherules begin to spin around the caster covering an area equal to the Influence score /2, alighting upon any of one type of being as selected by the caster, i.e., Animal, Enemy, or Monster. From that point until the spell effects ends, the caster maintains an awareness of the locations, movements, and general well-being of the target(s) so long as they remain within a 100-yard radius. The spherules will be visually present on the target for the duration of the spell. Those who are magically hidden or camouflaged are allowed a save per the capabilities and type of magic.
| Type: | Attack |
| Domain: | Divination |
| Range: | Reach |
| Area of Effect: | Individual |
| Duration: | Instant |
| Components: | V, S, M |
| Casting Time: | One Action |
| Resistance: | Willpower negates |
Description: This spell provides the caster with biological information about the target. With each casting, the character can choose to determine one of the target’s capabilities, i.e., Armor, Attack Abilities, Defend Abilities, Tactical Abilities, or Weaknesses, determine their stance towards the group, i.e., loyal, friendly, cordial, neutral, reserved, antagonistic, or hostile, or ascertain their physical condition by color, i.e., ⅔ to full health – green, ⅓ to ⅔ health – yellow, less than ⅓ health – red. When cast, the spherules briefly link from caster to target, typically surrounding the area to be identified, i.e., specific capability, heart, head, etc.
| Type: | Attack |
| Domain: | Create |
| Range: | Reach |
| Area of Effect: | Locus |
| Duration: | Passive |
| Components: | V, S, M |
| Casting Time: | Two Actions |
| Resistance: | Reaction |
Description: This spell creates a yellow-green fog that smells heavily of rotting flesh, freshly turned dirt, and old stone. The combination of odors is overwhelming to living creatures and anyone in the defined area must make a Reaction save, if successful they may use move actions to escape the AoE. Those unable to escape become violently ill and remain prone until the duration ends or they are removed from the cloud from someone else. The material components are a cut of rotting flesh, dirt from a graveyard, and a chunk of gravestone held in the palm of the hand and used up during the casting.
| Type: | Defend |
| Domain: | Summon |
| Range: | Personal |
| Area of Effect: | Individual |
| Duration: | Passive |
| Components: | V, S, M |
| Casting Time: | One Action |
| Resistance: | N/A |
Description: This is a shadowy field that engulfs the Death Eater, providing them with a displacement protection from attack. When cast, an amorphous blackness covers an area one yard around the caster shrouding their location, with shadowy arms that will reach for any living being that’s in range. Any targeted range or melee attack made against the caster is subject to a defend check against the skill used to cast the spell, and if successful, the attack misses, and magic attacks with an AoE of Individual cannot target the caster. However, it is not effective against area attacks. The material component is a used death shroud that is worn over the shoulders.
| Type: | Attack |
| Domain: | Change |
| Range: | Touch |
| Area of Effect: | Individual |
| Duration: | Passive |
| Components: | V, S, M |
| Casting Time: | Two Actions |
| Resistance: | Stamina negates |
Description: When this spell is cast, the target is touched by death energy, causing them to collapse and begin to rapidly rot. The effect lasts a number of rounds based on the caster’s Character Rank, i.e., Novice 3, Expert 6, Master 12, Epic 24, with the rot escalating the longer it lasts, i.e., bloated and graying flesh, becoming desiccated, leaving only the skeleton, and crumbling to dust. The target feels these sensations as they occur, but is restored to normal after the effect ends. Should anyone touch or strike the target, the effect immediately ends – because of this, those under the effect of this spell are not subject to kill shots. The material component is a small marble figurine wrapped in dried flesh (used up) that is held in the palm during casting.
| Type: | Attack |
| Domain: | Control |
| Range: | Personal |
| Area of Effect: | Group |
| Duration: | Passive |
| Components: | V, S, M |
| Casting Time: | Two Actions |
| Resistance: | Willpower negates |
Description: This spell is used to make those in an area around the caster equal to the Influence score /2 feel insecure or inferior, with an air of intimidating power or merely a sense that something is wrong. In addition to causing folk to maintain a wide berth and spooking animals, requiring a morale check or Handle Animal check to keep them from fleeing. In combat, the spell gives anyone in the AoE a modifier to all attack, defend, or move actions based on Character Rank, i.e., Novice -2, Expert -4, Master -6, Epic -8. In roleplay situations, the spell offers the caster a bonus modifier to Influence based attacks (non-psionic) equal to the Character Rank, i.e., Novice +2, Expert +4, Master +6, Epic +8. The material component is an eyeball that is held in the palm and used up during casting.
| Type: | Attack |
| Domain: | Control |
| Range: | Reach |
| Area of Effect: | Individual |
| Duration: | Active |
| Components: | V, S, M |
| Casting Time: | Two Actions |
| Resistance: | Reaction negates |
Description: When this spell is cast, the target will rise up off the ground a number of yards equal to the Influence score on a column of fire the color of the caster’s focus object, negating the ability to take move or defend actions or engage in melee combat. Targets on the column rise and fall continuously, giving them a very difficult (-8) modifier to cast spells, make ranged attacks, or perform virtually any other attack or utility action. In addition, they are engulfed in uncomfortable hot magical flames that cause eight (8) points of elemental damage anytime an action is attempted. When the spell duration ends, the target will fall, suffering normal falling damage.
| Type: | Utility |
| Domain: | Divination |
| Range: | Touch |
| Area of Effect: | Individual |
| Duration: | Passive |
| Components: | V, S |
| Casting Time: | Four Actions |
| Resistance: | N/A |
Description: Use of this spell allows the caster to understand and speak the language of the target but does not include literacy in that language. The magic is such that while every word the caster speaks has the correct pronunciation, tone, and inflection, mouth movement will not necessarily match the words spoken, making it apparent to anyone watching that there is magic involved. Languages that rely on a combination of verbalization and scent, semantics, or another similar process may be broken and hard to understand. This spell may only be cast upon willing recipients.
| Type: | Defend (L) |
| Domain: | Change |
| Range: | Personal |
| Area of Effect: | Locus |
| Duration: | Passive |
| Components: | V, S, M |
| Casting Time: | Two Actions |
| Resistance: | Reaction |
Description: With this spell the caster is able to decrease the amount of friction in the surrounding area, making it slippery. When attempting an attack, defend, or move action, those within the AoE are required to make a Reaction save (Balance or a similar skill may be used in place of the save) or fall prone. Regardless of the type of surface, there is no way to gain traction and those who fall must spend two actions to stand from prone. Those who fall in the AoE cause a splash in the color of the caster’s focus object, which remains on them through the following round. The caster is immune to the effect, though it does not move with them.
| Type: | Attack |
| Domain: | Damage |
| Range: | Touch |
| Area of Effect: | Object |
| Duration: | Instant |
| Components: | V, S |
| Casting Time: | Two Actions |
| Resistance: | Special |
Description: When cast, this spell will cause solid items of up to 1 yard in size to become very brittle, allowing them to be easily shattered with minimal pressure. This spell is effective against dead woods, gems, metals, and stone, however, it may not be used on living wood and sentient or animated gems, metals, and stone. The caster must be able to touch the item to be shattered and remain in contact with it for the casting time, after which it shatters like glass when struck. At Novice level, a normal object gets a structural strength save and masterwork items and magic items are unaffected, while at Expert level normal items get no save, masterwork items get a structural strength save, and magic items are unaffected, and at Master level normal and masterwork items get no save, and magic items get a structural strength save.
| Type: | Utility |
| Domain: | Summon |
| Range: | Special |
| Area of Effect: | Object |
| Duration: | Instant |
| Components: | V, S, M |
| Casting Time: | Four Actions |
| Resistance: | N/A |
Description: This spell is used to magically carry a message or some tiny object to another being at any distance away. When the spell is cast, a magic figure in the form of their focus object is summoned and takes the item that is to be delivered. The general location of the recipient must be known and it can only be delivered to a person who is known to the caster. When the message or object is delivered, it’s left in a location near the recipient, such as in a pocket where it can be easily discovered.
| Type: | Defend |
| Domain: | Control |
| Range: | Personal |
| Area of Effect: | Individual |
| Duration: | Instant |
| Components: | V, S |
| Casting Time: | One Action |
| Resistance: | Special |
Description: A defensive spell that’s used to block a spell and redirect the energies back at the caster. It may be used to counter reach spells that have been cast directly at the caster and is not effective against touch or locus area type spells. This is a defensive spell, should the attempt fail, all normal saves apply. However, when successful, a Novice level caster can reflect the magic back in its current form with any applicable effects (all saves apply per the reflected spell), while an Expert level caster can reflect back any unmodified reach attack spell available in the caster’s spellbook as a single action, and a Master level caster can redirect a modified spell at any target as a single action, though this requires an appropriate casting skill check to modify the spell.
| Type: | Defend (L) |
| Domain: | Create |
| Range: | Personal |
| Area of Effect: | Locus |
| Duration: | Passive |
| Components: | V, S, M |
| Casting Time: | Two Actions |
| Resistance: | N/A |
Description: This spell fills the area surrounding the caster with a raging blizzard of snow, that shimmers in the color of their focus object and completely masks the area of effect. Although the caster can see normally, all others inside the AoE are blinded, i.e. a very difficult (-8) modifier to attack, defend, and move actions that require vision, in addition, due to the atmospheric cover, all those inside get a passive difficult (-4) modifier to be hit by ranged attacks, and may only be targeted by locus area spell attacks. The effect does not move with the caster and it will dissipate after its duration expires.
| Type: | Defend (L) |
| Domain: | Create |
| Range: | Personal |
| Area of Effect: | Locus |
| Duration: | Passive |
| Components: | V, S, M |
| Casting Time: | Two Actions |
| Resistance: | N/A |
Description: Those with this spell generate a mini quake that kicks up a thick cloud of dust around the caster, in the color of their focus object, which completely masks the area of effect. Although the caster can see normally, all others inside the AoE are blinded, i.e. a very difficult (-8) modifier to attack, defend, and move actions that require vision, in addition, due to the atmospheric cover, all those inside get a passive difficult (-4) modifier to be hit by ranged attacks, and may only be targeted by locus area spell attacks. The effect does not move with the caster and it will dissipate after its duration expires.
| Type: | Defend (L) |
| Domain: | Create |
| Range: | Personal |
| Area of Effect: | Locus |
| Duration: | Passive |
| Components: | V, S, M |
| Casting Time: | Two Actions |
| Resistance: | N/A |
Description: With this spell, the area surrounding the caster is filled with a thick black smoke and hints of flames the color of the caster’s focus object, which completely masks the area of effect. Although the caster can see normally, all others inside the AoE are blinded, i.e. a very difficult (-8) modifier to attack, defend, and move actions that require vision, in addition, due to the atmospheric cover, all those inside get a passive difficult (-4) modifier to be hit by ranged attacks, and may only be targeted by locus area spell attacks. The effect does not move with the caster and it will dissipate after its duration expires.
| Type: | Defend (L) |
| Domain: | Create |
| Range: | Personal |
| Area of Effect: | Locus |
| Duration: | Passive |
| Components: | V, S, M |
| Casting Time: | Two Actions |
| Resistance: | N/A |
Description: When cast, a dark, thunderous cloud that flashes lightning in the color of the focus object covers the area surrounding the caster, cloaking it in darkness. Although the caster can see normally, all others inside the AoE are blinded, i.e. a very difficult (-8) modifier to attack, defend, and move actions that require vision, in addition, due to the atmospheric cover, all those inside get a passive difficult (-4) modifier to be hit by ranged attacks, and may only be targeted by locus area spell attacks. The effect does not move with the caster and it will dissipate after its duration expires.
| Type: | Defend (L) |
| Domain: | Create |
| Range: | Personal |
| Area of Effect: | Locus |
| Duration: | Passive |
| Components: | V, S, M |
| Casting Time: | Two Actions |
| Resistance: | N/A |
Description: This spell surrounds the caster with colorful rotating lights, flashes, and sparks, in the shape and color of their focus object, completely masking the area of effect. Although the caster can see normally, all others inside the AoE are blinded, i.e. a very difficult (-8) modifier to attack, defend, and move actions that require vision, in addition, due to the atmospheric cover, all those inside get a passive difficult (-4) modifier to be hit by ranged attacks, and may only be targeted by locus area spell attacks. The effect does not move with the caster and it will dissipate after its duration expires.
| Type: | Move |
| Domain: | Summon |
| Range: | Touch |
| Area of Effect: | Individual |
| Duration: | Instant |
| Components: | V, S, M |
| Casting Time: | Four Actions |
| Resistance: | N/A |
Description: When cast, this spell creates a portal through the realm of magic, allowing a caster to step inside and exit in another place. The distance traveled is based on Character Rank, i.e. Novice – 1 mile per minute, Expert – 5 miles per minute, Master – 10 miles per minute, Epic – 20 miles per minutes, and for each minute spent within the realm, there is a 5% chance of attracting attention. In addition, due to the stress of travel, anyone who steps into the portal is required to make a Stamina save, those who fail enter a fatigue state, requiring an hour of rest, but acclimate after five successful saves and are no longer required to make the Stamina save. The portal appears as a rippling circle of water, those who dive in make an exaggerated splash as they enter and exit, completing the duration of travel underwater in a bubble based on the caster’s focus object.
| Type: | Move |
| Domain: | Summon |
| Range: | Touch |
| Area of Effect: | Individual |
| Duration: | Instant |
| Components: | V, S, M |
| Casting Time: | Four Actions |
| Resistance: | N/A |
Description: When cast, this spell creates a portal through the realm of magic, allowing a caster to step inside and exit in another place. The distance traveled is based on Character Rank, i.e. Novice – 1 mile per minute, Expert – 5 miles per minute, Master – 10 miles per minute, Epic – 20 miles per minutes, and for each minute spent within the realm, there is a 5% chance of attracting attention. In addition, due to the stress of travel, anyone who steps into the portal is required to make a Stamina save, those who fail enter a fatigue state, requiring an hour of rest, but acclimate after five successful saves and are no longer required to make the Stamina save. Rather than a portal, those who enter drop through soft dirt and leave a short trail of raised land after entering and before emerging, traversing through dirt for the duration of the travel time.
| Type: | Move |
| Domain: | Summon |
| Range: | Touch |
| Area of Effect: | Individual |
| Duration: | Instant |
| Components: | V, S, M |
| Casting Time: | Four Actions |
| Resistance: | N/A |
Description: When cast, this spell creates a portal through the realm of magic, allowing a caster to step inside and exit in another place. The distance traveled is based on Character Rank, i.e. Novice – 1 mile per minute, Expert – 5 miles per minute, Master – 10 miles per minute, Epic – 20 miles per minutes, and for each minute spent within the realm, there is a 5% chance of attracting attention. In addition, due to the stress of travel, anyone who steps into the portal is required to make a Stamina save, those who fail enter a fatigue state, requiring an hour of rest, but acclimate after five successful saves and are no longer required to make the Stamina save. The portal appears as hole in the ground that belches flame, and those who jump in are subject to a near scalding heat for the duration that they travel, trailing embers and smoke as they emerge.
| Type: | Move |
| Domain: | Summon |
| Range: | Touch |
| Area of Effect: | Individual |
| Duration: | Instant |
| Components: | V, S, M |
| Casting Time: | Four Actions |
| Resistance: | N/A |
Description: When cast, this spell creates a portal through the realm of air, allowing a caster to step inside and exit in another place. The distance traveled is based on Character Rank, i.e. Novice – 1 mile per minute, Expert – 5 miles per minute, Master – 10 miles per minute, Epic – 20 miles per minutes, and for each minute spent within the realm, there is a 5% chance of attracting attention. In addition, due to the stress of travel, anyone who steps into the portal is required to make a Stamina save, those who fail enter a fatigue state, requiring an hour of rest, but acclimate after five successful saves and are no longer required to make the Stamina save. The portal appears as open sky that emits a strong blowing breeze, and anyone who steps through soars/falls continuously through an unending sky while being buffeted by intense winds.
| Type: | Move |
| Domain: | Summon |
| Range: | Touch |
| Area of Effect: | Individual |
| Duration: | Instant |
| Components: | V, S, M |
| Casting Time: | Four Actions |
| Resistance: | N/A |
Description: When cast, this spell creates a portal through the realm of magic, allowing a caster to step inside and exit in another place. The distance traveled is based on Character Rank, i.e. Novice – 1 mile per minute, Expert – 5 miles per minute, Master – 10 miles per minute, Epic – 20 miles per minutes, and for each minute spent within the realm, there is a 5% chance of attracting attention. In addition, due to the stress of travel, anyone who steps into the portal is required to make a Stamina save, those who fail enter a fatigue state, requiring an hour of rest, but acclimate after five successful saves and are no longer required to make the Stamina save. The portal appears as a blue and black tear in space, and anyone who steps through is encased in a sphere based on the caster’s focus object where they witness colorful streaks of magic running in concurrent lines spread out in all directions.
| Type: | Utility (L) |
| Domain: | Create |
| Range: | Touch |
| Area of Effect: | Group |
| Duration: | Passive |
| Components: | V, S, M |
| Casting Time: | One Action |
| Resistance: | N/A |
Description: Those with this spell can illuminate one side of a focus object, talisman, small rock, or virtually any other small object to be carried or handed to an ally. It provides a cone-shaped coronal glow in an area equal to the Influence score, with a light that is of the same color as the caster’s focus object and shimmers as if underwater.
| Type: | Utility (L) |
| Domain: | Create |
| Range: | Touch |
| Area of Effect: | Group |
| Duration: | Passive |
| Components: | V, S, M |
| Casting Time: | One Action |
| Resistance: | N/A |
Description: This spell is used on the caster or an ally giving them a bioluminescent glow in the same color as the caster’s focus object, providing light in an area equal to the Influence score. If used on a foe to mark them or make them stand out, the casting skill is used for the touch attack, and the target gets a Reaction save to resist.
| Type: | Utility (L) |
| Domain: | Create |
| Range: | Touch |
| Area of Effect: | Group |
| Duration: | Passive |
| Components: | V, S, M |
| Casting Time: | One Action |
| Resistance: | N/A |
Description: When cast, this spell creates a magic flame, six inches tall, that appears as a humanoid dancer in the same color as the focus object and illuminates an area equal to the Influence score /2. If the figure is not contained in a lamp or lantern, it will attempt to set fire to flammable objects within a 1-foot area in order to propagate itself. While the initial effect doesn’t consume fuel, as it spreads, it will burn like normal fire.
| Type: | Utility (L) |
| Domain: | Create |
| Range: | Touch |
| Area of Effect: | Group |
| Duration: | Passive |
| Components: | V, S, M |
| Casting Time: | One Action |
| Resistance: | N/A |
Description: With this spell, the caster can illuminate an area equal to the Influence score, making it as bright as a sunny afternoon, without a visible light source. The spell may be cast on a focus object, talisman, small rock, or virtually any other small object to be carried or handed to an ally, but must be at least the size of a closed fist.
| Type: | Utility (L) |
| Domain: | Create |
| Range: | Touch |
| Area of Effect: | Group |
| Duration: | Passive |
| Components: | V, S, M |
| Casting Time: | One Action |
| Resistance: | N/A |
Description: This spell can be cast on a focus object, talisman, small rock, or virtually any other small object to be carried or handed to an ally. Whatever object is it cast upon, the light effect takes on the color and shape of the focus object. It provides illumination in an area equal to the Influence score /2 and doesn’t cast shadows. Alternately, it can be cast on a powdery substance and thrown into a target’s face (requires the Throw or similar skill, with normal Defend actions), blinding them for the duration of the spell or until the substance can be washed away.
| Type: | Utility |
| Domain: | Control |
| Range: | Personal |
| Area of Effect: | Individual |
| Duration: | Active |
| Components: | V, S |
| Casting Time: | Two Actions |
| Resistance: | N/A |
Description: With the use of this spell, the caster is able to vanish from sight by cloaking their physical form within their particular realm of magic. The spell effect is visual only and will not conceal them from any other senses, i.e. drawing a weapon or clanging armor will still make sounds; footsteps will still appear in the dirt, mud, etc. Any gear worn by the caster at the time of the casting remains invisible so long as it remains in contact with the caster, becoming immediately visible upon leaving their person, i.e. a fired arrow, visual spell effect, dropped weapon, etc. In melee or ranged combat, an invisible character may attack as if the target is prone, gaining a Simple (+4) modifier to the first attack action, and the defender has a difficult (-4) modifier to any attack and defend actions while in combat with the invisible character. Invisible targets are allowed a defend save against an Observation, Search, or similar skill check based on the magic skill rank used in the casting that doesn’t require an action. This spell is not effective against those using means other than sight for location.
| Type: | Attack (L) |
| Domain: | Change |
| Range: | Touch |
| Area of Effect: | Individual |
| Duration: | Passive |
| Components: | V, S, M |
| Casting Time: | Three Actions |
| Resistance: | Stamina Negates |
Description: With this spell, the caster is able to engulf the target in the realm of water and encase them in ice that shimmers with the same color as their focus object. The ice left behind is an exact representation of the target, but is fragile and may be destroyed easily without affecting the target. For the duration of the spell, the target is unable to move and doesn’t perceive the passage of time. Once the spell expires, the target returns to the same place and in the same position from which they vanished.
| Type: | Attack (L) |
| Domain: | Change |
| Range: | Touch |
| Area of Effect: | Individual |
| Duration: | Passive |
| Components: | V, S, M |
| Casting Time: | Three Actions |
| Resistance: | Stamina Negates |
Description: Those with this spell can engulf the target an effect that is the same color and/or texture as their focus object, making them appear to have turned to stone while trapping them in the realm of land. While the statue left behind is an exact representation, it is fragile and can be destroyed easily, without affecting the trapped target. For the duration of the spell, the target is unable to move and doesn’t perceive the passage of time. Once the spell expires, the target returns to the same place and in the same position from which they vanished.
| Type: | Attack (L) |
| Domain: | Change |
| Range: | Touch |
| Area of Effect: | Individual |
| Duration: | Passive |
| Components: | V, S, M |
| Casting Time: | Three Actions |
| Resistance: | Stamina Negates |
Description: When cast, this spell engulfs a target in a fire that burns the same color as their focus object, making them appear to turn to ash and fall away, and temporarily trapping them in the realm of fire. For the duration of the spell, the target is unable to move and doesn’t perceive the passage of time. Once the spell expires, the target returns to the same place and in the same position from which they vanished.
| Type: | Attack (L) |
| Domain: | Change |
| Range: | Touch |
| Area of Effect: | Individual |
| Duration: | Passive |
| Components: | V, S, M |
| Casting Time: | Three Actions |
| Resistance: | Stamina Negates |
Description: This spell enables a caster to push a target partway into the realm of air, trapping them between realms, and leaving a ghostly appearance behind. A wind swirls from the caster’s focus object to surround the target and once trapped, they cannot move from that spot and any movements they make are exaggeratedly slow for the duration of the spell. Once the spell expires, the target returns to a solid form.
| Type: | Attack (L) |
| Domain: | Change |
| Range: | Touch |
| Area of Effect: | Individual |
| Duration: | Passive |
| Components: | V, S, M |
| Casting Time: | Three Actions |
| Resistance: | Stamina Negates |
Description: With this spell, the caster is able to temporarily place the target in the realm of magic, literally causing them to disappear in a flourish of light and sound that has the same color and/or shape as the caster’s focus object. For the duration of the spell, the target is unable to move and doesn’t perceive the passage of time. Once the spell expires, the target returns to the same place and in the same position from which they vanished.
| Type: | Utility |
| Domain: | Divination |
| Range: | Special |
| Area of Effect: | Individual or Object |
| Duration: | Instant |
| Components: | V, S, M |
| Casting Time: | Four Actions |
| Resistance: | Willpower |
Description: Casters can use this spell to locate almost anything or anyone by direction. It is cast on a specially prepared needle that has a pointed and blunt end, is crafted from a precious metal, and hangs on a chain, floats in a bowl, or is otherwise free to rotate (if not it can only indicate two-dimensional directions). The caster must have specific details of an object or the true name of the individual before casting the spell. When cast the needle will point in the direction of the subject for that round, and the target is allowed a Willpower save to feel the scry attempt. Because a brief magical link is being established through this spell, the subject can potentially use Detect Magic to get information on the caster, especially if this spell is used at regular intervals.
| Type: | Attack |
| Domain: | Change |
| Range: | Reach |
| Area of Effect: | Special |
| Duration: | Instant |
| Components: | V, S |
| Casting Time: | One Action |
| Resistance: | None |
Description: This spell is used to dispel or destroy magic that has been cast by another. Any active or passive spell can be dispelled, so long as the caster is of the same or higher Character Rank than the original caster. If successful, the effect will immediately end, and an impression of the dispeller’s skill level will wash over the original caster. If the attempt is unsuccessful, the caster can’t make another attempt to dispel that particular spell for the rest of the encounter. Destroying a magic item requires the caster to be of Master Character Rank or higher, takes a full round to cast, and the item must be held in the caster’s hands. Minor magic has a difficult modifier, while Medium magic has a very difficult modifier. Major magic cannot be destroyed with this spell.
| Type: | Utility |
| Domain: | Divination |
| Range: | Reach |
| Area of Effect: | Individual or Object |
| Duration: | Instant |
| Components: | V, S, M |
| Casting Time: | One Action |
| Resistance: | None |
Description: This spell can be used to reveal the details of a magic item (powers, augment level, etc.) and the temperament of a spirit bound to an item, based on Character Rank, i.e. minor powers at Novice, medium powers at Expert, and major powers at Master. In addition, it may be used to identify a caster’s specialization, any active or passive spells currently cast, or the presence of magic items, though the caster must be of equal or lower Character Rank. There is a drawback to this spell, while it offers information, it will also alert the target caster to the detection and provide similar information if the caster is of greater Character Rank.
| Type: | Attack |
| Domain: | Control |
| Range: | Reach |
| Area of Effect: | Individual |
| Duration: | Instant |
| Components: | V, S |
| Casting Time: | One Action |
| Resistance: | Willpower Negates |
Description: Casters use this spell to disorient the target, causing them to lose their next four actions and disrupt any active spells. This effect will carry over from one round to the next round if one or more actions have been used in the round it was cast. Those affected immediately halt all movement, drop any active spells, and stop any attack or defend actions, in addition, those riding must make a Reaction save to avoid falling. The spell is broken if the target is struck, whether or not they sustain any damage, because of that, those affected by this spell are not susceptible to a kill shot.
| Type: | Utility (L) |
| Domain: | Change |
| Range: | Personal |
| Area of Effect: | Individual |
| Duration: | Passive |
| Components: | V, S, M |
| Casting Time: | Four Actions |
| Resistance: | N/A |
Description: Casters may use this spell to alter their appearance, height, weight, and form. The changes are aesthetic and don’t affect scale, attack, or defend abilities. Travel abilities may be granted, however, including gallop (Move x2), flight (Move x4), burrow (Move x ½), swimming (Move x2), or wall-crawling (Move). Armor, gear, and weapons will be aesthetically affected by the spell to match the form, but their function is unchanged. The spell will last a number of minutes equal to the Constitution score and it can be dispelled at will. The caster’s focus object will be visible on the altered form for the duration of the spell.
| Type: | Utility (L) |
| Domain: | Create |
| Range: | Reach |
| Area of Effect: | Group |
| Duration: | Passive |
| Components: | V, S |
| Casting Time: | One Action |
| Resistance: | Special |
Description: With this spell, the caster can create a single audial, olfactory, tactile, or visual illusory effect. The type of resistance save depends on the effect. Audial effects can be used to fool, startle, or deafen a foe; all targets in the group are allowed a Willpower save to recognize a deception or a Stamina save to resist a deafening attack. Olfactory effects can be used to overwhelm a foe, causing each individual in the group to become prone from retching unless a Stamina save is made. Tactile effects can be a light touch, tickle, tap, or pinch, but do not cause damage, all targets in a group are allowed a Willpower save to recognize the deception. Visual effects are static, three-dimensional creations of up to medium scale within the spell range, each target in the group gets a Willpower save to recognize the deception. All effects last one round per rank and must be familiar to the caster.
| Type: | Defend |
| Domain: | Summon |
| Range: | Reach |
| Area of Effect: | Personal |
| Duration: | Instant |
| Components: | V or S |
| Casting Time: | One Action |
| Resistance: | N/A |
Description: With this spell, the caster is able to dive through the realm of water, instantly moving a distance of up to the Influence score in yards. It can be used as a defend action (the caster must move at least one yard) or to move tactically in an area. The caster appears to turn to water and splash down onto the ground and then rains down to reform at the new location.
| Type: | Defend |
| Domain: | Summon |
| Range: | Reach |
| Area of Effect: | Personal |
| Duration: | Instant |
| Components: | V or S |
| Casting Time: | One Action |
| Resistance: | N/A |
Description: This spell is used to drop into the realm of land and rise out of the ground at another point, instantly moving a distance of up to the Influence score in yards. It can be used as a defend action (the caster is able to blink in place) or to move tactically. When it is cast the caster appears to crumble or wilt, and will reform or re-grow in the new location.
| Type: | Defend |
| Domain: | Summon |
| Range: | Reach |
| Area of Effect: | Personal |
| Duration: | Instant |
| Components: | V or S |
| Casting Time: | One Action |
| Resistance: | N/A |
Description: Those with this spell are able to step through the realm of fire, instantly moving a distance of up to the Influence score in yards. It can be used as a defend action (the caster must move at least one yard) or to move tactically in an area. The caster appears to turn to ash when the spell is cast and emerges in the new location amid a burst of flame.
| Type: | Defend |
| Domain: | Summon |
| Range: | Reach |
| Area of Effect: | Personal |
| Duration: | Instant |
| Components: | V or S |
| Casting Time: | One Action |
| Resistance: | N/A |
Description: This spell is used to step through the realm of magic, instantly moving a distance of up to the Influence score in yards. It can be used either as a defend action (the caster must move at least one yard) or to move tactically. The effect is a dissolution of light (in some form, i.e. stars, birds, etc.) that appears to break apart and will reform in the new location.
| Type: | Utility |
| Domain: | Divination |
| Range: | Personal |
| Area of Effect: | Locus |
| Duration: | Instant |
| Components: | V, S |
| Casting Time: | One Action |
| Resistance: | N/A |
Description: With this cantrip, the caster can sense the presence of a focus object within the AoE. It does not provide any additional information beyond the presence and general location of the focus object.
| Type: | Utility |
| Domain: | Summon |
| Range: | Reach |
| Area of Effect: | Locus |
| Duration: | Passive |
| Components: | V, S |
| Casting Time: | One Action |
| Resistance: | N/A |
Description: When cast, small magical beings in the shape of brooms and rags manifest and begin to clean the AoE, removing heavy soil, dirt, and the like from walls, dishes, windows, etc. The finished result is neat and tidy.
| Type: | Utility |
| Domain: | Create |
| Range: | Touch |
| Area of Effect: | Locus |
| Duration: | Passive |
| Components: | V, S |
| Casting Time: | One Action |
| Resistance: | N/A |
Description: This cantrip can be used to create a magical screen that will hide objects up to the area of effect in size from those in front of the caster at up to a 90° angle. It does not dampen sound, smell, or touch, and the object may be viewed from the side or behind the screen.
| Type: | Utility |
| Domain: | Change |
| Range: | Touch |
| Area of Effect: | Object |
| Duration: | Instant |
| Components: | V, S |
| Casting Time: | One Action |
| Resistance: | N/A |
Description: The caster can cause any non-living, non-sentient material that is less than 1 cubic foot in size to instantly become about 40° warmer, returning to its normal temperature based on substance and environmental conditions.
| Type: | Utility |
| Domain: | Control |
| Range: | Touch |
| Area of Effect: | Object |
| Duration: | Instant |
| Components: | V, S |
| Casting Time: | One Action |
| Resistance: | N/A |
Description: With this cantrip, the caster is able to untie any standard knot of thread, string, rope, etc. It cannot be used on magical bindings but will effectively untangle any tangled item.
| Type: | Utility |
| Domain: | Control |
| Range: | Touch |
| Area of Effect: | Object |
| Duration: | Instant |
| Components: | V, S |
| Casting Time: | One Action |
| Resistance: | N/A |
Description: The caster can magically direct a tiny object of relevant material (thread, string, rope, etc.) to tightly knot itself around something or to a similar object, resulting in a common knot.
| Type: | Utility |
| Domain: | Change |
| Range: | Touch |
| Area of Effect: | Object |
| Duration: | Instant |
| Components: | V, S |
| Casting Time: | One Action |
| Resistance: | N/A |
Description: When cast, this cantrip will mend ripped or broken objects of small size, i.e. parchment, a single item of clothing, glass jar, etc. It cannot be used to make complex repairs such as battle damage to armor but can be used to fix cut or ripped straps. All of the pieces must be present to restore the object.
| Type: | Utility |
| Domain: | Change |
| Range: | Touch |
| Area of Effect: | Object |
| Duration: | Instant |
| Components: | V, S |
| Casting Time: | One Action |
| Resistance: | N/A |
Description: With this cantrip, the caster can remove taints of spoil or bring new life to small size objects, i.e. invigorate flowers, freshen meat or milk, remove dirt or a stain from a single item of clothing, etc. Damaged objects are not repaired by the cantrip, they merely take on a quality of freshness.
| Type: | Utility |
| Domain: | Change |
| Range: | Touch |
| Area of Effect: | Object |
| Duration: | Instant |
| Components: | V, S |
| Casting Time: | One Action |
| Resistance: | N/A |
Description: This cantrip can be used to remove excess moisture from small-sized materials or objects, such as drying a book, single item of clothing, herbs, etc. While it will remove the moisture, this cantrip will not remove other contaminants or repair water damage.
| Type: | Utility |
| Domain: | Damage |
| Range: | Touch |
| Area of Effect: | Object |
| Duration: | Instant |
| Components: | V, S |
| Casting Time: | One Action |
| Resistance: | N/A |
Description: When cast, flame surrounds the caster’s finger and may be used to ignite a tiny object of combustible material, i.e. twigs, parchment, etc. If used against a living being, it causes just one point of damage, and any structural strength modifiers and/or defend actions apply normally.
| Type: | Utility |
| Domain: | Change |
| Range: | Touch |
| Area of Effect: | Object |
| Duration: | Instant |
| Components: | V, S |
| Casting Time: | One Action |
| Resistance: | N/A |
Description: The caster can cause any non-living, non-sentient material that is less than 1 cubic foot in size to instantly become about 40° cooler, returning to its normal temperature based on substance and environmental conditions.
Attribute: Knowledge
Type: Utility
Time: N/A
Description: Those with this skill can access and modify additional elemental spell variations without having to purchase the spellbook. Casters can add one variant type (Land Strider, Wind Rider, Fire Walker, Wave Runner) based on their character rank, Expert (1), Master (2), and Epic (3). This applies to all previous or future purchased spells and does not require the variant spells to be purchased separately. Variant spells may be used with Casting skills based on character rank: Expert = novice level skills, Master = expert level skills, Epic = master level skills.
Prerequisites: The Channel Elements skill and eight points in the skill tree
Attribute: Knowledge
Type: Utility
Time: N/A
Description: Those with this skill can access additional elemental spell variations without having to purchase the spellbook. Casters can add one variant type (Land Strider, Wind Rider, Fire Walker, Wave Runner) based on their character rank, Expert (1), Master (2), and Epic (3). This applies to all previous or future purchased spells and does not require the spells to be purchased separately. Variant spells may be used with any Novice Casting skill.
Prerequisites: Four points in the skill tree and an Elemental Magic Foundation, i.e., Land Strider, Wind Rider, Fire Walker, Wave Runner
Attribute: Strength
Type: Attack
Time: One Action
Description: This skill is used to make a powerful forward strike with an upper limb or foreleg in melee combat, with the intent of knocking the opponent down. On a hit, the target takes Strength or Claw damage and is knocked prone. The defender is allowed a Reaction save or related defend skill to remain standing, with a -1 modifier per two points in the skill tree. If the skill check fails or the target successfully defends, the attack misses.
Prerequisites: Four points in the skill tree
Attribute: Constitution
Type: Attack
Time: One Action
Description: This skill is used to drive bodily into an opponent while in melee combat, with the intent of causing damage and knocking them down. With a successful skill check, the character surges forward, striking with their mass to cause damage equal to the Strength score plus basic hits. The defender gets a Reaction save, with a -1 modifier per 2 points in the skill tree, to avoid being knocked down. If the skill check fails or the target successfully defends, the attack misses.
Specialization: None
Attribute: Strength
Type: Attack
Time: One Action
Description: This skill is used to deliver a powerful sidelong swing attack with an upper limb or foreleg. On a hit, it does Strength or Claw damage and carries a stun effect. The defender gets a Stamina save to avoid being stunned for the remainder of the round. If the skill check fails or the target successfully defends, the attack misses.
Specialization: None
Attribute: Strength
Type: Attack
Time: One Action
Description: Characters with this skill have horns, tusks, or other such protrusions used to strike an opponent and drive them to the ground. On a successful skill check, the attack succeeds causing damage equal to the attack ability (horns, tusks, etc.) damage +2, + 1 per two skill points in the tree. Targets get a Reaction save to avoid the knockdown effect, -1 per two points in the skill tree. Because of the aggressive nature of the attack ability, using this skill negates any defensive modifiers gained by stance or defend skills for the remainder of the round. If the skill check fails or the target successfully defends, the attack misses.
Specialization: None
Attribute: Constitution
Type: Attack
Time: One Action
Description: Characters with this skill can make a savage series of attacks on a helpless foe. It may only be used on a prone or grabbed target, with a successful skill check, the attacker makes a combination of two novice melee attacks in a single action, assuming there is a logical path to the attack. One skill check is required to hit and to defend; if the attack hits, the defender saves against damage from both attacks individually. If the check fails or the target successfully defends, the attack misses.
Prerequisites: The Clawing skill and Biting skill, and four points in the skill tree
Attribute: Agility
Type: Attack
Time: One Action
Description: Those with this skill have the Claws attack ability. With a successful skill check, the character can make a slashing or stabbing attack motion, causing damage equal to their Claws +2, plus one per three points in the skill tree. If the skill check fails or the target successfully defends, the attack misses.
Specialization: None
Attribute: Strength
Type: Attack
Time: One Action
Description: A character with this skill has the Bite attack ability. On a successful skill check, the attack succeeds causing damage equal to the Bite +2, plus one per two points in the skill tree. Because of the aggressive nature of the attack ability, using this skill negates any defensive modifiers gained by stance or defend skills for the remainder of the round. If the skill check fails or the target successfully defends, the attack misses.
Specialization: None
Attribute: Knowledge
Type: Utility
Time: N/A
Description: Those with this skill are able to rattle off tidbits of unimportant, inconsequential, or nonessential information about most common subjects or topics. It can be used to enhance an attempted ruse (Novice), distract a target or annoy a companion (Expert), and hold the attention of a group or verbally detain a target through small talk (Master). When it’s used to enhance roleplay skills, a +1 modifier, +1 per 4 points in the skill tree, is added to the skill check. And when used against a target, they have a -1 modifier, -1 per 4 points in the skill tree to Willpower or Morale saves.
Skill Trees: Cunning, Statecraft
Attribute: Knowledge
Type: Utility
Time: N/A
Description: A specialization in a particular sport is required. Those with this specialty know the business of running a sports team. It can be used to establish a notoriety and bring awareness of the team through advertising (Novice), hire key personell to expand the team’s stature or establish partnerships with relevant businesses to secure sponsorships (Expert), and exert influence over fans and leagues achieve a degree of prominence to bring further opportunities (Master). These activities will increase the team’s reputation by 1 level per 4 points in the skill tree.
Skill Trees: Vigilance
Attribute: Constitution
Type: Utility
Time: N/A
Description: A specialty in a particular sport is required. Those with this specialization have been instructed in a particular role and know how to use their skills to compete in a contest, giving them a +1 modifier, +1 per 4 points in the skill tree, to any relevant skill checks. It includes an awareness of individual and team goals, required equipment, and infractions. This skill can also be used to enhance reputation, increasing reputation rank by 1 level per 4 points in the skill tree in relevant situations.
Skill Trees: Athletics
Attribute: Influence
Type: Utility
Time: N/A
Description: Requiring a specialization in a particular sport, this skill includes the ability to direct, instruct, and train those competing in the sport. It can be used to coach a particular position (Novice), position grouping, formation, or lineup (Expert), or an entire team (Master). When giving direction, those competing get a +1 modifier, +1 per 4 points in the skill tree, to any relevant skill checks.
Skill Trees: Athletics, Vigilance
Attribute: Knowledge
Type: Utility
Time: N/A
Description: Those with this skill have an in-depth understanding of rules, positions, statistics, and elements of common athletic games. It can be used to provide a general commentary or explain aspects of the game (Novice), predict an action or series of actions based on lineups, formations, or infractions (Expert), and get insider information on teams, leagues, or participants (Master). When used to aid in investigations, gambling, etc., it offers a +1 modifier, +1 per point in the skill tree, to the relevant skill check.
Skill Trees: Athletics, Vigilance
Attribute: Perception
Type: Utility
Time: N/A
Description: The ability to sift through debris or junk and find items of value. With a successful skill check, it can be used to locate common items that can be sold to earn 1 day’s wage, +1 per 4 points in the skill tree, however, on a roll of a 1, something extraordinary is found. It can also be used to assist with a specific search, such as a part or material, adding a +1 modifier, +1 per point in the skill tree, to Scavenge or other relevant skill checks.
Skill Trees: Technocracy, Vigilance
Attribute: Knowledge
Type: Utility
Time: N/A
Description: Those with this skill know how to write code to program and reprogram some type of technology. It can be used to code simple programs that do basic functions (Novice), write multiple languages of code for complex programs that includes games and multitasking functions (Expert), or to reprogram complex coding and sim artificial intelligence (Master).
Skill Trees: Cunning, Technocracy
Attribute: Perception
Type: Utility
Time: N/A
Description: A specialization that is based on the scientific analysis of evidence gathered at a crime scene to provide additional investigative information. With a successful skill check and assuming relevant collected evidence, it can be used to identify an individual, methodology, or substance (Novice), provide insight on oddities, peculiarities, or rarities in the collected evidence (Expert), reveal a finding that could directly lead to solving the investigation (Master). If the skill check fails, up to two additional checks may be attempted at a progressive difficult (-4) modifier.
Skill Trees: Medicine, Vigilance
Attribute: Knowledge
Type: Utility
Time: N/A
Description: Those with this specialty know how to investigate a crime scene to locate clues that determine the likely events that occurred. It can be used to determine the number of people involved, the nature of the crime, and collect evidence (Novice), identify specific suspects based on evidence left behind and find clues to provide additional avenues of investigation (Expert), and find obscure, concealed, or otherwise ambiguous clues that could directly lead to solving the case (Master).
Skill Trees: Scoutcraft, Vigilance
Attribute: Influence
Type: Utility
Time: N/A
Description: This specialization is used to ask a series of questions in a systematic manner to provides relevant investigative answers through deception, intimidation, or liability. Targets get a -1 modifier, -1 per 4 points in the skill tree, to their Willpower or Morale saves to resist. If the target fails the save, they reveal a previously unknown clue to pursue (Novice), an additional suspect or new avenue of investigation (Expert), or some new revelation that could directly lead to solving the investigation (Master).
Skill Trees: Scoutcraft, Statecraft, Vigilance
Attribute: Knowledge
Type: Utility
Time: N/A
Description: Responsible for upholding law and order through the detection, prevention, and investigation of crime, those with this skill have received the training necessary to qualify for the role. It can be used to patrol, issue violations, and apprehend criminals (Novice), talk to suspects, manage crime scenes, or operate in undercover roles (Expert), and manage a department, run a specialty team, or move into an autonomous or mentor-type role (Master).
Skill Trees: Medicine, Scoutcraft, Statecraft, Vigilance
Attribute: Perception
Type: Utility
Time: N/A
Description: Those with this skill understand the focus, lighting, and composition that goes into efficiently capturing still and motion imagery. It includes the ability to use the required equipment and process the imagery, and can be used to capture staged or static shots (Novice), get an artful short or clear and stable imagery while moving (Expert), use odd angles and settings to enhance, distort, or exaggerate the shot (Master).
Skill Trees: Guile, Scoutcraft, Vigilance
Attribute: Constitution
Type: Utility
Time: N/A
Description: The ability to leap from a high altitude, unfurling a folded fabric device with cords attached to a harness, to slow the descent to reach the surface. With a successful skill check, it can be used to land safely in an open area (Novice), use cords or body movement to steer the parachute in a particular direction or land on a specific surface, i.e., roof, island, mountainside, etc., (Expert), and deploy the parachute at the last possible moment, maintain control in high winds or land on a moving or mobile surface (Master). If the skill check fails, the character falls prone and takes falling damage equal to 10 yards distance in addition to missing the targeted area.
Skill Trees: Athletics, Scoutcraft
Attribute: Perception
Type: Utility
Time: N/A
Description: The study of weather patterns and phenomena to make a prediction or provide information. With a successful skill check, it can be used to determine atmospheric conditions for a period of time and identify signs of dangerous conditions (Novice), instruct on the use of wind and thermal currents for navigation, or identify specific disruptions in a climate (Expert), and to determine how long specific weather events will last, effects on migration patterns, and seasonal abnormalities (Master). Using this skill while on unfamiliar worlds has a difficult (-4) modifier. If the skill check fails, another may not be made until some time has been spent researching.
Skill Trees: Scoutcraft, Vigilance
Attribute: Perception
Type: Utility
Time: N/A
Description: Playing games is a common form of entertainment, however, those with this skill are delving into the world of competition gaming. After choosing one general type of game to play, i.e., chess, shooters, simulators, etc., it can be used to enter tournaments that offer windfall prizes based on Character Rank. In addition, the character can increase their reputation in gaming circles by +1, +1 per 4 points in the skill tree (Novice), find an advantage against other players, getting a reroll on a failed skill check (Expert), or take inventive approaches in standard scenarios, roll two skill checks and take the better result (Master). The skill can also be used to spot a cheater, getting a +1 modifier per 4 points in the skill tree to relevant notice skills.
Skill Trees: Cunning, Guile
Attribute: Knowledge
Type: Utility
Time: N/A
Description: Those with this specialty can quickly and efficiently search for more than just a recipe or local news bulletin on simple gadgetry. It can be used to find information on events not yet reported to the public and sources that carry different or subversive opinion and perspectives (Novice), access hidden archives unavailable to the public to find unaltered footage or suppressed information (Expert), and to access underground or illegal networks to gain access emergency or military information sources (Master).
Skill Trees: Guile, Technocracy, Vigilance
Attribute: Knowledge
Type: Utility
Time: N/A
Description: Gadetry is designed to be user friendly and functional, but this skill is for those who want to delve into more complex functions to use them in unintended ways. It can be used to modify the interface to hide functions, decrease access times, or link a variety of personal devices to one another (Novice), add common functions from other devices to increase usefulness (Expert), and layer functions to run multiple capabilities at one time and to set access and intrusion alarms (Master).
Skill Trees: Guile, Technocracy, Vigilance
Attribute: Knowledge
Type: Utility
Time: N/A
Description: There’s a great deal more to comm systems than calling Mom, and those with this skill understand how the systems work. It can be used to access public comm streams to listen in on chatter, including emergency services and unencrypted conversations (Novice), directly connect to communication hubs to utilize hidden or unused frequencies (Expert), and establish end-to-end encryption and decrypt military-grade comm systems (Master).
Skill Trees: Guile, Cunning, Technocracy
Attribute: Knowledge
Type: Utility
Time: N/A
Description: While just about anyone can use a computer without the need of a skill, those who want to actually accomplish something besides mindless entertainment need a little more. It can be used to install programs and access hard to find information (Novice), hide the identifying factors of the computer, including location and ID (Expert), encrypt and access hidden or illegal networks (Master).
Skill Trees: Technocracy, Vigilance
Attribute: Perception
Type: Utility
Time: N/A
Description: The study and understanding of known galactic features, including planets, star systems, nebulae, etc. This skill can be used to find common resources (Novice), determine the relative safety of approach and/or atmospheric entry (Expert), and identify oddities indicative of rare resources or unexpected forces.
Skill Trees: Mobile Combat, Scoutcraft, Technocracy, Vigilance
Attribute: Knowledge
Type: Utility
Time: N/A
Description: This skill is used to calculate a course through space with the use of computers, course tables, and navigation beacons to reach a specific destination, and offers a +1 modifier, +1 per 4 points in the skill tree to relevant piloting or navigation skill checks that stacks with other modifiers.
Skill Trees: Mobile Combat, Scoutcraft, Technocracy, Vigilance
Attribute: Perception
Type: Utility
Time: N/A
Description: A specialty in the study of and interaction with otherworldly cultures, typically gained through disguise and surveillance. While collecting information, a skill check is rolled, if it’s successful, the character gets information about local greetings and general interests (Novice), learns mannerisms and societal norms (Expert), and gets a feel for the inner-workings of trade, religion, and government (Master). If the skill check fails, another may not be made until some time has been spent researching.
Skill Trees: Scoutcraft, Vigilance
Attribute: Perception
Type: Utility
Time: N/A
Description: Whether researchers or treasure hunters, those with this specialization study the ruins of bygone civilizations seeking information and artifacts. Upon locating something of note, a skill check is rolled, if it’s successful the character gets some general information (Novice), including specific details based on assumption and logical deduction (Expert), and hidden or previously undiscovered facts (Master). If the skill check fails, another may not be made until some time has been spent researching.
Skill Trees: Scoutcraft, Vigilance
Attribute: Knowledge
Type: Utility
Time: N/A
Description: Those with this skill have an interest in otherworldly beings and spend time learning about them. It can be used to identify a variety of life forms (Novice), provide information about physical abilities and talents (Expert), and to describe behaviors and attitudes (Master). In addition, the skill offers a +1 modifier, +1 per 4 points in the skill tree to offset the negative modifier for treating an unfamiliar species with any type of aid skill.
Skill Trees: Medicine, Scoutcraft, Vigilance
Attribute: Perception
Type: Utility
Time: N/A
Description: Those with this skill are able to spend some time looking around to take a reading on a particular area. It can be used to determine the presence of nearby creatures or areas of relative safety (Novice), identify specific types of creatures that may inhabit or pass through an area or positions of advantage (Expert), and predict likely location where creatures or enemies could lie in wait or provide a number of ways that the area could be advantageous to combat (Master).
Skill Trees: Scoutcraft, Vigilance
Attribute: Knowledge
Type: Utility
Time: N/A
Description: This specialization is specific to the study of rare or famous items, antiques, and other such oddities. When a question is asked, a skill check is rolled, if it’s successful the character gets the answer in general information about the object (Novice), including specific details not generally known or inherent attributes (Expert), and things about it that have been hidden or concealed, as well as the ultimate purpose of its creation (Master). If the skill check fails, another may not be made until some time has been spent researching.
Skill Trees: Faith, Guile, Hedge Wizardry, Sorcery, Wizardry, Vigilance
Attribute: Knowledge
Type: Utility
Time: N/A
Description: The ability to enter a place with learned individuals and/or scholarly materials to gain more information on a subject. It can be used to find facts about a specific topic, including those covered in other skills, gaining a +1 modifier, +1 per 4 points in the skill tree, to the next relevant skill check, i.e., researching a particular locale could provide a bonus modifier to a Local History skill check. An appropriate amount of time must be spent researching to get the bonus modifier.
Skill Trees: Faith, Guile, Hedge Wizardry, Sorcery, Statecraft, Wizardry, Vigilance
Attribute: Knowledge
Type: Utility
Time: N/A
Description: Those with this specialty have studied familial lines. When a question is asked, a skill check is rolled, if it’s successful the character gets the answer in general information (Novice), including specific details not generally known (Expert), and facts that have been hidden or concealed from the populace (Master). If the skill check fails, another may not be made until some time has been spent researching.
Skill Trees: Guile, Statecraft, Vigilance
Attribute: Knowledge
Type: Utility
Time: N/A
Description: There are dark powers in the world that carry truly horrific costs, whether granted by outsiders or as a corruption of existing magics, these are hidden in society and often forbidden. It can be used to recognize cabalistic paraphernalia, symbols, and concepts (Novice), identify and decipher grimoires codes to decode the meaning behind specific rituals (Expert), and perform cabalistic rituals to summon or banish outsider influences, or to abort rituals in process. A successful skill check is required, but if it fails, another attempt may not be made until some time has been spent researching.
Skill Trees: Cunning, Hedge Wizardry, Sorcery, Wizardry
Attribute: Knowledge
Type: Utility
Time: N/A
Description: This specialty represents the ability to compose and comprehend the symbology that makes up a written language. It is used to read and write simple text (Novice), wordsmith a creative or professional narrative with the use of details, anecdotes, and metaphors (Expert), and include hidden meaning in the text for others to interpret (Master). It can be purchased with each individual language skill.
Skill Trees: Sorcery, Statecraft, Vigilance, Wizardry
Attribute: Knowledge
Type: Utility
Time: N/A
Description: This specialty represents the ability to take the symbology that makes up a known written language and render it into another known written language without a loss of meaning. It is used to convert simple text (Novice), maintain details, anecdotes, and metaphors (Expert), and recognize and rewrite hidden meanings in the text (Master). It can be purchased with each individual language skill.
Skill Trees: Guile, Statecraft, Vigilance, Wizardry
Attribute: Knowledge
Type: Utility
Time: N/A
Description: This specialization represents the ability to speak a known language. It is used to speak conversationally with others who speak the same language (Novice), grasp an understanding of the nuances of the language, including the use of metaphor (Expert), and speak with the same intonations and dialect as those who speak the language natively (Master). It can be purchased with each individual language skill.
Skill Trees: Guile, Scoutcraft, Statecraft, Vigilance, Wizardry
Attribute: Knowledge
Type: Utility
Time: N/A
Description: While all characters begin with knowledge of the local language, there are numerous racial languages, regional languages, and trade languages worldwide. Each purchase of this skill represents an additional language the character can understand and speak well enough to be understood. Specialties are required per language to speak conversationally (Linguist) and write (Literacy) the language.
Skill Trees: Guile, Scoutcraft, Sorcery, Statecraft, Vigilance, Wizardry
Attribute: Knowledge
Type: Utility
Time: N/A
Description: In-depth knowledge of the facts and figures surrounding events that involve countries and governments in the known world, including general news, instances of revisionist history, propaganda, and conspiracies. When a question is asked, a skill check is rolled, if it’s successful, the character gets the answer in general information (Novice), including specific details not generally known (Expert), and facts that have been hidden or concealed from the populace (Master). If the skill check fails, another may not be made until some time has been spent researching.
Skill Trees: Statecraft, Vigilance
Attribute: Knowledge
Type: Utility
Time: N/A
Description: A knowledge of the figures, dogma, and holidays that surround a religion. When a question is asked, a skill check is rolled, if it’s successful the character gets the answer in general information (Novice), including specific details not generally known (Expert), and facts that have been hidden or concealed from the populace (Master). If the skill check fails, another may not be made until some time has been spent researching.
Skill Trees: Faith, Statecraft, Vigilance
Attribute: Knowledge
Type: Utility
Time: N/A
Description: Those with this specialty have studied the lore surrounding an area or region, including its founding and important dates, events, and figures. When a question is asked, a skill check is rolled, if it’s successful the character gets the answer in general information (Novice), including specific details not generally known (Expert), and facts that have been hidden or concealed from the populace (Master). If the skill check fails, another may not be made until some time has been spent researching.
Skill Trees: Faith, Statecraft, Vigilance
Attribute: Knowledge
Type: Utility
Time: N/A
Description: A knowledge of general facts and figures related to past events beyond simple awareness to include details of who, where, and when. It can be used to draw historical parallels to current events and identify cultural or societal turning points (Novice), determine how or why a specific event occurred and its greater impacts on the region (Expert), and to identify specific clues related to historical figures or events to solve a current or past mystery (Master).
Skill Trees: Faith, Statecraft, Vigilance
Attribute: Perception
Type: Utility
Time: N/A
Description: The ability to understand and interpret a visual form of communication based on colors and symbols, either worn on clothing or displayed on flags or pennants, typically on the battlefield and in a variety of social structures. It is used to identify government affiliations, powerful families, and popular guilds (Novice), notice the variations within the symbols that denote rank or other hierarchal structure (Expert), and identify individuals by subtle variations in color or symbology (Master).
Skill Trees: Guile, Statecraft, Vigilance
Attribute: Knowledge
Type: Utility
Time: N/A
Description: A specialty that involves taking the stories and traditions expressed by a group of people and treating them like mysteries to be solved. It is used to interview people and make deductions based on clues gleaned from tales, celebrations, and parables to find the underlying truth of the myths. With a successful skill check, a clue or narrative can be discovered, assuming there is one to find, that could lead towards a solution.
Skill Trees: Cunning, Scoutcraft
Attribute: Knowledge
Type: Utility
Time: N/A
Description: Those with this skill have an understanding of the criminal world, whether from a participatory or investigative viewpoint. It is used to make contact with low-level members of the criminal underworld or find information on the individuals, gangs, and syndicates operating in a particular area (Novice), gain information on which groups control different types of crimes, and identify ranking members in organizations (Expert), and get information on upcoming crimes or identities of crime bosses (Master). The skill offers a +1 modifier, +1 per 4 points in the skill tree to roleplay skills related to the criminal underworld.
Skill Trees: Cunning, Statecraft
Attribute: Perception
Type: Utility
Time: N/A
Description: There’s a difference between not smelling bad and being well-manicured. Those with this specialty not only know how to clean up, but they can also maximize their physical attractiveness, gaining a +1 modifier, +1 per 4 points in the skill tree to roleplay skills, that stack with other modifiers.
Skill Trees: Cunning, Statecraft
Attribute: Perception
Type: Utility
Time: N/A
Description: Everyone can dress, but not everyone can dress to impress. Those with this specialty know how to follow the trends and can put together outfits that appear atop their current social class while at their wealth level (Novice), make contacts with higher-end shopkeepers to dress at a social class higher (Expert), and work with designers and trendsetters to establish new fashion trends (Master). The skill offers a +1 modifier, +1 per 4 points in the skill tree to roleplay skills based on appearance.
Skill Trees: Cunning, Statecraft, Wizardry
Attribute: Influence
Type: Utility
Time: N/A
Description: An understanding of the code of behavior that governs social norms and encompasses most aspects of social interaction. It can be used as a skill check to determine the proper actions or responses to fit into the character’s existing social status, or else to simulate the behaviors and appear to be of a higher social status (Novice), gain some acceptance among those in the simulated social status (Expert), and become full embraced as a member of the simulated social status (Master). There is a progressive difficulty modifier to the skill checks for each degree of separation, i.e. proletariat to mercantile has a base (-0-) modifier, proletariat to nobility has a difficult (-4) modifier, etc.
Skill Trees: Cunning, Statecraft, Wizardry
Attribute: Influence
Type: Utility
Time: N/A
Description: This skill is all about gaining an understanding of local laws and politics. It is used to ask the right questions to determine the general governmental structure and whose in charge, which races inhabit the area, and information on common laws (Novice), to gain information on ranking members of the government, the general chain of command, and which races are preferred or shunned (Expert), and learn the meaning behind ranks and insignias, the penalties for most crimes, and methods of navigating the system to get out of trouble (Master). The skill offers a +1 modifier, +1 per 4 points in the skill tree to roleplay skills related to laws and politics.
Skill Trees: Cunning, Statecraft
Attribute: Perception
Type: Utility
Time: N/A
Description: Those with this skill are good at learning about different cultures. It is used to make observations and ask questions to learn about local greetings and styles of dress (Novice), to gain information about accepted or shunned mannerisms and special events (Expert), and to learn the meaning behind particular behaviors or events, allowing them to function as members of the culture (Master). The skill offers a +1 modifier, +1 per 4 points in the skill tree to roleplay skills related to cultural behaviors.
Skill Trees: Scoutcraft, Statecraft, Vigilance
Attribute: Knowledge
Type: Utility
Time: N/A
Description: A general knowledge of the science of life. It can be used to identify a general class of animals or plants (Novice), determine the toxicity of plants or special characteristics of animals (Expert), and analyze the properties of specific plants and their effect on the body or diagnose potential weaknesses in animals or special characteristics of monsters (Master). This skill offers a +1 modifier, +1 per 4 points in the skill tree, to relevant skills.
Skill Trees: Scoutcraft, Vigilance
Attribute: Perception
Type: Utility
Time: N/A
Description: Those with specialization can copy information from one medium to another, typically a book, scroll, etc. Familiarity with the language or symbols to be copied isn’t necessary, it is used to carefully make an accurate copy over the course of days (Novice), hours (Expert), or minutes (Master), depending on its length and complexity. A skill check is made after the copy is complete, a failure indicates errors that could alter meaning, or make spells unusable.
Skill Trees: Sorcery, Statecraft, Vigilance, Wizardry
Attribute: Constitution
Type: Utility
Time: N/A
Description: Those with this specialty are able to make books. It can be used to take separate parchments, scrolls, or other such mediums and bind them into a single tome with a cover (Novice), make a weather-resistant travel tome (Expert), or add and remove pages from a book while maintaining its original binding and appearance. In addition, At Expert Character Rank, masterwork quality books can be created from masterwork quality raw materials, and at Master Character Rank, masterwork quality books can be made from common raw materials.
Skill Trees: Sorcery, Statecraft, Vigilance, Wizardry
Attribute: Knowledge
Type: Utility
Time: N/A
Description: Academic professionals who organize and care for books who are concerned with gathering and protecting knowledge. The skill is used to clean and repair books (Novice), determine their value and authorship (Expert), and restore badly damaged pages to a readable state (Master).
Skill Trees: Sorcery, Statecraft, Vigilance, Wizardry
Attribute: Knowledge
Type: Utility
Time: N/A
Description: Those with this skill have the ability to do math and accounting. It is used to keep accurate records and investigate businesses or organizations for fraudulent activity, determining the financial condition, or to see how money was gained or lost in the past, getting +1 modifier, +1 per 4 points in the skill tree to any relevant skill checks.
Skill Trees: Statecraft, Vigilance
Attribute: Knowledge
Type: Utility
Time: N/A
Description: A specialty in the oddities of monster physiology and how their organs sustain life. It can be used to aid in healing attempts, giving a +1 modifier, +1 per 4 points in the skill tree, to attempts to administer aid. Conversely, it can also be used to better know how to cause damage, increasing the critical hit range of all weapons by one, when fighting monsters.
Skill Trees: Medicine, Vigilance
Attribute: Knowledge
Type: Utility
Time: N/A
Description: This specialization includes a comprehensive knowledge of the inner-workings of humanoid physiology. It can be used to aid in healing attempts, giving a +1 modifier, +1 per 4 points in the skill tree, to attempts to administer aid. Conversely, it can also be used to better know how to cause damage, increasing the critical hit range of all weapons by one, when fighting humanoid enemies.
Skill Trees: Medicine, Vigilance
Attribute: Knowledge
Type: Utility
Time: N/A
Description: Those who understand the location and movement of celestial objects are never lost. This skill is used to recognize specific celestial objects, including planets, specific stars, and constellations (Novice), track the movement of stars and planets to aid in navigation, getting a +1 modifier, +1 per 4 points in the skill tree, to any navigation type skill (Expert), or to chart the time of calendar year and accurately track and predict celestial events (Master).
Skill Trees: Scoutcraft, Sorcery, Statecraft, Vigilance, Wizardry
Attribute: Knowledge
Type: Utility
Time: N/A
Description: Those with this specialty have a comprehensive knowledge of animal physiology and how their organs sustain life. It can be used to aid in healing attempts, giving a +1 modifier, +1 per 4 points in the skill tree, to attempts to administer aid. Conversely, it can also be used to better know how to cause damage, increasing the critical hit range of all weapons by one, when fighting animals.
Skill Trees: Medicine, Vigilance
Attribute: Knowledge
Type: Utility
Time: N/A
Description: This skill is used to create and illustrate maps drawn from first-hand experience or created by hiring explorers. Tools and materials related to the specialty are required to use this skill. It can be used to map a small area to scale, inside or outside (Novice), a small overland area with rough natural features (Expert), a large overland area with accurate natural features, political boundaries, etc. (Master). It can also be helpful in reading and interpreting unfamiliar maps, including orienting the map based on observed or known landmarks (Novice), deciphering directional and scale markings on a map (Expert), determining where a map was drawn or finding hidden markings (Master).
Skill Trees: Cunning, Scoutcraft, Statecraft
Attribute: Knowledge
Type: Utility
Time: N/A
Description: Those with this skill know the Merchant’s Code with the basic knowledge to run a business. In addition to providing an ongoing source of income, it can be used to set up a shop or hire out services with proper pricing (Novice), expand business influence and hire key personnel (Expert), and spot investment opportunities (Master). This business knowledge provides a +1 modifier, +1 per 4 points in the skill tree, to relevant appraisal and negotiation skills.
Skill Trees: Cunning, Guile, Statecraft
Attribute: Influence
Type: Utility
Time: N/A
Description: This is the ability to raise and care for domestic animals used for work or food, and includes knowledge of the environmental conditions, feed, and treatment required to keep them from running off. It can be used to call the animals, tend to injuries, and manage their work.
Skill Trees: Brewcraft, Guile, Scoutcraft, Shamanism, Performance, Vigilance
Attribute: Perception
Type: Utility
Time: N/A
Description: An expertise in games of chance, those with this skill know how to make bets and calculate odds to give themselves the best chance to win. It can be used to bet an amount of current money against a win percent, at an escalating difficulty modifier, x1.5 = -2 modifier, x2 = -4 modifier, x5 = -8 modifier, x10 = -12 modifier (Novice), find an advantage against other players or the house, getting a reroll on a failed skill check (Expert), or cheating, roll two skill checks and take the better result (Master). The skill can also be used to spot a cheater, getting a +1 modifier per 4 points in the skill tree to relevant notice skills.
Skill Trees: Cunning, Guile, Statecraft
Attribute: Knowledge
Type: Utility
Time: N/A
Description: This skill represents an understanding of the shipboard environment, and includes familiarity with nautical terms and jargon. It can be used to work on common water vessels with knowledge of ropes, knots, and stowage techniques (Novice), steer and direct crew to maximize the efficiency of wind-driven propulsion (Expert), and navigate with the use of specialty tools, i.e., compass, deadline, charts, astrolabe, etc. (Master).
Skill Trees: Cunning, Scoutcraft
Attribute: Perception
Type: Utility
Time: N/A
Description: A skill of subterfuge and deception, this is the ability to prepare and lay traps to catch unwary animals for food. Specific tools and materials are required to use this skill and must include some type of triggering mechanism and a lethal or seizing component. It is typically designed to catch a specific type or size of animal and set in a place where those animals wander in familiar environments (Novice), harsh environments (Expert), and extreme environments (Master), catching enough food to feed a small group for 1 day, +1 per 2 points in the skill tree.
Skill Trees: Cunning, Guile, Scoutcraft
Attribute: Perception
Type: Utility
Time: N/A
Description: Sometimes traps are meant for more intelligent prey, such as passers-by or the curious, this specialty is for designing these types of traps. In addition to the specific tools and materials are required to use this skill, which must include some type of triggering mechanism and a lethal or seizing component, the trap must be well disguised to be effective. Targets have a -1 modifier, -1 per 2 points in the skill tree to attempts to locate the trap, and a difficulty modifier based on Character Rank to disarm it, Novice -0-, Expert -4, Master -8, Epic -12.
Skill Trees: Cunning, Guile, Scoutcraft
Attribute: Perception
Type: Utility
Time: N/A
Description: Those with this skill can find appetizing food or serviceable gear in a city environment. It can be used to search through refuse, debris, or marketplaces to locate items of value that have been carelessly discarded or left behind. A skill check is required, with a +1 modifier, +1 per 2 points in the skill tree. A successful skill doesn’t necessarily mean that the specific item sought is found, though there is always the chance that something of extreme value is found.
Skill Trees: Guile, Performance, Vigilance
Attribute: Perception
Type: Utility
Time: N/A
Description: This is the ability to recognize, identify, and substantiate the presence of one or more valuable resources in an area. It can be used to determine their availability in familiar environments (Novice), harsh environments (Expert), or extreme environments (Master). A successful skill check doesn’t necessarily mean there is something of value, there may be tracks to potential resources or nothing at all.
Skill Trees: Scoutcraft, Vigilance
Attribute: Perception
Type: Utility
Time: N/A
Description: Those with this skill are adept at earning something through begging. It can be used to earn enough money or food to subsist on for 1 day per 2 points in the skill tree, and are able to effectively go unnoticed in public areas, giving them a +1 modifier, +1 per 4 points in the skill tree, to relevant concealment and notice skills, which stack with other modifiers.
Skill Trees: Cunning, Guile
Attribute: Perception
Type: Utility
Time: N/A
Description: This skill is used to chase and kill wild animals for food. It is used to locate animals and approach them without drawing attention or scaring them off in familiar environments (Novice), harsh environments (Expert), and extreme environments (Master), locating enough food to feed a small group for 1 day, +1 per 2 points in the skill tree.
Skill Trees: Scoutcraft, Vigilance
Attribute: Constitution
Type: Utility
Time: N/A
Description: The world of caverns and caves contain distinct challenges that are addressed by this specialty. With a successful skill check, it can be used to ascertain general structural integrity and determine direction by air currents (Novice), orient by gradations, echoes, or moisture (Expert), and safely move a group through gaps and cracks (Master). When used in conjunction with the Climbing skill a +1 bonus, +1 per 4 points in the skill tree, is available to anyone following their direction.
Skill Trees: Scoutcraft, Vigilance
Attribute: Perception
Type: Utility
Time: N/A
Description: This specialty is used to gather wild plants and their outgrowths for consumption, either raw or cooked. Those with this skill know the difference between edible and toxic plants and where to find them in familiar environments (Novice), harsh environments (Expert), and extreme environments (Master), locating enough food to feed a small group for 1 day, +1 per 2 points in the skill tree.
Skill Trees: Scoutcraft, Vigilance
Attribute: Constitution
Type: Utility
Time: N/A
Description: A wilderness expertise used to trek great distances over rugged, natural terrains. With a successful skill check, it is used to find the most hospitable path by avoiding common dangers in familiar terrains (Expert), harsh terrains (Expert), and extreme terrains (Master). When used in conjunction with the Survival skill, a +1 bonus, +1 per 4 points in the skill tree, is applied to both skill checks.
Skill Trees: Scoutcraft, Vigilance
Attribute: Knowledge
Type: Utility
Time: N/A
Description: This skill is used to locate, gather, and prepare plants that have medicinal or other qualities that can have a positive or negative effect on the body. Specific tools are required with this skill, including clippers, vials, pouches, and a mortar and pestle. It can be used to locate plants with specific qualities in familiar environments (Novice), harsh environments (Expert), and extreme environments (Master). Combining plant effects requires the Apothecary skill.
Skill Trees: Brewcraft, Guile, Dryanroot, Medicine, Scoutcraft, Vigilance
Attribute: Knowledge
Type: Utility
Time: N/A
Description: A specialization in combining materials that act on the body. An alchemist kit or similar tools and the raw materials are needed to use this skill. It can be used to create medicines, toxins, hallucinogens, and more. At Expert Character Rank, masterwork quality versions can be made from masterwork quality materials, and at Master Character Rank, masterwork quality versions can be made from common materials.
Skill Trees: Brewcraft, Guile, Medicine, Scoutcraft, Wizardry
Attribute: Perception
Type: Utility
Time: N/A
Description: The ability to fashion a simple rod or net with which to catch fish. Those with this skill are better able to locate areas within a body of water or river where they might catch fish, whether in a lake or slow-moving river (Novice), rapidly flowing or drying-up water body (Expert), or frozen conditions (Master), catching enough fish to feed a small group for 1 day, +1 per 2 points in the skill tree.
Skill Trees: Scoutcraft, Vigilance
Attribute: Constitution
Type: Utility
Time: N/A
Description: This is the ability to produce the basic goods required for life, which including plowing, seeding, crop growing, nurturing, and harvesting. Those with this skill better understand how food grows and can gather subsistence resources more efficiently in familiar environments (Novice), harsh environments (Expert), and extreme environments (Master), locating enough food to feed a small group for 1 day, +1 per 2 points in the skill tree.
Skill Trees: Scoutcraft, Vigilance
Attribute: Perception
Type: Utility
Time: N/A
Description: This foresight comes in various forms, typically a method for reading random patterns to find personal revelations. A practiced methodology is required to do a reading, such as shuffling and revealing cards, discerning lines on the hand or face, or other such machination. The readings include ambiguous information about a future event (Novice), general information about the target and a confusing omen about a future event (Expert), and a specific piece of information about the target and an enigmatic but credible future event (Master). Very often, these future events are most obvious in hindsight.
Skill Trees: Cunning, Guile, Performance, Shamanism, Sorcery
Attribute: Knowledge
Type: Utility
Time: N/A
Description: The future is written in the stars and planets, and those with this skill can tell whether or not it holds a favorable answer for almost any question. A clear night sky, telescope, reference book, and skill check are required to do a reading and make a prediction, which could include vague and cryptic information (Novice), conjectured forecasts applied to specific questions (Expert), and non-specific revelations or prophecies (Master).
Skill Trees: Cunning, Guile, Performance, Shamanism, Sorcery
Attribute: Perception
Type: Utility
Time: N/A
Description: A specialization in shaping decorative objects out of stone or etching symbols into stone. Tools and raw materials related to the specialty are required to use this skill. At Expert Character Rank, masterwork quality work can be created from masterwork quality raw materials, and at Master Character Rank, masterwork quality work can be made from common raw materials.
Skill Trees: Cunning, Guile, Performance, Sorcery, Statecraft, Talisman
Attribute: Perception
Type: Utility
Time: N/A
Description: Those with this specialization are preoccupied with color and decorative design, adding it wherever they can. Tools and materials related to the specialty are required to use this skill. It can be used to create intricate and colorful designs (Novice), quickly produce colorful artwork for sale or to mark an area (Expert), or to produce exquisite works of art (Master). It can also be used to aid with some concealment type skills, adding a +1 modifier, +1 per 4 points in the skill tree, to relevant skill checks.
Skill Trees: Cunning, Guile, Performance, Sorcery, Statecraft, Talisman
Attribute: Perception
Type: Utility
Time: N/A
Description: A specialty in shaping decorative objects out of wood or etching symbols into wood. Tools and raw materials related to the specialty are required to use this skill. At Expert Character Rank, masterwork quality work can be created from masterwork quality raw materials, and at Master Character Rank, masterwork quality work can be made from common raw materials.
Skill Trees: Cunning, Guile, Performance, Sorcery, Statecraft, Talisman
Attribute: Perception
Type: Utility
Time: N/A
Description: This skill is used to create general artwork, including the ability to draw basic figures, accurately add color to an item or object, or create simple decorative designs. Tools and materials related to the specialty are required to use this skill. It can also be used to judge or interpret a piece of art to determine if there is a meaning behind it, adding a +1 modifier, +1 per point in the skill tree, to relevant skill checks.
Skill Trees: Cunning, Guile, Performance, Sorcery, Statecraft, Talisman
Attribute: Perception
Type: Utility
Time: N/A
Description: This specialty includes the practice of tabari and is used to illustrate flesh with indelible patterns, pictures, symbols, etc. Tools and materials related to the specialty are required to use this skill. At Expert Character Rank, masterwork quality work can be done using masterwork quality tools and inks, and at Master Character Rank, masterwork quality work can be done using common tools and inks.
Skill Trees: Cunning, Guile, Performance, Sorcery
Attribute: Perception
Type: Utility
Time: N/A
Description: An understanding of building and landscape design, including construction, sculpting, metalworking, and woodworking. It can be used to identify a room’s features and notice flaws, which can help to locate secret doors or spot traps, offering a +1 modifier, +1 per point in the skill tree, to relevant skill checks.
Skill Trees: Guile, Performance, Scoutcraft, Statecraft, Technocracy, Vigilance
Attribute: Influence
Type: Utility
Time: N/A
Description: Those with this specialty can teach animals to obey basic commands based on their Trainability (TA) rank. It may be used to provide voice commands to domestic animals (Novice), signal commands to domestic animals, and voice commands to wild animals (Expert), signal commands to wild animals, voice commands to monsters (Master), and signal commands to monsters (Epic). The subject must be subdued before they can be trained.
Skill Trees: Guile, Performance, Scoutcraft, Statecraft, Shamanism, Vigilance
Attribute: Influence
Type: Utility
Time: N/A
Description: This specialization is used to teach animals to obey advanced commands based on their Trainability (TA) rank. It may be used to provide voice commands to domestic animals (Novice), signal commands to domestic animals, and voice commands to wild animals (Expert), signal commands to wild animals, voice commands to monsters (Master), and signal commands to monsters (Epic). The subject must be subdued and have Obedience Training before they can be trained with Advanced commands.
Skill Trees: Guile, Performance, Scoutcraft, Statecraft, Shamanism, Vigilance
Attribute: Influence
Type: Utility
Time: N/A
Description: Used to domesticate animals by subduing them and teaching basic behavior principles, including socializing to people/other animals, nonaggression, feeding methods, and waste location. This includes teaching simple jobs such as pulling a plow or wagon. It can be used with domesticated animals (Novice), wild animals (Expert), and monsters (Master). Subjects get a Morale save to resist at a -1 modifier, -1 per 4 points in the skill tree.
Skill Trees: Guile, Performance, Scoutcraft, Shamanism, Vigilance
Attribute: Influence
Type: Utility
Time: N/A
Description: This specialization involves the temporary lodging and care for domestic animals and includes grooming, feeding, exercising, ascertaining injuries, and providing treatment. The skill can be used to increase recovery time and ensure a safe environment, even while out in the wilderness (difficult -4 modifier). While under care, the animals get their healing rate +1 per point in the skill tree.
Skill Trees: Scoutcraft, Vigilance
Attribute: Influence
Type: Utility
Time: N/A
Description: This specialization is used to round up domestic animals and drive them in a particular direction. It can be used tactically with wild animals at a difficult (-4) modifier, though the animals get a Morale save with a -1 modifier, -1 per 4 points in the skill tree to resist. There must be a minimum of five associated animals to constitute a herd and attacking one or more will negate the effect.
Skill Trees: Brewcraft, Cunning, Guile, Performance, Scoutcraft, Wizardry
Attribute: Influence
Type: Utility
Time: N/A
Description: Those with this specialty can build and maintain hives that produce honey, honeycomb, and wax. In addition to providing a source of income, increases in character rank increase yield and purity, and general knowledge of dealing with dangerous insects that can give a +1 modifier, +1 per point in the skill tree to relevant lore skill checks.
Skill Trees: Brewcraft, Cunning, Guile, Performance, Scoutcraft, Wizardry
Attribute: Constitution
Type: Utility
Time: N/A
Description: This specialty represents a focus on a specific weapon group, such as. blades, axes, bows, etc., that fall within the specialty material of the parent skill. Specific, high-quality tools are required based on the material specialty. At Expert Character Rank, masterwork quality weapons can be created from masterwork quality raw materials, and at Master Character Rank, masterwork quality weapons can be made from common raw materials.
Skill Trees: Martial Combat, Mounted Combat, Scoutcraft, Technocracy
Attribute: Constitution
Type: Utility
Time: N/A
Description: This is an expertise in designing, making, maintaining, and repairing melee and ranged weaponry that is primarily composed of a specialty material, such as metal, bone, wood, etc. Specific tools are required based on the material specialization. Working with materials outside of the specialty carries a difficult (-4) modifier.
Skill Trees: Martial Combat, Mounted Combat, Scoutcraft, Technocracy
Attribute: Agility
Type: Utility
Time: N/A
Description: Used to create small clockwork type toys and providing assistance with minor adjustments to mechanical components, these wandering mechanics tend to be fascinated with all things mechanical. While most of what they do has an abbreviated short lifecycle, it tends to be impressive, even as things start to fail. Tinker tool kits typically contain various fine tools and parts that don’t necessarily go to anything but could be useful someday.
Skill Trees: Brewcraft, Guile, Performance, Technocracy, Wizardry
Attribute: Knowledge
Type: Utility
Time: N/A
Description: This is the ability to recognize and extract various ores and calculate the correct mixtures to produce alloys. Tools are required to analyze and to extract ores. At Expert Character Rank, they can grade worked metals, getting a +1 modifier, +1 per 4 points in the skill tree, to any relevant skill check. At Master Character Rank, higher quality metals and alloys can be produced for masterwork construction.
Skill Trees: Brewcraft, Mounted Combat, Talisman, Technocracy, Wizardry
Attribute: Perception
Type: Utility
Time: N/A
Description: This specialization is used to make fabrics by weaving fibers together. While it includes knowing how to work a loom, that’s not feasible while traveling, where threads, needles, and scraps are used to weave smaller cloths useful in repairs or for accessories. A familiarity with cloth types provides a +1 modifier, +1 per 2 points in the skill tree to relevant appraisal skills checks. At Master Character Rank, higher quality cloths can be produced for masterwork designs.
Skill Trees: Brewcraft, Cunning, Guile, Performance, Scoutcraft, Statecraft, Wizardry
Attribute: Perception
Type: Utility
Time: N/A
Description: Out in the wilderness, there are few things more important than good footwear, those with this specialty can not only make and repair it but can also spot quality, gaining a +1 modifier per 2 points in the skill tree to relevant appraisal checks. At Expert Character Rank, masterwork quality footwear can be created from masterwork quality raw materials, and at Master Character Rank, masterwork quality footwear can be made from common raw materials.
Skill Trees: Cunning, Guile, Performance, Scoutcraft
Attribute: Perception
Type: Utility
Time: N/A
Description: An expertise in designing, altering, and repairing worn garments. It requires a tailoring kit and includes the ability to make gloves, hats, and other such accessories. It can be used with appearance-related skills, such as Disguise, Entice, Camouflage, Stealth, etc., getting a +1 modifier, +1 per 4 points in the skill tree, that stacks with other skills. At Expert Character Rank, masterwork quality garments can be created from masterwork quality raw materials, and at Master Character Rank, masterwork quality garments can be made from common raw materials.
Skill Trees: Brewcraft, Cunning, Guile, Performance, Scoutcraft, Statecraft, Wizardry
Attribute: Perception
Type: Utility
Time: N/A
Description: An expertise in the design, assembly, and repair of locking mechanisms. Specialty tools, components, and equipment are required to use this skill based on the type of mechanism and device to be secured. A security modifier may be added based on Character Rank to foil pick attempts, Novice = base (-), Expert = difficult (-4), Master = very difficult (-8), and Epic = Amazing (-12). In addition, an understanding of this makes these characters better at lockpicking, gaining a +1 modifier, +1 per 4 points in the skill tree, which stacks with other skill modifiers.
Skill Trees: Cunning, Guile, Technocracy
Attribute: Constitution
Type: Utility
Time: N/A
Description: This specialization is used to dry, oil, and stretch the skins and hides of animals to produce leather. It includes the ability to properly skin the animals, make simple drying racks, and requires the time to dry and materials to properly treat. At Master Character Rank, masterwork quality leathers can be produced.
Skill Trees: Athletics, Scoutcraft
Attribute: Constitution
Type: Utility
Time: N/A
Description: Those with this specialization can make and repair saddlery, which includes saddle design, stirrups, bridles, halters, reins, harnesses, tack, etc. In addition to leatherworking tools, they need a method of measurement. While this skill is used for common animals, gear can be created or modified for exotic riding animals with a modifier based on the number of differences, i.e., size, number of legs, number of heads, etc.
Skill Trees: Athletics, Armed Combat, Mounted Combat, Performance, Scoutcraft
Attribute: Constitution
Type: Utility
Time: N/A
Description: This specialty is for assembling and stitching armors that include animal hides, scales, hardened leather molds, protective jackets, etc. In addition to the required leatherworking tools, this skill requires specific tools, including molds, racks, oils, etc. At Expert Character Rank, masterwork quality armor can be created from masterwork quality raw materials, while at Master Character Rank, masterwork quality armors can be made from common raw materials.
Skill Trees: Armed Combat, Mounted Combat, Performance, Scoutcraft
Attribute: Perception
Type: Utility
Time: N/A
Description: This specialty is used to assemble and stitch padded doublets, create pocketed tunics, trousers, or vests for hardened leather molds, and sew multi-layered jackets. In addition to the required tailoring tools, this skill requires specific stuffing hooks and resilient cloths, as well as maintenance oils and materials for making repairs. At Master Character Rank they can make masterwork quality armors. At Expert Character Rank, masterwork quality armor can be created from masterwork quality raw materials, while at Master Character Rank, masterwork quality armors can be made from common raw materials.
Skill Trees: Brewcraft, Cunning, Guile, Performance, Scoutcraft, Wizardry
Attribute: Constitution
Type: Utility
Time: N/A
Description: Used to cut, stretch, and stitch a prepared animal hide to make or repair common items, such as pouches, scabbards, straps, etc. Specific tools, including knives, shears, mallets, punches, stamps, and bevelers are required to use this skill. It can be used to repair more complex items like leather armor and saddles at a difficult (-4) modifier.
Skill Trees: Athletics, Mounted Combat, Performance, Scoutcraft
Attribute: Perception
Type: Utility
Time: N/A
Description: Those with specialization can add decorative or faceted designs to common or precious stones, minerals, and gemstones. It requires cutting and polishing tools based on the raw material and is primarily used to improve the presentation to increase value. The value increase is based on character rank, Novice 25%, Expert 100%, Master 250%, Epic 500%.
Skill Trees: Brewing, Talisman, Wizardry, Performance
Attribute: Perception
Type: Utility
Time: N/A
Description: This specialization is used to incise a design onto a surface by cutting grooves into it. The type of tool required varies based on the material but could include a drypoint, burin, rocker, or corrosive. It is most often used to add decoration, personalization, or magic symbology.
Skill Trees: Brewing, Talisman, Wizardry, Performance
Attribute: Perception
Type: Utility
Time: N/A
Description: The ability to design, create, and repair decorative adornments, accessories, and trinkets from precious raw materials. It can also aid in making appraisals, getting a +1 modifier, +1 per 4 points in the skill tree. A jeweler’s kit or the appropriate tools are required when working with materials or making appraisals. At Expert Character Rank, masterwork quality items can be created from masterwork quality raw materials, while at Master Character Rank, masterwork quality items can be made from common raw materials.
Skill Trees: Brewcraft, Performance, Talisman, Wizardry
Attribute: Constitution
Type: Utility
Time: N/A
Description: This specialty represents a focus on a specific armor type, i.e., scalemail, platemail, chainmail, etc., within the character’s specialty class. Specific, high-quality tools are required based on the class specialty and armor type. At Expert Character Rank, masterwork quality armor can be created from masterwork quality raw materials, while at Master Character Rank, masterwork quality armors can be made from common raw materials.
Skill Trees: Martial Combat, Mounted Combat, Scoutcraft, Technocracy
Attribute: Consitution
Type: Utility
Time: N/A
Description: Used to forge or repair common items made of metal. A forge and the proper tools are required to perform work. Most often used for creating and maintaining tools, trinkets, and utensils, it can be used to maintain and repair weapons or armor at a difficult (-4) modifier. At Expert Character Rank, masterwork quality items can be made from masterwork quality raw materials, while at Master Character Rank, masterwork quality items can be made from common raw materials.
Skill Trees: Brewcraft, Mounted Combat, Scoutcraft, Talisman, Technocracy, Wizardry
Attribute: Constitution
Type: Utility
Time: N/A
Description: This specialization is for making specialty jars. Higher quality tools are required, including a blowpipe, punty, jacks, paddles, tweezers, and shears. It’s used to make jars with a specific thickness, size, neck size, width, and other such factors. It includes knowing how to store the jars for travel without breaking, even in combat scenarios.
Skill Trees: Brewing, Wizardry
Attribute: Constitution
Type: Utility
Time: N/A
Description: An expertise in glassblowing, glass painting, and lens work. Specific tools are required, including a blowpipe, punty, jacks, paddles, tweezers, and shears. This skill is used to create common glass objects or tools, create glass designs, and helps with appraisals, gaining a +1 modifier, +1 per 4 points in the skill tree.
Skill Trees: Brewcraft, Performance, Talisman, Vigilance, Wizardry
Attribute: Knowledge
Type: Utility
Time: N/A
Description: The ability to safely prepare and store food and properly ration it. Those with this skill can manage food supplies in the wilderness, increasing the number of days of available food by 1 day, +1 per 4 points in the skill tree without causing hardship, as well as prepare fresh kills, gathered foods, or dried goods in a tasty manner.
Skill Trees: Brewcraft, Scoutcraft, Vigilance, Hedge Wizardry, Sorcery, Wizardry
Attribute: Perception
Type: Utility
Time: N/A
Description: Those with this specialty can carve up a kill to get the most out of the meat. Depending on the type of creature, a sharp blade is the only tool needed. It can also be used to skin kills, and harvest rare parts or components from animals or monsters without destroying their inherent value.
Skill Trees: Brewcraft, Scoutcraft, Vigilance, Hedge Wizardry, Sorcery, Wizardry
Attribute: Knowledge
Type: Utility
Time: N/A
Description: An expertise in infrastructure that includes labor, material handling, and tool use. It can help locate secret doors, determine the likelihood of collapse, or ascertain location within a structure, adding a +1 modifier, +1 per 4 points in the skill tree to relevant Search checks.
Skill Trees: Vigilance, Technocracy
Attribute: Knowledge
Type: Utility
Time: N/A
Description: This specialty has a focus on constructing watertight structures that will float. To use this skill, the character needs access to tools and raw materials. It can be used to build, maintain, repair, and evaluate the seaworthiness of watercraft.
Skill Trees: Scoutcraft, Technocracy
Attribute: Consitution
Type: Utility
Time: N/A
Description: The ability to build, maintain, and repair a specific class of armor, i.e., light, medium, heavy. The tools required to use this skill depend on the type of work, i.e., a forge and raw materials to create armor, an armor care kit to perform maintenance, and tools and materials to make repairs. Working on armor classes outside of the specialty carries a difficult (-4) modifier.
Skill Trees: Martial Combat, Mounted Combat, Scoutcraft, Technocracy
Attribute: Knowledge
Type: Utility
Time: N/A
Description: This specialty has a focus on changing colors. Access to an alchemist kit and the raw materials are required to use this skill. It can be used to create chalks, dyes, scribe inks, tattoo inks, weapon black, etc. At Master Character Rank, masterwork quality versions can be produced.
Skill Trees: Brewcraft, Guile, Medicine, Performance, Scoutcraft, Wizardry
Attribute: Knowledge
Type: Utility
Time: N/A
Description: This specialization allows for the creation of airborne fragrances. Access to an alchemist kit and the raw materials are required to use this skill. It can be used to create repellents, attractants, mimic natural odors, aid in disguises, or throw-off tracking, among others, offering a +1 modifier, +1 per 4 points in the skill tree to applicable skills.
Skill Trees: Brewcraft, Guile, Medicine, Performance, Scoutcraft, Wizardry
Attribute: Knowledge
Type: Utility
Time: N/A
Description: A methodological approach to transforming substances, to use this skill, the character needs access to an alchemist kit or similar tools and the raw materials. It can be used to create explosives, corrosives, other reactants, various mineral compounds, and more.
Skill Trees: Brewcraft, Medicine, Scoutcraft, Wizardry
Attribute: Agility
Type: Utility
Time: N/A
Description: The ability to cut, shape, maintain, and repair items and objects made of wood. This includes the use of various cutting tools and processes, including designing frames and joints, lashing and nailing, and whittling.
Skill Trees: Scoutcraft, Talisman, Vigilance, Wizardry
Attribute: Knowledge
Type: Utility
Time: N/A
Description: Candles provide light and enough warmth to maintain life in extremely cold conditions, the ability to form them from natural wax, animal fat, and other such natural materials could be the difference between life and death.
Skill Trees: Guile, Performance, Scoutcraft, Vigilance
Attribute: Knowledge
Type: Utility
Time: N/A
Description: The process of combining materials to create alcoholic beverages. Several specialized tools are required, including a kettle, funnel, stir spoon, and fermenter.
Skill Trees: Brewcraft, Guile, Scoutcraft, Wizardry
Attribute: Constitution
Type: Utility
Time: N/A
Description: Characters with this skill call upon their deity or entity to restore life to a being that has died. By sacrificing all body points and making a successful skill check, the dead being is restored to life with 1 health point and 1 body point. This is a ritual process that takes time, requires contact, and cannot be interrupted. If the skill check fails or the process is interrupted the body points are lost, the being remains dead, and no further attempts may be made. Those who are resurrected may experience other consequences.
Prerequisites: The Heal skill and eight points in the skill tree
Attribute: Influence
Type: Defend
Time: Two Actions
Description: This skill is used to protect another with the power of the character’s faith, blocking melee or ranged attacks with an upraised palm. The target must be within a range of 1 yard per 2 points in the skill tree and the attack is turned away as if blocked. The use of this skill begins a communal state.
Prerequisites: The (E) Aegis skill, the (E) Sanctify skill, and eight points in the skill tree
Attribute: Influence
Type: Defend
Time: Two Actions
Description: This skill is used to call upon the deity or entity to stop a target from attacking a specific individual. On a successful skill check, the target cannot attack the protected individual for one round per 4 points in the skill tree and can choose to attack another or wait out the effect. Should the protected individual attack that target, the effect is broken. It can only be used against a specific target one time per encounter. The use of this skill begins a communal state.
Prerequisites: The Aegis skill and four points in the skill tree
Attribute: Influence
Type: Attack
Time: Two Actions
Description: This skill is used to temporarily expel the controlling spirit from an undead form. With a successful skill check, the character can break the bond between a spirit and its undead physical form in a range equal to the number of points in the skill tree. The effect is like severing a puppet’s strings. Rotters get a Willpower or Morale save to resist at a -1 modifier per point in the skill tree, while feeders have a base (-) save. Undead of a higher character rank are immune to this effect. If the skill check fails, it may not be attempted on that being again in that encounter. The use of this skill begins a communal state.
Prerequisites: The (E) Command Undead skill and eight points in the skill tree
Attribute: Influence
Type: Utility
Time: N/A
Description: A character with this skill can bless a holy symbol in possession of another, allowing them to lay on hands at range. Only believer symbols can be sanctified, and it must be symbolic of the character’s representative deity or entity, though it can be a trinket, tattoo, vestment, etc. The blessing extends the range for all touch requirements to the skill tree rank in yards and lasts a number of days equal skill tree rank, at which point their worthiness is reevaluated. Performing the blessing does not normally require an action or begin a communal state. In combat, the blessing requires two actions.
Prerequisites: Four points in the skill tree
Attribute: Constitution
Type: Utility
Time: Two Actions
Description: A character with this skill can lay on hands to transfer minor wounds, healing the target while taking on their health damage. The character can choose to exchange any number of health points at a 1:1 rate. The use of this skill begins a communal state.
Specialization: (Required) Deity or entity
Attribute: Influence
Type: Attack
Time: Two Actions
Description: Characters with this skill can issue orders at animate dead in their vicinity. General obedience commands can be used to direct any rotters within an area in yards equal to the number of points in the skill tree (Expert) or 1 feeder per 4 points in the skill tree in the same radius (Master). Rotters get a Willpower or Morale save to resist at a -1 modifier per point in the skill tree, while feeders have a base (-) save. Undead of a higher character rank are immune to this power. If the skill check fails, it may not be attempted again on those undead during the encounter. The use of this skill begins a communal state.
Prerequisites: The Turn Undead skill and four points in the skill tree
Attribute: Influence
Type: Attack
Time: One Action
Description: A character with this skill can repel the undead. They can choose to chase away a number of undead equal to the number of points in the skill tree 100 yards away (Novice) or choose to be ignored by all undead in a 100-yard radius for a number of rounds equal to the number of points in the skill tree (Expert). Rotters get a Willpower or Morale save to resist at a -1 modifier per point in the skill tree, while feeders have a base (-) save. Undead of a higher character rank are immune to this power. If the skill check fails, it may not be attempted again on those undead during the encounter. The use of this skill begins a communal state.
Specialization: (Required) Deity or entity
Attribute: Influence
Type: Utility
Time: Two Actions
Description: This skill is used to take a contribution of life energy from a target for the benefit of the character. With a successful skill check, a number of health points equal to the skill tree rank (Novice), or a number of body points equal to the number of points in the skill tree (Expert) may be taken from a donor to heal the character at a 1:1 rate. An unwilling donor gets a Stamina save to resist. If the skill check fails or the target saves, there is no transfer. How this skill is used depends greatly on the dogma of the deity or entity and could have dire consequences. The use of this skill begins a communal state.
Specialization: (Required) Deity or entity
Attribute: Influence
Type: Attack
Time: One Action
Description: This skill is used to repel an unanchored target a distance away, without causing damage. With a successful skill check, the target is pushed backward a number of yards equal to Influence plus 1 yard per 2 points in the skill tree. Defenders get a base Strength save to resist, if successful the target is unmoved. It can affect up to medium-sized targets, with a -4 modifier per size category increase. The use of this skill begins a communal state.
Specialization: (Required) Deity or entity
Attribute: Constitution
Type: Utility
Time: Two Actions
Description: Those with this skill can lay hands on a target to draw a disease or poison out and into themselves. The ally is immediately cured of the effect, and the character gets a save against it, with a +1 modifier per two points in the skill tree. If the save fails, the character suffers the effects until they pass or are relieved. The use of this skill begins a communal state.
Specialization: (Required) Deity or entity
Attribute: Knowledge
Type: Utility
Time: N/A
Description: A character with this skill can combine specific elixirs with magic to produce temporary physical changes to aid in combat. Production of these takes about ten minutes and requires preparing a container (typically a small jar), the addition of the elixir, an infusion of magic, and sealing the jar with a stopper covered in wax. Characters are required to make a skill check, can produce 1 per 2 points in the skill tree per day, and the magic within them fades after 1 day per 3 points in the skill tree. If the skill check fails, that one is lost for the day. Mutations can include a single random attack, defend, move, or sensory abilities (Expert), a combination of two random abilities (Master), or a specific ability (Epic). Elixirs must have an alcohol base with specific flavors based on the abilities, i.e. attack = salty, defend = sweet, move = sour, sense = bitter, with a strong spicy overtone when combining abilities.
Prerequisites: The Formulae skill and four points in the skill tree
Attribute: Knowledge
Type: Utility
Time: N/A
Description: Those with this skill can build and animate a being entirely from the matter of their Magic Foundation, i.e. embers, ice, aerogel, crafted items, etc. The process requires a character to first fashion the form from the proper material, adorning it with magic symbology. While it is possible to hire a craftsman to assist, the character must be involved in sculpting, carving, molding, etc. The final casting to animate the construct takes about 20 hours. Once complete, it has health points equal to twice the skill tree rank, complete immunity to the magic foundation, a Durability rating, to hit, and does damage equal to the skill tree rank, and lumbers at a move rate of 1 yard per 2 points in the skill tree. It will obey general obedience commands from the creator and crumbles into component parts when it loses all health points.
Prerequisites: The (E) Craft Magic skill and four points in the skill tree
Attribute: Knowledge
Type: Utility
Time: N/A
Description: Those with this skill can bestow a magical effect on items or objects that have been specifically crafted to receive and contain magic. While the caster doesn’t need to be the person who crafted the item, they must have knowledge of the crafting process for the item or else have a master craftsman on-hand during enchantment. The types of enchantments available, time required, and other factors are defined in the Master Player Rules.
Prerequisites: Four points in the skill tree and a Magic Foundation, i.e., Mystic, Land Strider, Wind Rider, Fire Walker, Wave Runner
Attribute: Knowledge
Type: Utility
Time: N/A
Description: Characters with this skill can add a magic timed-release effect to bombs, extracts, trinkets, or elixirs. Measured in rounds, with this addition the effect occurs a number of rounds after activation as determined by the character, with a minimum of 1 round and a maximum of 1 round per point in the skill tree. This effect adds five minutes to the production time. It is not uncommon for the timing to be off.
Prerequisites: The Formulae skill and four points in the skill tree
Attribute: Influence
Type: Utility
Time: N/A
Description: A character with this skill can combine specific elixirs with magic to produce temporary physical changes to aid in combat. Production of these takes about ten minutes and requires preparing a container (typically a small jar), the addition of the elixir, an infusion of magic, and sealing the jar with a stopper covered in wax. Characters are required to make a skill check, can produce 1 per 2 points in the skill tree per day, and the magic within them fades after 1 day per 3 points in the skill tree. If the skill check fails, that one is lost for the day. Mutations can include a single random attack, defend, move, or sensory abilities (Expert), a combination of two random abilities (Master), or a specific ability (Epic). Elixirs must have an alcohol base with specific flavors based on the abilities, i.e. attack = salty, defend = sweet, move = sour, sense = bitter, with a strong spicy overtone when combining abilities.
Prerequisites: The Formulae skill and four points in the skill tree
Attribute: Knowledge
Type: Utility
Time: N/A
Description: Character with this skill can temporarily infuse spells into small, specially designed items for later casting. The trinkets must be of masterwork quality and be somewhat representative of the spell that is to be stored within. Characters are required to make a skill check to imbue the spell, which takes a minimum of ten minutes, can imbue 1 per 2 points in the skill tree per day, may not imbue duplicate spell trinkets, and the magic within them fades after 1 day per 3 points in the skill tree. The trinkets can have 1 charge (Novice), 2 charges (Expert), or 4 charges (Master), and must have a defined method of activation, i.e., command phrase, somatic action, etc. Anyone with the activation method can use the trinket. Spell details can be found in Chapter 2: Magic.
Specialization: (Required) Magic Foundation, i.e. Mystic, Land Strider, Wind Rider, Fire Walker, Wave Runner
Attribute: Influence
Type: Attack
Time: One Action
Description: A character with this skill can derange the target’s spiritual harmony, pushing them towards calamity. With a successful skill check, the target is afflicted with a severe unease that affects their physical actions – requiring a second roll when the target makes a successful skill check, taking the worse result. Up to two of the target’s actions per round can be affected, at the attacking character’s choice. In addition to these forced rerolls, the target has a -1 modifier per 2 points in the skill tree to all attack, defend, and move actions. The target must be within a range in yards equal to the number of points in the skill tree, gets a Willpower save with a -1 modifier per 2 points in the skill tree, and the effect lasts 1 round per 3 points in the skill tree. This skill may only be used on sentient beings.
Prerequisites: The (E) Evil Eye skill and eight points in the skill tree
Attribute: Influence
Type: Utility
Time: Two Actions
Description: Characters with this skill can temporarily bring an otherworldly being into the physical world. While the general type of being is dependent upon the character’s associations, i.e. angels, demons, C’thulu, etc., the strength of being is determined at random. This is not a summoning so much as creating a rift to allow whatever is in the vicinity to step through. A successful skill check is required and then a random D20 roll, on a roll of 1 = Epic rank, 2-4 = Master rank, 5-10 = Expert rank, and 11-20 = Novice rank. The rift remains open for 1 round per 2 points in the skill tree, and while the character can make suggestions to the being, it will act according to its nature. Only one rift may be open at a time and it will remain open until the duration ends, regardless of the actions of the character.
Prerequisites: The Death Sense skill and four points in the skill tree
Attribute: Perception
Type: Attack
Time: One Action
Description: A character with this skill can inflict a target with otherworldly sight, giving them twisted and disturbing glimpses into outside realms. The strength of the visions increases with Character Rank, causing the target to be distracted by visions, suffering a -2 modifier to all casting skills and attack actions (Novice), has trouble distinguishing between visions and incoming attacks, suffering a -4 modifier to defend skill checks (Expert), and engages in combat with visions, ignoring all allies and enemies (Master). A touch attack is required, with a successful skill check, the target gets Willpower save (-1 modifier per two points in the skill tree) to negate the effect and may overcome it with a successful Concentrate or similar skill check each round. The effect lasts 1 round per 2 points in the skill tree, and this skill may only be used on sentient beings.
Specialization: (Required) Magic Foundation, i.e. Mystic, Land Strider, Wind Rider, Fire Walker, Wave Runner
Attribute: Influence
Type: Attack
Time: One Action
Description: A character with this skill can push a target into emotional distress, affecting their ability to respond to threats. Eye contact must be made with the target within a distance in yards equal to the number of points in the skill tree, and with a successful skill check the target is allowed a Willpower save with a -1 modifier per 2 points in the skill tree. If the save fails, the target is overcome with feelings of alarm and foreboding, giving them a -1 modifier to all saving throws (including morale saves) per 2 points in the skill tree for a number of rounds equal to the number of points in the skill tree. This skill may only be used on sentient beings.
Prerequisites: The Hex skill and four points in the skill tree
Attribute: Knowledge
Type: Utility
Time: N/A
Description: This skill is used to temporarily connect an abound spirit to an assembled puppet, giving it individual will. All aspects of the puppet remain the same, except that the infusion of spirit energy doubles its Health points and increases the duration to one day per point in the skill tree. There is an inherent risk to this in that the spirit cannot be controlled by the character and their magic is not only ineffective against puppet, but can be redirected by the spirit at any target in range. The act of connecting the spirit to the puppet takes two actions, and may only be used against willing targets.
Prerequisites: The Puppetry skill and eight points in the skill tree
Attribute: Perception
Type: Utility
Time: N/A
Description: Characters with this skill are able to understand the speech of animals and effectively communicate with them. The communication is spiritual in nature, though it involves interpreting animal sounds, odors, and body language, and then mimicking them to form the basis of the communication. It is an active skill, requiring the character to concentrate on communication, and may be used with familiar animals at a simple (+4) modifier, or attempted with monsters at a difficult (-4) modifier at Master Character Rank. In combat, it takes two actions to initiate communication but does not compel the animal to actively communicate, it is up to the character to convince them to do so. A skill check is required, and after three failed attempts, the character may not try to commune with that spirit again until the Character Rank is raised, i.e., Novice to Expert, Expert to Master, etc.
Prerequisites: The Aura Reading skill and four points in the skill tree
Attribute: Influence
Type: Utility
Time: N/A
Description: A character with this skill has created a powerful spiritual bond that allows for the ability to channel magic through their Animal Companion. In addition to the aesthetics of the spell appearing to emanate from the Animal Companion rather than the caster, it can be used to deliver touch attacks, maintain the range requirements for active duration spells, or provide a greater distance for ranged attacks. It must be within the skill tree rank in yards of the caster to channel magic, all other factors are based on the Animal Companion skill. Casting skills are used normally to make the attack and two of the familiar’s actions are used to conduct the spell effect.
Prerequisites: The Animal Companion skill and four points in the skill tree
Attribute: Knowledge
Type: Utility
Time: One Action
Description: Those with this skill can magically assemble components of their magic foundations (Landstrider – dirt or stone, Firewalker – burning wood, Mystic – a series of crafted objects, etc.) into a roughly humanoid form that can be directed. The puppet can be medium-scale (Expert) or large-scale (Master), uses the skill tree rank to hit, for damage, to determine Health points, and as a Durability rating. It lumbers about, with a per action move rate of 1 yard per 2 points in the skill tree, and has a carrying capacity equal to the skill tree rank x 10. In combat, it takes two actions to assemble and must be continually directed, requiring the character to spend one action per round to maintain control, as well as the ability to provide audible instructions for each of its actions (two instructions per free action/action). There must be a sufficient quantity of material for it to be constructed. The puppet will remain for one hour per point in the skill tree, so long as the character maintains active control, and will simply fall apart once it loses all its Health points or the duration expires.
Prerequisites: The Totemic Cast skill and four points in the skill tree
Attribute: Perception
Type: Utility
Time: N/A
Description: Characters with this skill can commune with the remnants of a life force left behind after a death event. Spirits that do not move to the afterlife typically remain tied to their physical form or the place of their death, though it is possible to find lost or wandering spirits as well as those who have been willingly or unwillingly used to power magic items. A skill check is required to reach out to the spirit, and the character may either spiritually commune with them (Expert) or give them a voice, allowing others to interact with them (Master). Giving a spirit a voice requires a vessel, whether a corpse a living host, though this latter comes with risk. After three failed attempts, the character may not try to commune with that spirit again until the Character Rank is raised, i.e., Novice to Expert, Expert to Master, etc.
Prerequisites: The Death Sense skill and four points in the skill tree
Attribute: Perception
Type: Utility
Time: N/A
Description: Characters with this skill have a connection with the spiritual world that gives them insight into death. It can be used to collect information about a death event, either for a specific individual or within a general area, to include empathically experiencing the moments surrounding the death event (Novice), a sensory experience of the physical events that immediately preceded death as an observer (Expert), and the ability to observe the series of events that led to the death event as flashbacks (Master). A skill check is required, with a progressive difficult (-4) modifier for each failure, after three tries the character may not try again until the Character Rank is raised, i.e., Novice to Expert, Expert to Master, etc., and defend is allowed for any magical, psionic, or other such countermeasures.
Specialization: (Required) Magic Foundation, i.e. Mystic, Land Strider, Wind Rider, Fire Walker, Wave Runner
Attribute: Influence
Type: Utility
Time: N/A
Description: A character with this skill can form a bond with a small animal, who will henceforth strive to protect and care for the character. It may be a specific animal, type of animal, or locality of animal, though the bond is limited to a single animal at any given time, that will then stay with the character until dismissed. The capabilities of the animal are based on the general statistics of a common animal of that type and Character Rank. At Novice rank they have non-verbal communication capabilities with the character and respond to general obedience commands. At Expert rank, they can verbally communicate with the character and respond to advanced obedience commands. At Master rank, the character and animal share a telepathic link within a 100-yard radius. If the animal dies, another cannot be summoned until the Character Rank is raised, i.e., Novice to Expert, Expert to Master, etc.
Specialization: (Required) Magic Foundation, i.e. Mystic, Land Strider, Wind Rider, Fire Walker, Wave Runner
Attribute: Perception
Type: Attack
Time: One Action
Description: Those with this skill can perceive and read the normally invisible fields that are generated by and surround every living thing. It can be used to determine the spiritual state of an individual or animal, including: descriptors of general emotional state and feelings towards individuals (Novice), moral alignment in terms of color, typically black, white, and shades of gray, which includes determining degrees of truth (Expert), the true nature or essence of a being, seeing past disguises or shapeshifting abilities (Master). This skill is used like a search skill, with aura’s visible despite the amount of light in an area. A defend is allowed for any magical, psionic, or other such countermeasures.
Specialization: (Required) Magic Foundation, i.e. Mystic, Land Strider, Wind Rider, Fire Walker, Wave Runner
Attribute: Knowledge
Type: Utility
Time: N/A
Description: Characters with this skill can combine the effects of two stored spells. A free action and skill check at this skill tree rank is required to cast, and this skill tree rank is used for all relevant spell factors. All normal saves apply to both spells, however, the resistance to spell effects may be manipulated (Hold and Burst to prevent the target from escaping the area of effect) and the spells may work together to achieve a result (Dispel Magic and Mage Blast, to cancel Mage Armor and cause damage). The spell combination must be announced before the check is made. Only spells available in the encounter may be used, and both spells are considered used whether or not the cast is successful.
Prerequisites: The Diligent Component skill and eight points in the skill tree
Attribute: Constitution
Type: Utility
Time: N/A
Description: A character with this skill can draw energy from the talisman to reduce the amount of physical rest that they require. While in possession of the talisman, the character recovers health and body points at half the normal rate, gaining their healing rate in health per half hour and body damage per four hours, while at rest.
Prerequisites: The Tenacious Path skill and four points in the skill tree
Attribute: Constitution
Type: Utility
Time: N/A
Description: A character with this skill can draw energy from the nexus to stave off casting fatigue. While in possession of the talisman, the character ignores the casting round limit during an encounter. As this is a passive effect, it may be used with any casting skill.
Prerequisites: The Tenacious Path skill and four points in the skill tree
Attribute: Influence
Type: Utility
Time: N/A
Description: Those with this skill move the one action maintenance required for all active duration spells to the talisman. This must be specified at the start of the character’s initiative turn and can be done as part of the maintenance action, allowing for further maintenance actions to be handled by the talisman for 1 round per 2 points in the skill tree. An action is required to activate the effect. The talisman may not be used for any other action while being used in this way. If the check fails, a second action is required to maintain the active spells or they drop. When this skill is activated, the Foundation Object will glow brightly, illuminating a 1-yard area per active duration spell being maintained.
Prerequisites: The Intense Path skill and four points in the skill tree
Attribute: Knowledge
Type: Utility
Time: N/A
Description: This skill negates the need for somatic components, allowing the caster to simply ignore the requirement for more rapid spell casts. In addition to being the material component for spells with the integrated Foundation Object, the talisman is adorned with precious bells, chimes, or other connected trinkets that resonate upon casting, reducing the casting time by one action, with a minimum cost of one action. This is a passive effect that may be used with other casting skills. Skilled casters are known to create specific tones for castings, crafting particular spells to sound off in individual ways.
Prerequisites: The Diligent Path skill and four points in the skill tree
Attribute: Influence
Type: Utility
Time: N/A
Description: This skill is used to increase the number of active duration spells that can be maintained at a time. Channeling the active duration spell through the talisman mitigates the fatigue of maintaining the magic, allowing for additional active duration spells before suffering a modifier, based on Character Rank – Novice 2, Expert 3, Master 4. As this is a passive effect, it may be used with any casting skill.
Prerequisites: The Intense Path skill and four points in the skill tree
Attribute: Knowledge
Type: Utility
Time: N/A
Description: Characters with this skill can add unmodified instant or passive spells with a casting time of three actions or less onto their talisman. Stored spells are cast with a free action, requiring a skill check at this skill tree rank and using this skill tree rank for all relevant spell factors. One spell may be cast off the talisman per round, and a particular spell may only be cast once per encounter, but the number of spells that can be cast in an encounter is based on Character Rank – Novice 1, Expert 2, Master 3, Epic 4. The talisman must be large enough for the spells to be crafted on it (medium size), a spell can be crafted on it multiple times, and the talisman must be modified in order to make changes, per the Talisman Construction rules.
Prerequisites: The Diligent Path skill and four points in the skill tree
Attribute: Perception
Type: Utility
Time: N/A
Description: Characters with this skill can view the world around them from the perspective of their talisman. This allows them to passively view all directions at once, giving them a +1 modifier per 2 points in the skill tree to Observation skill checks and to save against Surprise attacks. In addition, when used with existing search type skills, the character can also see if individuals or objects are connected to a magic foundation, subject to normal countermeasures. The character must be in possession of the talisman to gain the benefit of this skill.
Prerequisites: The Nexus skill and four points in the skill tree
Attribute: Constitution
Type: Utility
Time: N/A
Description: Characters with this skill can draw sustenance from the talisman to fulfill their biological needs. While in possession of the talisman, they don’t need to eat or drink for a number of days equal to the number of points in the skill tree with no negative effects. After this point, the talisman will continue to sustain them indefinitely but in a fatigue state until food and water can be attained. In addition, the character can hold their breath for a number of rounds equal to the skill tree rank, and endure harsh elements with no lasting effects for a number of days equal to the number of points in the skill tree rank. This is a passive effect that doesn’t require any actions to activate.
Prerequisites: The Tenacious Energy skill and eight points in the skill tree
Attribute: Constitution
Type: Utility
Time: N/A
Description: A character with this skill can draw energy from the talisman to more quickly overcome temporary effects. While in possession of the talisman, the character ignores the second-round effects from stun attacks, overcomes fatigue effects with ten minutes of rest, rebounds from disabling damage in half the normal time. In addition, they gain a +1 modifier per 3 points in the skill tree to Stamina saves vs poison. This is a passive effect that doesn’t require any actions to activate.
Prerequisites: The Tenacious Rest skill, and eight points in the skill tree
Attribute: Perception
Type: Utility
Time: N/A
Description: Those with this skill can set a temporary nexus in a specific location and instantly return themselves to that point. The temporary nexus is stationary, appearing as a hovering version of the talisman, but doesn’t actually have a physical presence in the world, though it can be dispelled by a sufficiently powerful caster. Two actions and a skill check are required to activate the effect, immediately transporting the character to the temporary nexus, at which point it dissipates. A temporary nexus will last a number of days equal to the skill tree rank, and there may be 1 temporary nexus per 4 points in the skill tree simultaneously active.
Prerequisites: The Awareness skill and eight points in the skill tree
Attribute: Constitution
Type: Utility
Time: N/A
Description: This skill is used to store life essence in the event of the untimely demise of the physical form. Rather than moving to the afterlife, the character’s spirit follows the link to their nexus where they remain aware and can potentially communicate with others. The ability for the spirit to move into a living form, be crafted into an item, or otherwise escape the phylactery is dependent upon outside factors, which may include specific crafting with the talisman. If the talisman is destroyed, the spirit is typically absorbed by the magic foundation.
Prerequisites: The Binding skill and eight points in the skill tree
Attribute: Influence
Type: Utility
Time: N/A
Description: A character with this skill is able to make it more difficult to break free of active duration spells. Channeling the active duration spell through the talisman increases the effectiveness of the magic, giving those under the effect of the spell a -1 modifier per 3 points in the skill tree to break free of the spell. As this is a passive effect, the modifier applies automatically.
Prerequisites: The Intense Annex skill and eight points in the skill tree
Attribute: Knowledge
Type: Utility
Time: N/A
Description: This skill is used to add instant or passive spells that have been modified with free actions to the talisman. The modified spells must be crafted onto the talisman by the caster, requiring that they have the ability to modify them. Stored spells are cast with a free action, requiring a skill check at this skill tree rank and using this skill tree rank for all relevant spell factors. One spell may be cast off the talisman per round, and a particular spell may only be cast once per encounter, but the number of spells that can be cast in an encounter is based on Character Rank – Novice 1, Expert 2, Master 3, Epic 4. The talisman must be large enough for the spells to be crafted on it (medium size), a spell can be crafted on it multiple times, and the talisman must be modified in order to make changes, per the Talisman Construction rules.
Prerequisites: The Diligent Storage skill and eight points in the skill tree
Attribute: Influence
Type: Utility
Time: N/A
Description: Those with this skill can establish a temporary nexus to maintain the per action maintenance required for all active duration spells. This must be specified at the start of the character’s initiative turn and can be done as part of the maintenance action, allowing for further maintenance actions to be handled by the temporary nexus for 1 round per 2 points in the skill tree. The temporary nexus is stationary, appearing as a hovering version of the talisman, and its link allows the caster to leave the area of effect while maintaining or dropping the spells normally. Once all active spells end, the temporary nexus dissipates. This ability may be used one time per encounter, the caster must remain within one hundred yards of the temporary nexus, and it requires an action and a skill check to activate this effect. If the check fails, the talisman takes over maintenance of the active spells or they drop.
Prerequisites: The Intense Maintenance skill, and eight points in the skill tree
Attribute: Influence
Type: Utility
Time: N/A
Description: Those who select this path prefer the aggressiveness of active duration spells, utilizing their talisman as a resource to maximize their use. This skill allows the character to channel active duration spells through the talisman, negating the requirement of a Concentration skill check for maintaining multiple active duration spells. As this is a passive effect, it may be used with any casting skill.
Specialization: (Required) Magic Foundation, i.e. Mystic, Land Strider, Wind Rider, Fire Walker, Wave Runner
Attribute: Constitution
Type: Utility
Time: N/A
Description: This skill is used to tether the character’s life energy to their Foundation Object to draw on it for aid. The type of aid is based on Character Rank – regenerate health points based on Character Rank – Novice 1, Expert 2, Master 3, Epic 4, per round for a number of rounds equal to the number of points in the skill tree (Novice), a minor immunity to magic, providing a second spell save if the first save fails (Expert), or give the character a second set of magical arms that increase speed factors by one and allow actions such as drawing a weapon or opening a door to be done as a free action (Master). The effect can be activated with a free action. Because of the link, the glow on the Foundation Object fades as the character loses health and body points.
Prerequisites: The Nexus skill, and four points in the skill tree
Attribute: Constitution
Type: Utility
Time: N/A
Description: A character who selects this path prefers to view casting as a marathon rather than a sprint, using their talisman to extend their overall effectiveness. This skill is used to draw energy from the talisman to help stave off the effects of fatigue, reducing the negative modifier based on Character Rank – Novice 1, Expert 2, Master 3, Epic 4. For this path, the talisman must have a greater expanse, either in size (at least medium) or in the visual intensity of the Foundation Object.
Specialization: (Required) Magic Foundation, i.e. Mystic, Land Strider, Wind Rider, Fire Walker, Wave Runner
Attribute: Constitution
Type: Per Spell
Time: Per Spell
Description: This skill is used to cast a number of unmodified spells into the familiar to be released at a later time. A familiar can store 1 spell per 3 points in the skill tree for a number of hours equal to the number of points in the skill tree. This skill tree rank is used when the familiar is casting the spell, on a fail the spell is lost, but if successful the spell effects are as if cast by the character. Only spells in the character’s spellbook may be stored in the familiar, a maximum of two spells may be cast per round, and the familiar must pay all associated action costs.
Prerequisites: The (E) Conduct Magic skill and eight points in the skill tree
Attribute: Perception
Type: Utility
Time: N/A
Description: A character with this skill has a magical link to their familiar that allows for communication and tangible awareness. In addition to being able to communicate telepathically through the Magic Foundation, the Druid can look in on the familiar to be fully aware of their situation and environment per its sensory capabilities. No skill check is required so long as the familiar is within the skill tree rank in yards of the caster, however, outside of that range, it is treated as a search type skill, requiring a skill check and susceptible to obscuring magics.
Prerequisites: The Surveil skill and four points in the skill tree
Attribute: Agility
Type: Utility
Time: N/A
Description: Those with this skill can use their familiar to temporarily interrupt Active or Passive Duration spells to free those affected. When the Druid or an ally is under the effect of a duration spell, the familiar can be directed to make contact with the magic effect to disrupt the effect and its connection to the target, allowing the target to move away while leaving the magic active. The spell ends when either the time elapses or the drops the active maintenance, anyone who passes through the area of the effect must make a save against the magic to avoid coming under its effect. The familiar must be within the skill tree rank in yards of the caster, moves in the same way and speed as their animal form, and acts on the same initiative as the caster.
Prerequisites: The (E) Deliver Magic skill and eight points in the skill tree
Attribute: Perception
Type: Utility
Time: N/A
Description: Those with this skill can use the sensory capabilities of their familiar to perceive the world around them. Granted sensory abilities are based on a normal type of the familiar’s animal form, i.e., a cat sees in the dark, a bat has echolocation, a mole senses vibration, etc., and the effect lasts a number of rounds equal to the number of points in the skill tree. These abilities may be used with existing skills, i.e., Search, Observation, etc., and provide additional information as is appropriate. In combat, one action and a skill check are required to activate the ability, and the familiar must be within the skill tree rank in yards of the caster.
Prerequisites: The Surveil skill and four points in the skill tree
Attribute: Agility
Type: Utility
Time: N/A
Description: A character with this skill can use their familiar to make a touch attack, channeling a spell through it to affect the target. In addition to the aesthetics of the spell appearing to emanate from the familiar rather than the caster, it keeps the caster from having to enter melee range to deliver the spell effect. The familiar must be within the skill tree rank in yards of the caster and maintain a semi-solid state for the remainder of the encounter, preventing it from moving through substances or disappearing from sight. Familiars move in the same way and speed as their animal form and act on the same initiative as the caster, casting skills are used normally to make the attack and two of the familiar’s actions are used to deliver the spell effect.
Prerequisites: The Nexus skill and four points in the skill tree
Attribute: Constitution
Type: Utility
Time: Two Actions
Description: This skill allows casters to summon a magical being based on their primary Magic Foundation to maintain their Active Duration spells. When summoned, the caster can transfer the action requirement to maintain Active Duration spells to the fiend for a number of spells based on their Character Rank – Expert 1, Master 2, Epic 4. The fiend has a serpentine form based on the Magic Foundation, is willed, and will react to those who come near, typically by hissing or striking at them, though it has no substance. Once summoned, it will remain until dismissed. If summoned during combat, it takes two actions.
Prerequisites: The Active Layering skill and four points in the skill tree
Attribute: Constitution
Type: Utility
Time: N/A
Description: Characters with this skill can move Active Duration spells to their familiar. A skill check is required to successfully move the action requirement to the familiar, allowing it to take over maintenance the next round, and it can maintain a number of spells based on Character Rank – Expert 1, Master 2, Epic 4. The familiar must be within the skill tree rank in yards of the caster and maintain a semi-solid state for the remainder of the encounter, preventing it from moving through substances or disappearing from sight. Familiars move in the same way and speed as their animal form and act on the same initiative as the caster.
Prerequisites: The Nexus skill and four points in the skill tree
Attribute: Influence
Type: Utility
Time: N/A
Description: This skill is used to channel a ranged spell through the familiar. In addition to the aesthetics of the spell appearing to emanate from the familiar rather than the caster, this skill could be used to increase the range of the spell. The familiar must be within the skill tree rank in yards of the caster and maintain a semi-solid state for the remainder of the encounter, preventing it from moving through substances or disappearing from sight. Familiars move in the same way and speed as their animal form and act on the same initiative as the caster. Casting skills are used normally to make the attack and two of the familiar’s actions are used to conduct the spell effect.
Prerequisites: The Nexus skill and four points in the skill tree
Attribute: Perception
Type: Utility
Time: N/A
Description: Characters with this skill can use their familiar to be on guard or scout an area. The familiar moves in the same way and speed as their animal form, maintaining a semi-solid state due to an increased presence in the physical world, preventing it from moving through substances or disappearing from sight. In combat, the familiar moves on the same initiative as the caster, must spend actions to move, and has to return to the caster to report information. If the familiar is also the Nexus, when it moves to a range beyond the skill tree rank in yards, the caster suffers the -4 modifier to all casting attempts for not having their Foundation Object.
Specialization: (Required) Magic Foundation, i.e. Mystic, Land Strider, Wind Rider, Fire Walker, Wave Runner
Attribute: Constitution
Type: Utility
Time: N/A
Description: Those with this skill can transition their Foundation Object to a more advanced form. A nexus is specific to the character and allows for specific capabilities depending on the form it takes. Because the nexus is more intertwined with the caster and their foundation than a standard Foundation Object, if it is taken or lost, it cannot simply be reforged and must be recovered. A new nexus may be forged if the link to the old one is severed, though that typically involves destruction or similarly extreme action.
Specialization: (Required) Magic Foundation, i.e. Mystic, Land Strider, Wind Rider, Fire Walker, Wave Runner
Attribute: Constitution
Type: Utility
Time: One Action
Description: A character with this skill can receive physical aid from their familiar. The magical aspect can provide the character with a number of temporary health points equal to the skill tree rank (Novice), heal a number of body points equal to the number of points in the skill tree (Expert), or stave off the effects of fatigue for 1 round per 2 points in the skill tree (Master). Temporary health points last until the end of the encounter and are subtracted first when taking damage. This type of aid weakens the familiar and may only be received one time per encounter.
Specialization: (Required) Magic Foundation, i.e. Mystic, Land Strider, Wind Rider, Fire Walker, Wave Runner
Attribute: Constitution
Type: Attack
Time: Two Actions
Description: Those with this skill can summon stones around a target to hold them in place and make crushing attacks. Stones rise up out of the ground around the target, holding them prone, and begin to grind, causing body damage each round equal to the number of points in the skill tree. The attack is considered a trap for the purpose of avoidance, requiring a Reaction or similar skill save to avoid, with a -1 modifier per 2 points in the skill tree, and it lasts a number of rounds equal to the number of points in the skill tree. Trapped targets have a -1 modifier per 3 points in the skill tree to make an escape attempt. Only one target may be Entombed at a time.
Prerequisites: The Seism skill and eight points in the skill tree
Attribute: Knowledge
Type: Utility
Time: Two Actions
Description: Characters with this skill can summon a large-sized stone spirit that serves as the vessel of nature’s wrath. The spirit inhabits a series of small boulders in a roughly humanoid shape that attacks targets, as directed by the Druid. All attacks are made with this skill rank, causing elemental damage equal to the skill tree rank plus the size modifier; a save against the skill rank is required each time the stone spirit takes damage, if the save fails, the form is lost and must be summoned again. After a number of rounds equal to the number of points in the skill tree, the form is lost and must be summoned again. It moves at a per action rate equal to a number of points in the skill tree, can be summoned a number of times in an encounter based on the Character Rank, Master=4, Epic= 6, and must remain within a number of yards equal to the skill rank.
Prerequisites: The Cobblestone skill and eight points in the skill tree
Attribute: Knowledge
Type: Utility
Time: Two Actions
Description: A character with this skill can summon a tiny or small stone spirit that typically serves as a scout. The spirit inhabits a single stone that rolls around to gather information; tiny stones may be tossed in a specific direction or at a target. The capabilities of the spirit are based on Character Rank. At Novice rank they perceive only generalities, i.e., numbers, location, etc., can follow simple instructions and must return to report findings. At Expert rank, they can perceive details, i.e., identify individuals, search for specific objects, etc., follow a complex set of instructions, and report back telepathically. At Master rank, they can follow instructions with an autonomous will and allow the Druid to perceive through them. At Epic rank, the Druid can channel their abilities through the spirit as if it were a part of them. A stone spirit can be summoned one time per encounter, has a move rate equal to the skill tree rank, lasts a number of rounds equal to the skill tree rank, and must remain within 100 yards of the Druid.
Specialization: (Required) Land Strider Magic Foundation
Attribute: Constitution
Type: Attack
Time: Two Actions
Description: Those with this skill can cause the surface around them to violently shake, knocking everyone in the area prone, and potentially cause damage to structures. The size of area the Druid can affect is based on Character Rank, Expert = 3-yard area, Master = 5-yard area, Epic = 7-yard area, and the effect lasts for 1 round per 3 points in the skill tree. All targets get a Reaction or similar skill save, at a -1 modifier per 2 points in the skill tree. A structure in the area of effect gets a structural strength save modifier based on type, wood -1 per 2 points in the skill tree, stacked stone -1 per 3 points in the skill tree, masoned stone -1 per 4 points in the skill tree.
Prerequisites: The Stone Sense skill and four points in the skill tree
Attribute: Agility
Type: Move
Time: One Action
Description: Those with this skill can move up, down, and across vertical natural surfaces or upside-down along ceilings. Druids move at their normal movement rate and may wall crawl (Novice), walk upright and engage in combat with no modifiers (Expert), use available movement skills, i.e., Running, Rolling Strike, etc., (Master). Surfaces may be any form of dirt or stone and must be able to support the character’s weight.
Specialization: (Required) Land Strider Magic Foundation
Attribute: Knowledge
Type: Utility
Time: Two Actions
Description: A character with this skill can summon a medium-sized stone spirit that serves as a guardian. The spirit inhabits a series of stones in a roughly humanoid shape that uses its actions to block melee or ranged attacks made against the Druid or allies, as directed. Blocks are made with this skill rank; a save against the skill rank is required each time the stone spirit takes damage, if the save fails, the form is lost and must be summoned again. After a number of rounds equal to the number of points in the skill tree, the form is lost and must be summoned again. It can be summoned a number of times in an encounter based on the Character Rank, Expert=2, Master=4, Epic= 6, and must remain within a number of yards equal to the skill rank.
Prerequisites: The Pebble skill and four points in the skill tree
Attribute: Strength
Type: Attack
Time: One Action
Description: This skill is used to project a wave of stones at all targets in the area. With a successful skill check, the character can hurl a series of stones in a forward cone with a maximum distance and arc equal to the number of points in the skill tree in yards. It is treated as an area attack, has a speed factor of two, causes elemental damage equal to the skill rank and causes stun damage – lose all actions for the remainder of the round and allowed only two actions in the following round, which may be used for defend or move actions. Target’s get a Stamina save to avoid the stun effect.
Prerequisites: The Slab skill and four points in the skill tree
Attribute: Perception
Type: Utility
Time: One Action
Description: This skill provides the character with a heightened sensitivity to vibrations in the ground. It may be used to discern factors including direction, number, size, and distance of moving beings in contact with the ground at a distance equal to ten yards per point in the skill tree. It may also be used in place of a skill check to locate those attempting to use Stealth or similar skills. The Druid must be in contact with the ground to use this skill, and the difficulty is based on the type of ground, type of obstacles in the environment, and time taken.
Specialization: (Required) Land Strider Magic Foundation
Attribute: Agility
Type: Attack
Time: One Action
Description: A character with this skill can make a series of simultaneous Talon skill claw attacks against a prone target. With a successful skill check, a single hit results in 1 strike per 2 points in the skill tree. The attack appears as a succession of ghostly claw attacks, each of which causes damage equal to Strength +2, plus one per two points in the skill tree, with a critical hit range of 1-2. If the target makes a successful defend against this attack, the effect is avoided entirely. If the skill check fails or the target successfully defends, the attack misses. All other factors work as the Talon skill.
Prerequisites: The Talon skill and eight points in the skill tree
Attribute: Strength
Type: Attack
Time: One Action
Description: Those with this skill can make a Fang skill bite attack against a target at range. With a successful skill check, the character can hit a target at a range equal to 1 yard per two points in the skill tree, causing damage equal to Strength +4, plus one per point in the skill tree, with a critical hit range of 1-4, and a speed factor of 2. The attack appears as a ghostly image of the muzzle that appears in front of the target as the attack is happening. If the skill check fails or the target successfully defends, the attack misses. All other factors work as the Fang skill.
Prerequisites: The Fang skill and eight points in the skill tree
Attribute: Agility
Type: Attack
Time: One Action
Description: This skill is used to make a Talon skill attack against multiple targets in the area. With a successful skill check, the character can simultaneously hit 1 target per 2 points in the skill tree, in an area around the Druid based on Character Rank, Expert = 3-yard area, Master = 5-yard area, Epic = 7-yard area. The attack causes damage equal to Strength +2, plus one per two points in the skill tree, with a critical hit range of 1-2. Each target is allowed a defend skill against the attack. If the skill check fails or the target successfully defends, the attack misses. All other factors work as the Talon skill.
Prerequisites: The Talon skill and four points in the skill tree
Attribute: Constitution
Type: Attack
Time: Two Actions
Description: A character with this skill can make a thunderous roar that overwhelms all targets in an area. The attack affects an area in front of the Druid equal to 1 yard per two points in the skill tree, causing a stun effect – lose all actions for the remainder of the round and allowed only two actions in the following round, which may be used for defend or move actions. All targets in the area are allowed a Stamina save (-1 modifier per two points in the skill tree) to resist the effect.
Prerequisites: The Animal Shape skill and four points in the skill tree
Attribute: Agility
Type: Attack
Time: One Action
Description: Characters with this skill can temporarily transform forearms and hands to be animal-like, with elongated nails to make a vicious claw attack. With a successful skill check, the character can make a raking or stabbing attack, causing damage equal to Strength +2, plus one per two points in the skill tree, with a critical hit range of 1-2. If the skill check fails or the target successfully defends, the attack misses. Characters can choose to transform for a single attack, retain the animal-like appearance for the encounter, or use any combination thereof.
Specialization: (Required) Magic Foundation, i.e. Mystic, Land Strider, Wind Rider, Fire Walker, Wave Runner
Attribute: Strength
Type: Attack
Time: One Action
Description: A character with this skill can temporarily transform their neck and head to be animal-like, with a wide muzzle to make a vicious biting attack against a grabbed or prone target. On a successful skill check, the attack succeeds causing damage equal to Strength +4, plus one per point in the skill tree, with a critical hit range of 1-4, a speed factor of 2, and a difficult (-4) modifier to hit. If the defender is not grabbed or prone, they get an Attack of Opportunity. Additionally, because of its aggressive nature, use of this attack action negates any defensive modifiers gained by stance or defend skills for the remainder of the round. If the skill check fails or the target successfully defends, the attack misses. Characters can choose to transform for a single attack, retain the animal-like appearance for the encounter, or use any combination thereof.
Specialization: (Required) Magic Foundation, i.e. Mystic, Land Strider, Wind Rider, Fire Walker, Wave Runner
Attribute: Constitution
Type: Move
Time: Two Actions
Description: A character with this skill can step into any tree with a circumference greater than one yard, and pass any distance to a similarly sized or larger tree, regardless of the distance separating the two. Travel is not instantaneous, taking a minute per hour of normal travel time. Both trees must be alive and the destination tree must be well known to the character. This is individual travel only, and the Druid may not carry weight that exceeds their carrying capacity or greater than a 10% bulk of their form. If either tree is cut down during travel, it is immediately fatal to the traveler.
Prerequisites: Eight points in the skill tree
Attribute: Strength
Type: Attack
Time: One Action
Description: This skill is used in conjunction with a successful called shot Lash attack at the throat (-8 modifier) to kill an opponent by preventing them from breathing. After the called shot hits, the Druid uses this skill to wrench the target, causing body damage equal to the Strength score plus one point per 2 points in the skill tree. Targets get a base save to resist damage, once they sustain body damage, the Druid may use this skill to make a Kill Attack. Escape attempts may be countered with this skill rank, though it does require an action.
Prerequisites: The (E) Constrict skill and four points in the skill tree
Attribute: Constitution
Type: Utility
Time: One Action
Description: Those with this skill can add a contact poison effect to any touch attack. This is a distress type poison that is yellowish in color, the strength of which is based on Character Rank, six points of damage and a -2 modifier to all actions (Expert), 8 points of damage and a -4 modifier to all actions (Master), 12 points of damage and a -6 modifier to all actions (Epic). Targets get a Stamina save to resist at a -1 modifier per 3 points in the skill tree. An action is required to generate the poison, it may only be generated one time per round, and is used on a successful hit. Druids are immune to their own poison.
Prerequisites: The Plant Mimicry skill and four points in the skill tree
Attribute: Influence
Type: Attack
Time: One Action
Description: A character with this skill is able to project their spirit into another, taking physical control of the target’s body and gaining access to all of their skills. While controlling another, the character remains aware of their physical form, but cannot take any actions without relinquishing control of the target’s body. The target gets a Willpower save to resist the effect at a -1 modifier per 3 points in the skill tree, and it lasts 1 hour per point in the skill tree. All target skills are used with this skill tree rank, at a difficult (-4) modifier. The character is required to touch the target. On a successful skill check, the target is hit and may defend normally; if the skill check fails or the target makes a successful defend, the attack fails.
Prerequisites: The (E) Bind Life skill and eight points in the skill tree
Attribute: Constitution
Type: Utility
Time: N/A
Description: This skill is used to draw objects into life energy to be released when needed. The size of the object is always in relation to the target, may not have a mass greater than half of the target, and is based on Character Rank, i.e., tiny or small (Expert), medium (Master), large (Epic). The seal appears as a tattoo and requires an action to release, but an hour to prepare and perform. Seals are temporary and will last a number of days equal to the number of points in the skill tree and limited to a number of seals equal to one per two points in the skill tree per target.
Prerequisites: The Life Sense skill, Spirit Touch skill, and four points in the skill tree
Attribute: Perception
Type: Attack
Time: One Action
Description: Those with this skill have an enhanced awareness of the fundamental forces that allow life to appear, grow, and flourish. They can use it to determine the physical state of an individual or animal – general health factors (Novice), a percentage of health or body points (Expert), Character Rank (Master), to get a sense of the current emotional state (Novice), or read the lineages of those present at -2 modifier per generation (Expert). A defend is allowed for any magical, psionic, or other such disguise factors.
Specialization: (Required) Magic Foundation, i.e. Mystic, Land Strider, Wind Rider, Fire Walker, Wave Runner
Attribute: Constitution
Type: Utility
Time: N/A
Description: A character with this skill is able to collect radiant energy for healing and sustenance. When activated, the character’s flesh takes on a plant-like hue and appearance, and while in direct sunlight they regenerate Health points at a rate of 1 point per 2 points in the skill tree per round. In addition, those who spend thirty minutes in the sunlight receive enough nourishment for the day. An action is required to activate this skill while in combat.
Prerequisites: The Plant Mimicry skill and four points in the skill tree
Attribute: Strength
Type: Attack
Time: One Action
Description: Characters with this skill can use a successful Lash attack to compress and disable a target. After a Lash attack hits, the Druid is able to wrap the vine-like appendage around the target and squeeze, causing damage equal to the Strength score plus one point per 2 points in the skill tree. Targets get a base save to resist damage, and for each round they’re held they must make a Stamina save to remain conscious, at a -1 modifier per 2 points in the skill tree. Escape attempts may be countered with this skill rank, though it does require an action.
Prerequisites: The Lash skill and four points in the skill tree
Attribute: Constitution
Type: Attack
Time: One Action
Description: A character with this skill is able to summon a tangle of underbrush to hinder a target. The effect of the underbrush is based on Character Rank and may be used to slow, reducing move rates by half (Novice), make trip attacks to know prone (Expert), hold in place (Master), hold and cause 1 point of damage per pointing the skill tree (Epic). These are considered traps for the purpose of avoidance, requiring a Reaction or similar save to avoid, with a -1 modifier per 3 points in the skill tree. The effect lasts one round per point in the skill tree.
Specialization: (Required) Land Strider Magic Foundation
Attribute: Constitution
Type: Defend
Time: N/A
Description: This skill is used to take on the outer appearance of local plants or shrubbery to disguise the Druid’s presence in an area. It may be used to defend against natural and magical location or detection attempts with an opposed save against this skill rank that does not require an action.
Specialization: (Required) Land Strider Magic Foundation
Attribute: Agility
Type: Attack
Time: One Action
Description: Those with his skill can temporarily transform an upper limb into a vine-like appendage to make flogging type attacks. The reach of the appendage is based on Character Rank, Novice = 1 yard, Expert = 3 yards, Master = 6 yards, Epic =9 yards, and does Strength plus 1 point of damage per point in the skill tree. Characters can choose to have the appendage transform for the single attack, retain the vine-like appearance for the encounter, or use any combination thereof.
Specialization: (Required) Land Strider Magic Foundation
Attribute: Agility
Type: Move
Time: One Action
Description: A character with this skill can instantly move across any natural surface. The number of successive moves that may be taken in a single round is based on Character Rank, Novice = 1, Expert = 2, Master = 3, Epic =4, and equal to 1 yard per point in the skill tree. While it can be used on a cleared surface, such as a dirt path, this skill may not be used on constructed surfaces, i.e., wood floor, hewn stone, etc.
Specialization: (Required) Land Strider Magic Foundation
Attribute: Influence
Type: Utility
Time: N/A
Description: This skill is used to move a spirit from one physical form to another. Physical attribute qualities (Agility, Strength, Constitution, and Perception) and racial abilities stay with the appropriate physical form, using those base scores as appropriate, while awareness, skill trees, and phrenic attributes (Knowledge and Influence) are exchanged. Beings must be of the same taxonomic kingdom (animal, plant, etc.) and have greater than animal intelligence. The process takes a full day to complete, and both subjects are required to make a difficult (-4) Stamina save to complete the process, a failure indicates death. Unwilling targets get a Willpower save to resist the effect at a -1 modifier per 3 points in the skill tree. The character is required to maintain physical contact with the target(s) throughout the process. Once begun, if interrupted the target(s) are required to make a difficult (-4) Stamina save, a failure indicates death.
Prerequisites: The (E) Bind Life skill and eight points in the skill tree
Attribute: Influence
Type: Attack
Time: Two Actions
Description: This skill is used to make a spiritual connection that allows for the sharing of abilities or knowledge. In addition to granting a skill to or drawing one from a target, racial abilities such as night vision, regeneration, etc, can be shared. A maximum of one ability per four points in the skill tree can be shared simultaneously. All shared abilities function at this skill tree rank, at a difficult (-4) modifier (if applicable), and last up to 1 round per 2 points in the skill tree. Beings must be of the same taxonomic kingdom (animal, plant, etc.) and have greater than animal intelligence. The effect lasts for one round per two points in the skill tree. When sharing knowledge, the transfer of information goes both ways and is limited to information located in the conscious mind. Unwilling targets get a Willpower save at a -1 modifier per 3 points in the skill tree to resist the effect. The character is required to touch both targets. On a successful skill check, the target is hit and may defend normally; if the skill check fails or the target makes a successful defend, the attack fails.
Prerequisites: The (E) Life Bind skill and four points in the skill tree
Attribute: Constitution
Type: Attack
Time: One Action
Description: Characters with this skill can absorb the life energies of another to use for themselves. At Expert Character Rank, one health point per point in the skill tree may be absorbed; at Master Character Rank, the character may choose to absorb health or body points; and at Epic Character Rank health and body points are absorbed simultaneously. These points can be used to heal wounds (Expert), temporarily increase health or body scores up to the number of points in the skill tree (Master), or temporarily increase attack damage up to the number of points in the skill tree (Master). Temporary effects last one round per two points in the skill tree. Targets get a Stamina save at a -1 modifier per 2 points in the skill tree to resist the effect. The character is required to touch the target. On a successful skill check, the target is hit and may defend normally; if the skill check fails or the target makes a successful defend, the attack fails.
Prerequisites: The Spirit Touch skill and four points in the skill tree
Attribute: Influence
Type: Attack
Time: Two Actions
Description: This skill is used to tether the life energies of two beings. Those who are bound share physical effects, including taking damage and healing – damage and saves are calculated normally, but half of the damage sustained is suffered by both individuals. Likewise, each individual benefits from half of healing. Beings must be of a similar size; at Expert Character Rank, the beings must be of the same taxonomic family; at Master Character Rank, the beings must be of the same taxonomic class; and at Epic Character Rank, the beings must be of the same taxonomic kingdom. The effect lasts for one round per two points in the skill tree. Targets get a Stamina save at a -1 modifier per 2 points in the skill tree to resist eth effect. The character is required to touch both targets. On a successful skill check, the target is hit and may defend normally; if the skill check fails or the target makes a successful defend, the attack fails.
Prerequisites: The Spirit Touch skill and four points in the skill tree
Attribute: Perception
Type: Attack
Time: One Action
Description: This skill is used to make a melee attack that briefly disrupts the target’s spiritual harmony. On a successful hit, the target is required to make a Stamina save (-1 modifier per two points in the skill tree) or be stunned – losing all actions for the remainder of the round and allowed only two actions in the following round which may be used for defend or move actions. The attack ignores non-magical physical armor or defenses but can be blocked by magical barriers. On a successful skill check, the target is hit and may defend normally; if the skill check fails or the target makes a successful defend, the attack misses.
Specialization: (Required) Magic Foundation, i.e. Mystic, Land Strider, Wind Rider, Fire Walker, Wave Runner
Attribute: Knowledge
Type: Utility
Time: N/A
Description: Those with this skill can create and empower Advanced Runes. These runes aren’t available until this skill is acquired and they must be purchased individually, and are used with the Runecasting skill.
Prerequisites: The Runecasting skill and four points in the skill tree
Attribute: Constitution
Type: Utility
Time: One Action
Description: A character with this skill can substitute an object they carry as the somatic and/or material component of a spell. The object must be of at least small size, held during casting, and pointed at the target. The magical effect will appear to emanate from the object. In combat one action is required to imbue the object with the power to be used in this way, and only one object may be used as such during an encounter. Using this skill begins the casting state.
Specialization: (Required) Magic Foundation, i.e. Mystic, Land Strider, Wind Rider, Fire Walker, Wave Runner
Attribute: Perception
Type: Defend
Time: N/A
Description: This skill is used by casters to disguise their presence or obscure their magic. It may be used to defend against scrying attempts (save), hide the nature of a specific casting (skill check at -4 modifier plus one action) in order to make spells more difficult to Dispel, Deflect, or steal (-1 per 2 skill points in the tree), or to shroud a magic signature (base skill check). Whenever Veiled magic is encountered, any attempt to discern further information is met with a save based on the strength of magic (skill rank) at the time of casting.
Prerequisites: The Descry skill and four points in the skill tree
Attribute: Constitution
Type: Defend
Time: One Action
Description: Characters with this skill can shield themselves with the power of their Magic Foundation, providing a passive defense against all forms of magic. One action is required to activate the resistance and it lasts for one round per two points in the skill tree. Once active, damage from any magical attack is reduced by one per skill point in the tree, and they get a save bonus equal to one per two points in the skill tree. This skill does not stack with similar abilities or effects and use of it begins a casting state.
Prerequisites: Eight points in the skill tree and the Elemental Magic Foundation
Attribute: Constitution
Type: Utility
Time: Two Actions
Description: A character with this skill can use Mystic energies to sustain biological functions for a period of time. They may go without food and water a number of days equal to the number of points in the skill tree with no adverse effects, magically facilitate breathing a number of hours equal to the number of points in the skill tree, and regenerate Health points equal to the healing rate a number of times per day equal to the number of points in the skill tree. Actions must be spent to activate this skill while in combat and use of this skill begins a casting state.
Prerequisites: Four points in the skill tree and the Mystic Magic Foundation
Attribute: Constitution
Type: Attack
Time: One Action
Description: Those with this skill can usurp any active or passive duration spell within range and redirect it. While it’s not necessary for the character to have the stolen spell in their spellbook, it must be within a range equal to one yard per point in the skill tree. A stolen spell may be redirected to the original caster or anyone else within range, and the original caster must spend an action to maintain any active duration spells (per the Multiple Duration Spells rule) until control of the spell is released or it is broken per the spell description. A single action is required to steal and redirect the spell. Multiple spells can be stolen and redirected, with a limited number simultaneously active equal to one per three points in the skill tree (rounded down). Use of this skill begins a casting state.
Tactical Use: Steal a Hold spell and redirect it to an adjoining opponent
Prerequisites: The Descry skill and four points in the skill tree
Attribute: Influence
Type: Attack
Time: One Action
Description: A character with this skill can use ambient magic for visual and/or audio effects to create a spectacle or aid in roleplay situations. Effects are purely aesthetic and can be composed of up to any two sensory combinations of audial, olfactory, tactile, or visual, with no damaging aspects. Depending on the manner in which it is used, targets get a -1 modifier per two points in the skill tree to saves or morale checks against mundane Influence based attacks or when drawing attention, and allies gain a +1 modifier per two points in the skill tree to saves against mundane Influence based attacks. The range of the effects is based on character rank, Expert = 10 yards, Master = 100 yards, Epic = 1000 yards. Use of this skill begins a casting state.
Tactical Use: Appear shadowy radiating a chill when using Intimidation, holding up a lightning bolt with thunder in the distance when attempting to Inspire, speak in a reverberating voice while appearing to grow larger while trying to Goad an enemy, etc.
Prerequisites: The Creative Effects skill and four points in the skill tree
Attribute: Perception
Type: Attack
Time: One Action
Description: This skill is used to determine the details of encountered magic, which includes: defining a specific casting, determine if and how a cast spell is modified, discern the character rank of the caster, recognizing a caster’s signature, etc. It’s an active observational skill that is initiated by the character. In combat, one action is required to survey the target, area, or object.
Specialization: (Required) Magical Foundation, i.e. Mystic, Land Strider, Wind Rider, Fire Walker, Wave Runner
Attribute: Knowledge
Type: Utility
Time: One Free Action
Description: Often called starter spells, most casters are taught a series of simple effects when learning the arts of magic, though not everyone retains that knowledge, focusing instead on the excitement of more powerful magics. Those who hold onto their starter spells can cast any of the available Cantrips at will. The minor effects are situationally useful, mostly in roleplay scenarios, and cannot be used to make attack, defend, or move type actions.
Specialization: (Required) Magical Foundation, i.e. Mystic, Land Strider, Wind Rider, Fire Walker, Wave Runner
Attribute: Influence
Type: Attack
Time: Two Actions
Description: Those with this skill are able to use the power of the mind to project feelings of intense dread and distress in order to paralyze an opponent with fear. With a successful skill check, a target is temporarily immobilized with anxiety fueled horror, unable to do anything but cower for a number of rounds equal to the number of points in the skill tree. The target must be within a range equal to the number of points in the skill tree in yards and they get a Willpower or Morale save at a -1 modifier per point in the skill tree to negate the effect. It can be used to affect those with an animal level intelligence. If the skill check fails or the target makes a successful defend, the attack is ineffective.
Prerequisites: The (E) Spook skill and eight points in the skill tree
Attribute: Influence
Type: Attack
Time: N/A
Description: This skill is used to forcibly extract information from a target’s mind. With a successful skill check, the character is able to dig through a target’s memories to find information, which is read like experiences that can include information from all five senses. Physical contact must be maintained throughout the process and the target gets a Willpower save at a -1 modifier per 2 points in the skill tree. Additionally, because this ability is extremely painful to the target, they suffer damage equal to the skill rank each round (save against Willpower or Morale to reduce damage). Those who suffer body damage from this ability are left with brain damage that can manifest in multiple ways. If the skill check fails or the target successfully defends, additional attempts may be made at a progressive difficult (-4) modifier. After three failed attempts, no further attempts may be made on that target until the skill rank is raised.
Prerequisites: The (E) Severance skill and eight points in the skill tree
Attribute: Influence
Type: Attack
Time: Two Actions
Description: Characters with this skill can use the power of the mind to drive an opponent temporarily insane. On a successful skill check, a target acts senselessly, attacking and/or moving without regard for themselves or others. The target must be in a range equal to the skill rank. The effect lasts a number of rounds equal to the number of points in the skill tree and targets get a Willpower save at a -1 modifier per two points in the skill tree to negate the effect. How the target reacts is dependent on the person, the situation, and the attacker’s intent, and can include foolish, violent, or suicidal actions. If the skill check fails or the target makes a successful defend, the attack is ineffective.
Prerequisites: The (E) Beguile skill and eight points in the skill tree
Attribute: Influence
Type: Attack
Time: Two Actions
Description: A character with this skill can use the power of the mind to project feelings of paranoia, apprehension, or alarm in a group in order to agitate and befuddle. With a successful skill check, a number of targets equal to the number of skill points in the skill tree suffer a -1 modifier per 2 points in the skill tree to all actions, for a number of rounds equal to the skill rank. This skill can be used to affect targets that have an animal intelligence and all targets get a Willpower or morale save to negate the effect. If the skill check fails or the target successfully defends, the attack is ineffective.
Prerequisites: The Startle skill and four points in the skill tree
Attribute: Influence
Type: Attack
Time: Two Actions
Description: Those with this skill can use the power of the mind to block a target’s ability to use any of the skills in a skill tree. On a successful skill check, the target is blocked from the knowledge of the skill tree for a number of rounds equal to the number of points in the skill tree. Any attempt to use the severed skills is made at difficult (-4) modifier to the base attribute score, in addition to normal modifiers. The target gets a Willpower save at a -1 modifier per 2 points in the skill tree to resist and must be within a range equal to the skill rank in yards. If the skill check fails or the target makes a successful defend, the attack fails.
Prerequisites: The Distract skill and four points in the skill tree
Attribute: Influence
Type: Utility
Time: Two Actions
Description: This skill is used to establish two-way mental communication with a group of willing participants in the immediate area. A skill check is required to activate the ability and it can be maintained for a number of rounds equal to the skill rank; once active the character can link a number of people equal to the number of points in the skill tree. Participants can voluntarily share thoughts in an area equal to the skill rank in yards around the character. A willing participant may break the link at any time. Unwilling participants are able to resist the connection with a successful Willpower save and can refuse to broadcast their thoughts. It cannot be used to communicate with those that have an animal intelligence. If the skill check fails, a connection may not be made for that round.
Prerequisites: The Missive skill and four points in the skill tree
Attribute: Influence
Type: Attack
Time: Two Actions
Description: A character with this skill can use the power of the mind to convince people of virtually anything. On a successful skill check, the target is temporarily brainwashed into believing what they are being told, accepting it as truth and willingly acting upon that information. The target is allowed a Willpower save with a -1 modifier per two points in the skill tree, and the effect lasts a number of minutes equal to the skill rank. After the effect wears off, the target gets an unmodified Willpower save to realize that were deceived if the premise is challenged. If the skill check fails or the target successfully defends, the attack fails.
Prerequisites: The Coerce skill and four points in the skill tree
Attribute: Influence
Type: Attack
Time: One Action
Description: Those with this skill are able to use the power of the mind to project unsettling or disturbing thoughts to cause involuntary shock. With a successful skill check, the target is briefly overcome with feelings of agitation, alarm, etc., suffering a -2 modifier to all actions for a number of rounds equal to the number of points in the skill tree. The target is allowed a Willpower save to negate the effect. Those with an animal level intelligence are allowed a morale save to negate the effect. Selecting a specialization reduces the save to -1 per point in the skill tree for the specialization target. If the skill check fails or the target successfully defend, the attack fails.
Specialization: (Optional) A specific species of animal/monster or race of humanoid
Attribute: Influence
Type: Utility
Time: One Action
Description: This skill is used to send a short thought message to another with the power of the mind. With a successful skill check, the character is able to send a short one-way message to a friendly individual who is known to them, within a number of miles equal to the skill rank. The message must be simple and could include an image of what the character sees, but not complex ideas or instructions. A target who is unwilling to receive the message is allowed a Willpower save to resist the intrusion in their mind. If the skill check fails, the character is unable to reach the others mind in that round.
Specialization: None
Attribute: Influence
Type: Defend
Time: One Action
Description: Those with this skill can close their thoughts off to all others. When subjected to a mental attack, the character can spend an action and make a successful skill check to completely negate the attack. Selecting a specialization gives a +1 modifier per 2 points in the skill tree for any saves against the specialization target. If the skill check fails, normal saves apply.
Specialization: (Optional) A specific species of animal/monster or race of humanoid
Attribute: Influence
Type: Defend
Time: One Action
Description: Characters with this skill have trained and refined their mental fortitude to resist mental attack, gaining a +1 modifier per 2 points in the skill tree to all Willpower saves. Selecting a specialization increases this bonus a +1 modifier per point in the skill tree for any saves against the specialization target.
Specialization: (Optional) A specific species of animal/monster or race of humanoid
Attribute: Influence
Type: Attack
Time: One Action
Description: Characters with this skill can use the power of the mind to make themselves and/or their ideas seem more attractive to others. With a successful skill check, NPC reactions to the character are increased by one level, i.e. hostile to unfriendly, neutral to friendly, etc., and animals or monsters can be coerced to calm down, either to be handled or leave an area. Those affected are allowed a morale save with -1 modifier per 2 points in the skill tree. Selecting a specialization increases the morale save to -1 per point in the skill tree for the specialization target. If the skill check fails or the save is successful, no further attempts may be made on those beings during that encounter.
Specialization: (Optional) A specific species of animal/monster or race of humanoid
Attribute: Influence
Type: Attack
Time: One Action
Description: A character with this skill can use the power of the mind to strike a foe with a damaging mental bolt of pain. With a successful skill check, the character causes an abnormal flare of activity in the brain, causing damage equal to the skill rank, with a range of up to the skill rank in yards. Targets get a Willpower save to reduce the amount of damage suffered by the difference between the skill rank and save rank or utilize other defenses. Monsters or animals may get a morale save to retreat or rage, depending on the type. Selecting a specialization adds a -1 modifier to the save per two points in the skill tree for the specialization target. If the skill check fails, the attack fails.
Specialization: (Optional) A specific species of animal/monster or race of humanoid
Attribute: Influence
Type: Attack
Time: One Action
Description: Those with this skill can use the power of the mind to force others to do or say something. With a successful skill check, the character imposes their will on the target, forcing them to take a suggested directive. The, directive must be simple and be completed immediately in the round. Those with an animal intelligence are allowed a morale save and can be directed within their comprehension ability. The target is allowed a Willpower save to resist, with a -1 penalty per 2 points in the skill tree. Selecting a specialization reduces the save to -1 per point in the skill tree for the specialization target. If the skill check fails or the target makes a successful defend, the attack is ineffective.
Specialization: (Optional) A specific species of animal/monster or race of humanoid
Attribute: Influence
Type: Attack
Time: One Action
Description: Those with this skill can use the power of the mind to create a mental blind spot in a target, allowing them to take actions as if invisible. A number of targets up to the number of points in the skill tree can be affected. Targets get a Willpower save or other applicable skill check, with a -1 modifier per 2 points in the skill tree to resist the effect. Selecting a specialization reduces the save to -1 per point in the skill tree for the specialization target. Any attack actions made against a target immediately breaks the effect, while actions that directly affect the target or have proximal effects, such as taking an item off their person, opening a door, moving a chair, etc., will allow for additional saves. The effect lasts a number of rounds equal to the skill rank. Those with an animal level intelligence are unaffected by this effect. If the skill check fails or the target makes a successful defend, the attack fails.
Specialization: (Optional) A specific species of animal/monster or race of humanoid
Attribute: Influence
Type: Attack
Time: One Action
Description: A character with this skill can use the power of the mind to temporarily fluster a target. With a successful skill check, the target’s attention is drawn from their intended action, causing them to lose that action. The target gets a Willpower save to resist, with a -1 penalty per 2 points in the skill tree. Those that have an animal level intelligence get a morale save to negate the effect with the same modifiers listed above. Selecting a specialization reduces the save to -1 per point in the skill tree for the specialization target. It may be used as a held action to affect a target on their turn, at a range of up to the skill rank in yards, however, the effect does not carry over to the next round if used at the end of the round. If the skill check fails or the target makes a successful save, the attack fails.
Specialization: (Optional) A specific species of animal/monster or race of humanoid
Attribute: Perception
Type: Attack
Time: One Action
Description: Characters with this skill can use the power of the mind to divine their target’s current mental state. With a successful skill check, the character can determine the intentions of the target, including whether or not they are telling the truth, hiding something, intend to attack, plan to flee, etc. Targets get a Willpower save to resist, with a -1 penalty per 2 points in the skill tree. Those with an animal level intelligence get a morale save to negate the effect with the same modifiers listed above. Selecting a specialization reduces the save to -1 per point in the skill tree for the specialization target. If the skill check fails or the target successfully defends, the attack fails.
Specialization: (Optional) A specific species of animal/monster or race of humanoid
Attribute: Influence
Type: Utility
Time: One Action
Description: Those with this enhancement can focus the power of the mind to ignore the effects of fatigue. A skill check is required to activate this ability and it can be maintained for a number of rounds equal to the skill rank. When active, the character ignores all fatigue modifiers and is immune to kill shots. Only one master enhancement may be active at a time. The time requirement is for activating the skill, once active it can be maintained or dropped at no time cost. If the check fails, the enhancement is unable to be activated for that round.
Prerequisites: Eight points in the skill tree
Attribute: Perception
Type: Move
Time: One Action
Description: This enhancement can be used focus the power of the mind to orient the physical body to any situation. A successful skill check is required to activate this ability and it can be maintained for a number of rounds equal to the skill rank. When activated, the character is able to maintain a perfect direction sense, is never required to make a Balance or similar skill check, and can move along precarious surfaces without issue, i.e. ledges, ice, grease, etc. In addition, when falling they are able to control direction within the range of their full round move rate. Only one master enhancement may be active at a time. The time requirement is for activating the skill only, once active it can be maintained or dropped at no time cost. If the check fails, the enhancement is unable to be activated for that round.
Prerequisites: Eight points in the skill tree
Attribute: Influence
Type: Utility
Time: One Action
Description: Those with this enhancement are able to use the power of the mind to enhance their ability to survive in harsh environments. A skill check is required to activate this ability and it can be maintained for a number of rounds equal to the skill rank. When active, the character can survive extreme conditions, unharmed, without external protection, i.e. below freezing temperatures, high radiation, underwater, extreme pressure, vacuum of space, etc. It does not include the ability to move or otherwise navigate these environments. Only one master enhancement may be active at a time. The time requirement is for activating the skill, once active it can be maintained or dropped at no time cost. If the check fails, the enhancement is unable to be activated for that round.
Prerequisites: Eight points in the skill tree
Attribute: Influence
Type: Utility
Time: One Action
Description: A character with this combat enhancement can focus the power of the mind to break free of any impediment. A skill check is required to activate this ability and it can be maintained for a number of rounds equal to the number of points in the skill tree. When active, the character gains a bonus modifier equal to the number of points in the skill tree to any break or escape attempt and may stand from prone as a free action. Only one expert combat enhancement may be active at a time. The time requirement is for activating the skill only, once active it can be maintained or dropped at no time cost. If the check fails, the enhancement cannot be activated for that round.
Prerequisites: Four points in the skill tree
Attribute: Perception
Type: Utility
Time: One Action
Description: Characters with this awareness enhancement skill are able to focus the power of the mind to see in every recumbent direction at once. A skill check is required to activate this ability and it can be maintained for a number of rounds equal to the skill rank. When active, the character can see in every direction along their standard scope of vision, i.e. left, right, back, and front, but not straight up or straight down, reducing flanking modifiers by one per point in the skill tree, and adding the same modifier to any general Dodge or general Evade attempt. Only one expert awareness enhancement may be active at a time. The time requirement is for activating the skill, once active it can be maintained or dropped at no time cost. If the check fails, the enhancement is unable to be activated for that round.
Prerequisites: Four points in the skill tree
Attribute: Influence
Type: Utility
Time: One Action
Description: A character with this awareness enhancement is able to use the power of the mind to bolster survivability against egregious threats. A successful skill check is required to activate this ability and it can be maintained for a number of rounds equal to the number of points in the skill tree. When active, the character gains a bonus modifier equal to the number of points in the skill tree to all saves, i.e. Reaction, Stamina, Willpower. Only one expert awareness enhancement may be active at a time. The time requirement is for activating the skill only, once active it can be maintained or dropped at no time cost. If the check fails, the enhancement cannot be activated for that round.
Prerequisites: Four points in the skill tree
Attribute: Influence
Type: Attack
Time: One Action
Description: Characters with this combat enhancement are able to channel the power of the mind into physical energy to amplify damage. A successful skill check is required to activate this ability and it can be maintained for a number of rounds equal to the number of points in the skill tree. When active, the character gains a bonus modifier to all attack damage equal to the number of points in the skill tree, stacking with all existing combat modifiers. This may only be used with held melee or ranged weapons of character scale. One expert combat enhancement may be active at a time. The time requirement is for activating the skill, once active it can be maintained or dropped at no time cost. If the check fails, the enhancement cannot be activated for that round.
Prerequisites: Four points in the skill tree
Attribute: Influence
Type: Move
Time: One Action
Description: This move enhancement can be used to focus the power of their mind to slow a fall. A successful skill check is required to activate this ability and it can be maintained for a number of rounds equal to the number of points in the skill tree. When activated, the character can fall any distance without taking damage. Only one expert move enhancement can be active at a time. The time requirement is for activating the skill only, once active it can be maintained or dropped at no time cost. If the check fails, the enhancement cannot be activated for that round.
Prerequisites: Four points in the skill tree
Attribute: Influence
Type: Move
Time: One Action
Description: This move enhancement can be used to focus the power of the mind to set and hold a position. A skill check required to activate this ability and it can be maintained for a number of rounds equal to the number of points in the skill tree. When active the character gets a bonus modifier equal to the number of points in the skill tree to save against any knockdown or knockback type attacks. Only one expert move enhancement may be active at a time. The time requirement is for activating the skill only, once active it can be maintained or dropped at no time cost. If the check fails, the enhancement cannot be activated for that round.
Prerequisites: Four points in the skill tree
Attribute: Influence
Type: Move
Time: One Action
Description: This move enhancement can be used to focus the power of the mind to make incredible leaps. With a successful skill check, the character is able to add the skill rank in yards when calculating jump distance and will not take falling damage so long as the skill check used to make the leap is successful. Once activated, it can be maintained a number of rounds equal to the skill rank. Only one novice move enhancement may be active at a time. The time requirement is for activating the skill only, once active it can be maintained or dropped at no time cost. If the skill check fails, this enhancement cannot be activated for that round.
Specialization: None
Attribute: Perception
Type: Defend
Time: One Action
Description: Characters with this combat enhancement can focus the mind on the field of battle to be aware of attack from any direction. With a successful skill check to activate, it can be maintained for a number of rounds equal to the skill rank. When active, the character cannot be surprised and gains a +1 modifier per point in the skill tree to defend skills, stacking with existing combat modifiers. Only one novice combat enhancement may be active at a time. The time requirement is for activating the skill only, once active it can be maintained or dropped at no time cost. If the check fails, the enhancement cannot be activated for that round.
Specialization: None
Attribute: Influence
Type: Defend
Time: One Action
Description: A character with this combat enhancement can use the power of the mind to bolster their physique against attack. A successful skill check is required to activate this ability and it can be maintained for a number of rounds equal to the skill rank. When active, characters ignore stun effects and get a +1 armor bonus per 2 points in the skill tree that stacks with existing armor modifiers. Only one novice combat enhancement may be active at a time. The time requirement is for activating the skill only, once active it can be maintained or dropped at no time cost. If the skill check fails, the enhancement cannot be activated for that round.
Specialization: None
Attribute: Perception
Type: Attack
Time: One Action
Description: A character with this awareness enhancement can define a target in the mind’s eye, maintaining a knowledge of their position even when out of sight. A successful skill check is required to activate this ability and it can be maintained for a number of rounds equal to the skill rank. When active, the character gains a bonus to hit equal to the number of points in the skill tree, stacking with existing modifiers, and maintains awareness of a foe in a 100-yard radius. Only one novice awareness enhancement may be active at a time. The time requirement is for activating the skill only, once active it can be maintained or dropped at no time cost. If the skill check fails, the enhancement is unable to be activated for that round.
Specialization: None
Attribute: Influence
Type: Move
Time: One Action
Description: This move enhancement can be used to focus the power of the mind to move quickly from one point to another. With a successful skill check, the character uses this skill rank in place of the single action move rate for a number of rounds equal to the number of points in the skill tree. Once the ability is active, it can be used in conjunction with other move-based skills, so long as at least two actions in the round are spent moving. When the effect ends a new skill check is required to make additional moves. Only one novice move enhancement may be active at a time. The time requirement is for activating the skill, once active it can be maintained or dropped at no time cost. If the skill check fails, this enhancement cannot be activated for that round.
Specialization: None
Attribute: Perception
Type: Utility
Time: One Action
Description: Characters with this awareness enhancement can focus the power of the mind to increase their visual acuity. On a successful skill check, they can see normally in up to complete darkness for a number of rounds equal to the skill rank. In addition, the character can transition between the light and dark at no penalty. Only one novice awareness enhancement can be active at a time. The time requirement is for activating the skill only, once active it can be maintained or dropped at no time cost. If the check fails, the enhancement is unable to be activated for that round.
Specialization: None
Attribute: Influence
Type: Attack
Time: One Action
Description: Characters with this skill can use their mind to pull anchored or held objects to them, without causing direct damage. With a successful skill check, an object of up to 20lbs, up to a number of yards away equal to the Skill rank, is torn away and pulled to the character. Held objects get a Reaction or other appropriate save and anchored objects get a structural strength save, with a -1 modifier per point in the skill tree. If the save is successful, the attempt fails. The attack appears as a blur of motion (the color and shape of which is defined by the character) between the attacker and object. If the skill check fails, there is no effect on the object.
Prerequisites: The Retrieve skill and eight points in the skill tree
Attribute: Influence
Type: Attack
Time: One Action
Description: Characters with this skill can use their mind to throw an unanchored person or object a distance away, without causing direct damage. With a successful skill check, the target is thrown a number of yards equal to skill rank in any direction; targets may suffer falling damage based on the circumstances of the throw. The attack appears as a blur of motion (the color and shape of which is defined by the character) between the attacker and target. Opponents get a defend action to negate the attack, while anchored objects get a structural strength save. It can affect up to medium sized targets or up to four hundred pounds, with a -4 modifier per size category increase or a -2 modifier per additional two hundred pounds, based on the situation. If the skill check fails or the target makes a successful defend, the attack misses.
Prerequisites: The Push skill and eight points in the skill tree
Attribute: Influence
Type: Defend
Time: One Action
Description: A character with this skill can redirect ranged attacks by focusing the power of their mind to create an angled transient physical barrier in the line of fire. With a successful skill check, all impact or energy damage from the attack is turned back at the attacker or towards another enemy or object within a range equal to the Influence score in yards (the target must be announced before the skill check is made). The type and amount of damage is based on the original shot, and targets get a defend action to avoid the attack, assuming available actions. It appears as an oscillation barrier (the color and shape of which is defined by the character) arced in front of the character in the line of fire. If the skill check fails, no other defend skills may be employed and damage is taken normally.
Prerequisites: The Screen skill and eight points in the skill tree
Attribute: Influence
Type: Attack
Time: One Action
Description: Characters with this skill can, create a vice of force that compresses and holds a foe, while causing damage, with their mind. With a successful skill check, a target of up to a number of yards away equal to the skill rank is captured and held prone, taking damage equal to Influence plus 1 per 2 points in the skill tree. Damage is caused in pulses, requiring one action to send and at least one pulse must be made each round to maintain the crush. The attack appears as a clamp of energy (the color and shape of which is defined by the character) that rushes at and envelopes targets. Those held prone may attempt to escape each round and this skill can be used to negate escape attempts, assuming available actions. It can affect up to medium sized targets, with a -4 modifier per size category increase. If the skill check fails or the target makes a successful defend, the attack misses.
Prerequisites: The (E) Immobilize skill and eight points in the skill tree
Attribute: Influence
Type: Attack
Time: One Action
Description: A character with this skill is able to choke the life out of their opponents with their mind. With a successful skill check, a target of up to a number of yards away equal to the Influence score plus 1 yard per 2 points in the skill tree, can be asphyxiated with pressure focused on the throat or chest; one action must be spent each round to maintain. The attack appears as a band of energy (the color and shape of which is defined by the character) that rushes at and surrounds targets. Those affected are required to make a Stamina save at a progressive -2 modifier per round to avoid passing out, and can attempt to escape each round, with this skill used to negate the escape attempt, assuming available actions. It can affect up to medium sized targets, with a -4 modifier per size category increase. If the skill check fails or the target makes a successful defend, the attack misses.
Prerequisites: The Projectile skill and four points in the skill tree
Attribute: Influence
Type: Attack
Time: One Action
Description: Characters with this skill can focus their mind to hold people or objects prone, without causing damage. With a successful skill check, a target of up to a number of yards away equal to the skill rank is held prone; one action must be spent per round to maintain. The attack appears as a blur of spinning bands (the color and shape of which is defined by the character) that rush at and then surround the target. Those held prone may attempt to escape each round and this skill can be used to negate escape attempts, assuming available actions. It can affect up to medium sized targets, with a -4 modifier per size category increase. If the skill check fails or the target successfully defends, the attack misses.
Prerequisites: Four points in the skill tree
Attribute: Influence
Type: Attack
Time: One Action
Description: Those with this skill can focus the power of their mind to launch many objects at an opponent with enough force to cause damage. With a successful skill check, the attacks hit in a burst, causing damage equal to the Influence score plus object damage, i.e. tiny (.5-2lbs) +2, small (2-5lbs) +4. This can be a number of objects equal to the number of points in the skill tree or a whirlwind of at least two objects striking that number of times, at a range of up to the Influence score in yards, plus 1 yard per 2 points in the skill tree. The objects must be less than 5lbs in weight, anchored objects get a structural strength save and held objects get a Reaction or other save as appropriate. The attack appears as a blur of motion around the objects (the color and shape of which is defined by the character) and the defender must save against the damage for each object separately. If the skill check fails or the target successfully defends, the entire attack misses.
Prerequisites: The Projectile skill and four points in the skill tree
Attribute: Influence
Type: Attack
Time: One Action
Description: Those with this skill can focus the power of their mind to create numerous force manifestations to attack a foe in melee or at range. With a successful skill check, the attack hits in a burst causing impact damage equal to Influence, a number of times equal to the number of points in the skill tree, at a range of up to the skill rank in yards. The attacks appear as a blur of motion (the color and shape of which is defined by the character) and the defender must save against the damage for each manifestation separately. If the skill check fails or the target successfully defends, the entire attack misses.
Prerequisites: The Batter skill and four points in the skill tree
Attribute: Influence
Type: Defend
Time: One Action
Description: A character with this skill can block ranged attacks by focusing the power of their mind to create a transient physical barrier in the line of fire. If the skill check is successful, all impact or energy damage from the attack is negated by the screen. The defend appears a brief oscillating barrier (the color and shape of which is defined by the character) that arcs across the front of the character in the line of fire. If the skill check fails, no other defend skills may be employed and damage is taken normally.
Specialization: None
Attribute: Influence
Type: Attack
Time: One Action
Description: Those with this skill can focus the power of their mind to launch an object at an opponent with enough force to cause damage. On a successful skill check, an unattended object is launched at an opponent, causing damage equal to the Influence score plus object damage, i.e. tiny (.5-2lbs) +2, small (2-6lbs) +4, medium (6-12lbs) +6, large (12-20lbs) +8, at a range of up to the Influence score in yards, plus 1 yard per 2 points in the skill tree. Objects more than 20lbs in weight cannot be affected, while anchored objects get a structural strength save and held objects get a Reaction or other appropriate save. The object streaks in a bur of motion at the target (the color and shape of which is defined by the character). If the skill check fails or the target successfully defends, the attack misses.
Specialization: None
Attribute: Influence
Type: Defend
Time: One Action
Description: A character with this skill can turn aside a melee attack by focusing the power of their mind to create a transient physical barrier at the point of impact. On a successful skill check, all impact or energy damage from the attack is negated by the buffer. The defend appears as a brief oscillating barrier (the color and shape of which is defined by the character) at the point of impact. If the skill check fails, no other defend skill may be employed and damage is taken normally.
Specialization: None
Attribute: Influence
Type: Attack
Time: One Action
Description: Those with this skill are able to focus the power of their mind to create a physical manifestation of force that is used as a damaging attack in melee or at range. On a successful skill check, the attack hits, causing impact damage equal to the skill rank, at a range of up to the skill rank in yards. The attack appears as a blur of motion (the color and shape of which is defined by the character) that is hard to defend, with a -1 modifier to the opponents defend skill per 2 points in the combat tree. If the skill check fails or the target makes a successful defend, the attack misses.
Specialization: None
Attribute: Constitution
Type: Utility
Time: Four Actions
Description: A character with this skill has gained enough control over their shifting ability to transform into a common form of their animal type. In this form, the character can pass as a common animal of their type, including size, behavior, and general mannerisms; in addition, a skill check is no longer required to shift forms under normal circumstances (i.e. Fast Form still requires a skill check). This shift typically includes a significant change in size and shape, clothing and gear do not transform with the character and could result in damage. If the check fails, the shift is too painful to complete, requiring a Stamina save that has a progressive difficult (-4) modifier, a failed save indicates the character has passed out from the strain of the transformation.
Prerequisites: The Hulking Form skill and eight points in the skill tree
Attribute: Constitution
Type: Utility
Time: One Action
Description: Those with this skill are able to quickly shift forms. With a successful skill check, the character completes a shift between any of the available forms in one action, though there is a progressive difficult (-4) modifier for each shift after the first in a single round. If the skill check fails, the shift requires the standard four actions to complete.
Prerequisites: The Hulking Form skill and eight points in the skill tree
Attribute: Constitution
Type: Utility
Time: Four Actions
Description: Characters with this skill are able to shift into humanoid hybrid of their animal type. This is an anthropomorphized version of the animal type, with access to attack and defend types and move rates, while maintaining the fine motor skills of their humanoid form. While this shift includes some modifications to the standard humanoid form, although clothing and gear do not transform with the character, it will typically not result in damage. If the skill check fails, the character is unable to complete the shift and spends the round in a painful transition that reverts back to the humanoid form; further attempts can be made by spending the actions at no modifier.
Prerequisites: The Savage Form skill and eight points in the skill tree
Attribute: Constitution
Type: Utility
Time: Four Actions
Description: A character with this skill can shift into a roughly humanoid form of the animal type. Also referred to as the monster form, this transformation has the natural attacks, defenses, and move capabilities common to the animal type, with a monstrous appearance that gives defenders a -1 modifier per 2 points in the skill tree to any intimidation based influence attacks. There may be other aesthetic changes, alterations in demeanor, etc., (it’s up to the player to determine the nuances of this form). Clothing and gear do not transform with the character and could result in damage depending on the circumstances of the change. If the check fails, the shift is too painful to complete, requiring a Stamina save that has a progressive difficult (-4) modifier, a failed save indicates the character has passed out from the strain of the transformation.
Prerequisites: The Hulking Form skill and four points in the skill tree
Attribute: Knowledge
Type: Utility
Time: N/A
Description: Characters with this skill retain their ability to speak and use items or technology after shifting. forms. The character is still subject to the limitations of the animal form (i.e. a lack of opposable thumbs), and they may speak a rough or guttural form of any known languages. This additional control extends to the shifting ability, negating the progressive difficulty modifier from the Stamina save after a failed attempt to shift.
Prerequisites: The Hulking Form skill and four points in the skill tree
Attribute: Constitution
Type: Utility
Time: Two Actions
Description: Those with this skill are able to work themselves up into a wild state, giving them a better chance to hit and cause more damage. With a successful skill check, the character enters a frenzied state, getting a +1 modifier to hit per 2 points, and a +1 to damage per point in the skill tree (stacking with other combat modifiers), but there is a difficult (-4) modifier to all defend actions for the duration of the effect. To regain control, a second skill check is required at a difficult (-4) modifier, increasing to a very difficult (-8) modifier if body damage has been sustained. This modifier can be reduced by half if allies to help to talk the frenzied character down. Failing to regain control three successive times results in a blood frenzy wherein the character attacks anyone in range until going unconscious. If the initial skill check fails, the character is unable to enter a frenzied state during the encounter, though may make another attempt after sustaining body damage.
Prerequisites: The Hulking Form skill and four points in the skill tree
Attribute: Influence
Type: Utility
Time: N/A
Description: Those with this skill can resist the trigger of an involuntary transformation with a successful skill check, maintaining their current form. This includes triggers from the humanoid form to animal form as well as maintaining any of the animal forms through stuns or knockouts. Triggers may be deferred a number of times equal to the number of points in the skill tree, after which there is a progressive difficult (-4) modifier for each trigger until a change occurs. If the skill check fails, the transformation is immediate.
Prerequisites: The Hulking Form skill and four points in the skill tree
Attribute: Constitution
Type: Utility
Time: Four Actions
Description: A character with this skill can shift into an animal form that is roughly the same size as their humanoid form. The transformation takes a round to complete, gaining any natural attacks, defenses, and move rates common to the animal type, but are unable to communicate, use items or technology, etc. Clothing and gear do not transform with the character and could result in damage depending on the circumstances of the change. If the check fails, the shift is too painful to complete, requiring a Stamina save that carries a progressive difficult (-4) modifier, a failed save indicates the character has passed out from the strain of the transformation.
Specialization: None
Attribute: Knowledge
Type: Utility
Time: N/A
Description: Those with this skill are able to recover the parts of destroyed technology and bring the whole of it back into an operational condition. It may be used with any repair skill, with a difficulty modifier determined by the technology type. Destroyed electronics have a difficult (-4) modifier to repair and destroyed mechanics have a very difficult (-8) modifier to repair; those modifiers are reduced by one level for technology within a particular specialization, i.e. bots, ground vehicles, weaponry, mechs, etc. All other modifiers apply normally based on the repair skill.
Prerequisites: The Electronics or Mechanics skill and Scavenge skill, and eight points in the skill tree
Attribute: Knowledge
Type: Utility
Time: N/A
Description: Characters with this skill can change the primary function of some piece of technology. With a successful skill check, the character can rearrange, reconfigure, and/or refit the native components so they fulfill a different purpose; the details of the change depend greatly upon the type of technology, how it works, and the availability of parts, i.e. a prosthetic arm cannot be modified to be a spacecraft, it can, however, be modified to house an energy weapon. All components must be of the same general technology type and there must be a logical path to the modification. It can be used with an Electronics or Mechanics specialization at a base (-0-) modifier, and the general type of technology at a difficult (-4) modifier. The difficulty and amount of time required is based on the complexity of the technology, degree of alteration, and the availability of parts and tools. If the skill check fails, additional attempts may be made at a progressive difficult (-4) modifier, but after three fails, the technology is destroyed.
Tactical Use: Reconfigure an energy cannon to work as a thruster, turn a holographic projector into a weapon that projects a blinding flash on the end of the target’s nose, adapt a land vehicle to function underwater, etc.
Prerequisites: The Electronics or Mechanics skill and Scavenge skill, and eight points in the skill tree
Attribute: Knowledge
Type: Utility
Time: N/A
Description: Those with this skill are able to make piecemeal or makeshift repairs using only the tools and materials available at hand. With a successful skill check, the character can restore basic functionality to damaged or non-functional technology through patchwork repairs. These types of repairs are not stable, typically able to withstand a number of uses equal to the number of points in the skill tree before breaking down. Any technology that breaks down after being jury rigged has an additional difficult (-4) modifier to be repaired and cannot be made functional again until it is actually repaired. Destroyed technology may not be jury rigged. This skill may be used with an Electronics or Mechanics specialization at a base (-0-) modifier, and the general type of technology at a difficult (-4) modifier. Difficulty modifiers may be applied to repairs based on working conditions, quality of parts, and/or tools available. If the skill check fails, additional jury-rigging attempts may be made at a progressive difficult (-4) modifier, but after three fails, additional attempts may not be attempted again on that particular technology until the skill rank is increased.
Tactical Use: Run a damaged weapons power system through the life support system; use an ammunition clip to power a jet pack for a short hop, use parts from an on-board ground vehicle to fix the spacecraft engines, etc.
Prerequisites: The Electronics or Mechanics skill and Scavenge skill and four points in the skill tree
Attribute: Knowledge
Type: Utility
Time: N/A
Description: This skill can be used to add or replace technology with better, more versatile, or more powerful technology. With a successful skill check, the character is able to integrate the new technology with the existing technology, adding to or enhancing its current function. Exactly what can be upgraded is dependent on the quality and function of the technology; all components must be of the same technology type, must have room for the technology to be added or replaced, and must function on the same type of power. This skill can be used with an Electronics or Mechanics specialization at a base (-0-) modifier, and the general type of technology at a difficult (-4) modifier. The difficulty and overall amount of time required is based on the complexity of the technology, type of upgrade, and the availability of parts and tools. If the skill check fails, additional attempts may be made at a progressive difficult (-4) modifier, but after three fails, the upgrade is not compatible with the existing technology.
Tactical Use: Adding a bigger power supply to ionic armor, installing an additional weapon onto a mech, upgrading a bot brain to increase its overall functionality, etc.
Prerequisites: The Electronics or Mechanics skill and Analyze skill, and four points in the skill tree
Attribute: Perception
Type: Utility
Time: N/A
Description: Those with this skill know how to evaluate technological damage to provide details about a particular scene, including failure, sabotage, fault, etc. With a successful skill check, the character can provide a general account of the event and identify involved technological factors. It may be used with an Electronics or Mechanics specialization at a base (-0-) modifier, and the general type of technology at a difficult (-4) modifier. The difficulty level and amount of time required to complete the inspection is based on the complexity and integration level of the system, as well as the tools available. If the skill check fails, additional attempts may be made at a progressive difficult (-4) modifier, but after three fails, additional attempts may not be made on that scene again until the skill rank has increased.
Prerequisites: The Electronics or Mechanics skill and Analyze skill, and four points in the skill tree
Attribute: Agility
Type: Utility
Time: N/A
Description: Characters with this skill can circumvent security safeguards, i.e. magnetic locks, biometric access, lockout codes, etc., without regard for further functionality. With a successful skill check, the character is able to rewire, disable, or sabotage a security system. It may be used with an Electronics or Mechanics specialization at a base (-0-) modifier, and the general type of technology at a difficult (-4) modifier. The overall difficulty and amount of time required is based on the complexity and integration level of the system, as well as the tools available. If the skill check fails, additional attempts may be made at a progressive difficult (-4) modifier, but after three fails, additional attempts may not be made again on that system until the skill rank has increased.
Tactical Use: Overload a security panel to release a series of magnetic locks, cross-wire a system to activate the engines, destroy a bot brain to remove a memory component, etc.
Prerequisites: The Electronics or Mechanics skill and four points in the skill tree
Attribute: Knowledge
Type: Utility
Time: N/A
Description: This skill is used to circumvent security safeguards, i.e. magnetic locks, biometric access, lockout codes, etc., while retaining the full functionality of the technology. With a successful skill check, the character is able to bypass the security system without setting off warnings or alarms or causing damage. It may be used with an Electronics or Mechanics specialization at a base (-0-) modifier, and the general technology at a difficult (-4) modifier. The difficulty and amount of time required is based on the complexity and integration level of the system, as well as the tools available. If the check fails, additional attempts may be made at a progressive difficult (-4) modifier, but after three fails, additional attempts may not be made again on that system until the skill rank has increased.
Tactical Use: Override a land-land lock that keeps a spacecraft from taking off, gain access to a penal colony through a loading port, break the encryption of a bot brain to get information, etc.
Prerequisites: The Electronics or Mechanics skill and four points in the skill tree
Attribute: Perception
Type: Utility
Time: N/A
Description: This skill is used to find working parts to repair or replace damaged components. Assuming that they are in a place where the type of technology they are seeking is available, with a successful skill check, the character can locate and extract parts they need, based on the number of points in the skill tree, i.e. novice 0-3 points, expert 4-7 points, master 8+ points. A novice can locate flawed parts in good condition, an expert can find parts in good condition, and a master can spot those rare parts that are like new or upgrades over the parts being replaced. In addition, this skill can be used in place of Search or Observation while in junkyards to spot something that might be useful or an upgrade. If the skill check fails, the character is unable to locate the components they seek; additional attempts may be made at a progressive difficult (-4) modifier, but after three fails, additional attempts may not be made again in that area until the skill rank is increased. In combat, a minimum of two actions is required to use this skill. Per the specialization, this skill can be used with one type of technology but can be selected multiple times.
Specialization: (Required) By type – electronics or mechanics
Attribute: Knowledge
Type: Utility
Time: N/A
Description: Those with this skill are familiar with vehicles and can perform maintenance, fix structural damage, and either replace or repair damaged or faulty components. With a successful skill check, the character can return a damaged vehicle to normal working condition based on the number of points in the skill tree, i.e. novice 0-3 points, expert 4-7 points, master 8+ points. A novice can repair minor damage at a base (-0-) modifier and additional levels at a progressive difficult (-4) modifier, i.e. serious damage -4, severe damage -8, critical damage -12; an expert can repair serious damage at a base (-0-) modifier and a master can repair severe damage at a base (-0-) modifier, each progressing as above. Destroyed vehicles may not be repaired. For vehicles in the specialization the difficulty level for repairs is reduced by one level; this skill can be taken multiple times to get multiple specializations. In addition, those with this skill can determine the general working condition of the vehicle and its components, with a successful skill check. Difficulty modifiers may be applied to repairs based on tools available, working conditions, and/or quality of parts. If the check fails, additional repair attempts may be made at a progressive difficult (-4) modifier, but after three fails, additional attempts may not be attempted again on that vehicle until the skill rank is increased.
Specialization: (Required) By type, air vehicles, ground vehicles, mechs, spacecraft, or watercraft
Attribute: Knowledge
Type: Utility
Time: N/A
Description: Characters with this skill know how general wiring and circuit-based systems work and are able to repair or replace damaged or overused components. With a successful skill check, an electronic device that has been rendered non-functional can be restored to an operational condition, but repaired devices have a -4 modifier to their deflect rating. Destroyed devices cannot be repaired. In addition, this skill can be used to determine the quality of an electronic device and discern new from used technology. For devices in the specialization the deflect rating penalty is reduced by one per two points in the skill tree; this skill can be taken multiple times for multiple specializations. There may be difficulty modifiers applied based on the tools available, working conditions, and/or quality of parts. If the skill check fails, additional repair attempts may be made at a progressive difficult (-4) modifier, but after three fails, additional attempts may not be attempted again on that device until the skill rank is increased.
Specialization: (Required) By type: armor, bots, computers, gadgets, weaponry
Attribute: Knowledge
Type: Utility
Time: N/A
Description: Those with this skill know how to safely work with explosives and can judge the correct size charge to demolish a target without causing collateral damage. With a Demolitions Kit and successful skill check, the character is able to handle, position, and discharge an explosive device, based on the number of skill points in Technocracy, i.e. novice 0-3 points, expert 4-7 points, master 8+ points. A novice can place, set, and arm an explosive device against a fixed structure (a stationary, unattended inanimate object); while an expert knows how to maximize damage with a minimal charge on a fixed or mobile structure by using an explosive set at a vulnerable point; and a master is able to place, set, and arm explosive devices on objects large enough to accommodate the device. In addition, it may be used to disarm explosive devices with a successful skill check, to make devices more difficult to be disarmed by adding a -1 modifier per point in the skill tree to a disarm check, or to identify explosives by type and/or signature builds. If the skill check fails, the intent fails and could result in the explosive going off in unintended ways.
Specialization: None
Attribute: Perception
Type: Utility
Time: N/A
Description: A character with this skill has a general understanding of technology and is able to diagnose problems, determine functions, and identify general properties of components. With a successful skill check, the character gains a bonus modifier equal to +1 per 2 points in the skill tree to any attempt to repair or scavenge parts. In addition, with this skill the character can perform a basic inspection to determine if and how the technology works. In combat, a minimum of two actions is required to use this skill. If the check fails, the modifiers are lost, or the basic inspection fails. Per the specialization, this skill can be used with one type of technology but can be selected multiple times.
Specialization: (Required) By type – electronics or mechanics
Attribute: Influence
Type: Utility
Time: N/A
Description: A character with this skill has an aura of strength and authority that draws the attention of everyone in the area, filling allies with hope and enemies with despair. With a successful skill check, allies gain a +1 modifier to all actions per three points in the skill tree (round up), and enemies suffer a -1 modifier to all actions per three points in the skill tree (round down), so long as the character shows no sign of weakness. These modifiers can be reversed if the character is forced to cower or flee. In addition, for those who have the Leadership skill, maintenance requires a free action, allowing them their full actions in the round. If the skill check fails, the bonus modifiers and maintenance reduction are not applied for that encounter.
Prerequisites: The (E) Captivate skill and eight points in the skill tree
Attribute: Influence
Type: Attack
Time: N/A
Description: Characters with this skill use trickery to cheat the target out of an asset, object, or service. With a successful skill check, the target is convinced to give up something of value to the attacker with the expectation that some type of compensation will be forthcoming. The target is allowed a Willpower or related save to negate the effect at a -1 modifier per point in the skill tree. If the check fails or the target successfully defends, they do not fall for the trick. Additional attempts may be made at a progressive difficult (-4) modifier, but after three fails, additional attempts may not be made again with that target until the skill rank has increased.
Tactical Use: A promise of payment later for access to goods immediately, convince a target to pay for goods scheduled for later delivery, assure the target that their support will be awarded with a promotion or other such compensation, etc.
Prerequisites: The Fast Talk skill and four points in the skill tree
Attribute: Influence
Type: Attack
Time: N/A
Description: Those with this skill are able to use fake news, rumors, and skewed facts to help or harm a person, group, movement, institution, etc. With a successful skill check, the character is able to disseminate believable information that will create a bias manipulating a person or group into taking a desired action. The target individual or group is allowed a group Willpower or morale check to recognize the deception at a -1 modifier per two points in the skill tree. If the skill check fails, the disseminated information failed to get the desired response.
Tactical Use: Triggering a riot with a faked story of injustice, harming an official’s reputation with false evidence of corruption, pushing one group to act against another with a claim of religious desecration, etc.
Prerequisites: The Confound skill and four points in the skill tree
Attribute: Influence
Type: Attack
Time: N/A
Description: Those with this skill are able to use a target’s mannerisms, tone, and expression to better deal or bargain with them to bring about a mutually beneficial settlement of terms. With a successful skill check, the character can convince a target to willingly concede on certain aspects of a deal in order to finalize an agreement between two or more parties, regardless of the degree of animosity. Targets get a Willpower or morale save to resist the effect at a -1 modifier per point in the skill tree. If the skill check fails, sides are unable to reach an agreement; additional attempts may be made at a progressive difficult (-4) modifier, but after three fails, additional attempts may not be made again with those terms until the skill rank has increased.
Tactical Use: Mediate a cessation of hostilities between two sides, arrange for an official to gain favor by releasing prisoners, convince a merchant to accept a trade rather than money, etc.
Prerequisites: The Interpreting skill and four points in the skill tree
Attribute: Influence
Type: Attack
Time: N/A
Description: This skill is used to force targets to reveal information that they consider personal or secret. With a successful skill check, the target is subjected to intense manipulative questioning, compelling them to reveal information. Targets get a Willpower or morale check at a -1 modifier per point in the skill tree to resist. If the skill check fails or the target makes a successful defend, the questioning is ineffective. Additional attempts may be made at a progressive difficult (-4) modifier, but after three fails, additional attempts may not be made again with that target until the skill rank has increased.
Tactical Use: Trick a target to reveal details about a specific person, place, or thing; pressure a target to reveal a master plan; threaten a target with extreme physical harm; etc.
Prerequisites: The Intimidation skill and four points in the skill tree
Attribute: Influence
Type: Attack
Time: N/A
Description: A character with this skill is able to attract and hold the interest of a target to the point of fascination. With a successful skill check, any NPC that views the character as Neutral or better temporarily moves to Loyal, and follows non self-destructive instructions willingly, with a -1 modifier per point in the skill tree to further Willpower or Morale saves against the character, until they experience an act of betrayal. The target is allowed a Willpower or related save to negate the effect, at the same modifier as above. If the skill check fails or the target successfully defends, the character is ignored. Additional attempts may be made at a progressive difficult (-4) modifier, but after three fails, additional attempts may not be made again with that target until the skill rank has increased.
Tactical Use: Convince an aide to turn on a superior, win over a merchant with a promise of future business, make a bystander believe that the character is a VIP in need of their assistance, etc.
Prerequisites: The Endear skill and four points in the skill tree
Attribute: Influence
Type: Attack
Time: N/A
Description: Those with this skill are able to pressure targets to perform specific actions with threats of extortion or violence. With a successful skill check, the target is made to believe that the attacker will cause them imminent harm, holding some threat over them and leveraging it to force them to follow instructions regardless of outside consequences. There is a difficult (-4) modifier to the skill check if the attacker is faking the threats. The target gets a Willpower or morale check at a -1 modifier per 2 points in the skill tree to resist. If the skill check fails or the target successfully defends, the attempt is ineffective.
Tactical Use: Threaten harm to a politician’s family if an ally is not freed, compel a fence to buy a stolen item under the threat of violence, ransom information back to an official, etc.
Prerequisites: The Coerce skill and four points in the skill tree
Attribute: Influence
Type: Attack
Time: N/A
Description: Characters with this skill are able to convince targets of something by using an avalanche of words. With a successful skill check, the target is convinced to agree with the character on a specific topic, and will act in their support, suffering a -1 modifier per 2 points in the skill tree to Willpower or Morale saves for a number of rounds equal to the skill rank. The target gets a Willpower or related save to resist the effect. If the skill check fails or the target makes a successful defend, the character is not convinced, and the modifiers are lost. This skill may not be used with either the Confound or Endear skills. Selecting a specialization gives the target a -1 modifier per point in the skill tree to a save, within that arena.
Tactical Use: Assure a target that there is minimal danger, prevail upon a guard to help in a fight between rivals, talk a neutral party into supporting a specific position, etc.
Specialization: (Optional) Diplomat, Merchant, Politician, Trader, etc.
Attribute: Influence
Type: Attack
Time: N/A
Description: This skill is used to manipulate a target, inducing them to perform an action that is not necessarily in their best interest. With a successful skill check, the target is overcome with the desire to commit a stated act, whether out of curiosity, fascination, or fear of loss. The target gets a morale check at a -1 modifier per 2 points in the skill tree to resist the effect. If the skill check fails or the target successfully defend, the action is ineffective. Selecting a specialization gives the target a -1 modifier per point in the skill tree to a save, within that arena.
Tactical Use: Tempt a target into buying a rare war-camel, lure a bounty into a vehicle with a promise of a job, bribe an official, etc.
Specialization: (Optional) Diplomat, Merchant, Politician, Trader, etc.
Attribute: Influence
Type: Attack
Time: N/A
Description: A character with this skill uses positive language to make them and their ideas more attractive to others. With a successful skill check, the NPC reaction is increased by one level, i.e. hostile to unfriendly, neutral to friendly, etc., and gives them a -1 modifier per 2 points in the skill tree to Willpower or Morale saves for a number of rounds equal to the number of points in the skill tree. The target is allowed a Willpower or related save to resist the effect. If the skill check fails or the target makes a successful defend, the modifiers are lost. This skill may not be used with the Confound or Fast Talk skills. Selecting a specialization gives the target a -1 modifier per point in the skill tree to a save, within that arena.
Specialization: (Optional) Diplomat, Merchant, Politician, Trader, etc.
Attribute: Influence
Type: Attack
Time: N/A
Description: Characters with this skill can talk in circles, leaving their target perplexed and unable to think clearly. With a successful skill check, the target gets flustered, briefly overcome with confusing or conflicting thoughts to suffer a -1 modifier per point in the skill tree to Willpower or Morale saves for a number of rounds equal to the number of points in the skill tree. The target is allowed an initial Willpower or related save to negate the effect or if threatened. If the skill check fails or the target makes a successful defend, the modifiers are lost. It may not be used with the Endear or Fast Talk skills. Selecting a specialization gives the target a -1 modifier per point in the skill tree to a save, within that arena.
Specialization: (Optional) Diplomat, Merchant, Politician, Trader, etc.
Attribute: Influence
Type: Attack
Time: N/A
Description: Those with this skill are very convincing and can talk a target into doing their bidding. With a successful skill check, the target agrees to do or say something that is not directly harmful to themselves or their allies, per the attacker’s instructions. The target is allowed a Willpower save or morale check at a -1 modifier per 2 points in the skill tree to resist the effect. If the skill check fails or the target successfully defends, the suggestion is ineffective. Selecting a specialization gives the target a -1 modifier per point in the skill tree to a save, within that arena.
Tactical Use: Talk a guard into allowing a visit to a prisoner, convince a VIP to let the character join a security detail, lure a fence into a trap with a tempting object, etc.
Specialization: (Optional) Diplomat, Merchant, Politician, Trader, etc.
Attribute: Agility
Type: Attack
Time: N/A
Description: Characters with this skill can locate a person and follow them around without being noticed. Adept at keeping their prey in a direct line of sight, they can use the surrounding environment for cover while moving along a similar path, matching both pace and route. This skill is used as a save against Observation, Search, or related skill checks. Difficulty modifiers may be applied to the skill check based on the paranoia or awareness of a target, type and familiarity of surroundings, location and number of obstacles, how much the character stands out, etc.
Tactical Use: Following a thief to find a fence, pursue an official to a secret location, shadowing a target to locate a person or object, etc.
Prerequisites: The Stealth skill and eight points in the skill tree
Attribute: Influence
Type: Attack
Time: One Action
Description: A character with this skill is instantly recognized as being dangerous, with an aura of menace that can be used to frighten foes. Whenever they are spending an action to actively take an ominous or sinister posture, those in the area are unnerved, losing an action each round so long as the character is present and in control. Targets are allowed a Willpower save with a -1 modifier per 2 points in the skill tree to resist the effect. While it’s not necessary to make a new skill check each round, one action must be spent per round to maintain the posture for the duration of the encounter. It can also be used to force a foe to flee or become more compliant, or take command of NPCs in the area with the same save modifiers. If the skill check fails or the target successfully defends, the attack is ineffective.
Prerequisites: The Intimidate skill and eight points in the skill tree
Attribute: Agility
Type: Move
Time: One Action
Description: This skill is used to vanish by employing a distraction and moving with speed and stealth to drop out of sight. In order to use this skill, there must be visual obstacles in the area. With a successful skill check, the character launches a distraction, i.e. flashbang, noisemaker, etc., and drops out of the immediate field of view. Additionally, they know how to use obstacles in an area to approach a target without being seen to make a surprise attack. Targets get a Search or related skill check to locate the character after the distraction, with a -1 modifier per point in the skill tree.
Tactical Use: Use a smoke bomb as cover to move behind a barrier, throw sand in the face of a foe to break line of sight and move, use an event distraction to duck out of sight, etc.
Prerequisites: The Stealth skill and eight points in the skill tree
Attribute: Knowledge
Type: Utility
Time: N/A
Description: Those with this skill are familiar with common hiding places for valuables. When burglarizing or otherwise ransacking an area, on a successful skill check, the character gains a +1 modifier per point in the skill tree to a relevant Search check to find secret doors and/or hidden compartments. In addition, they can burglarize a prone victim in a single round and a small room in six rounds, locating and taking any minimally secured valuables. A difficulty modifier may be applied based on the size of the room, lighting, and/or the situation. If the skill check fails, the character does not get the bonus modifier for that attempt and/or their burglary attempt fails to yield anything of value.
Prerequisites: The Search skill and four points in the skill tree
Attribute: Influence
Type: Defend
Time: N/A
Description: A character with this skill can take on the role of another and believably project their attitude, mannerisms, etc. There are two ways to use this skill; when challenged while pretending to be someone else, the character gets a save to oppose a Search or related skill check. Alternately, it can be used to overcome a failed Bluff—on a successful skill check, the target gets a -1 modifier per point in the skill tree to save. The character must have a passing resemblance to the person they are impersonating, either naturally or through a disguise, and be able to speak the same language. The difficulty is based on the degree of difference between the character and the role, the likelihood of that person being present at that time and place, and the target’s familiarity with them. If the skill check fails, the role was not believably presented.
Tactical Use: Dress as a prison guard to reach a specific cell, pretend to be a person of authority to make a specific demand, shout instructions in passing to throw off suspicions, etc.
Prerequisites: The Streetwise skill and four points in the skill tree
Attribute: Knowledge
Type: Utility
Time: N/A
Description: A character with this skill can attempt to falsify a written, pictorial, or symbolic document displayed in a physical or electronic form. The forger must have an understanding of the language and/or symbolism to be forged, have access to the materials and/or media, and be familiar with the display form. A skill check is required to make the forgery and it assumes the forger’s skill rank—challenges made against the validity of the document are made at this skill rank to pass it off as a genuine document. The difficulty for creating the document is based on the type, its frequency within the culture, and the likelihood of such a document being forged. If the initial skill check fails, the time and materials are wasted and a new document will need to be forged; if the save fails, its authenticity is called into question.
Tactical Use: Write a note requesting false aid from an official, create a symbol of a magistrate to gain access to an estate, make passable orders to have a prisoner released, etc.
Prerequisites: The Bluff skill and four points in the skill tree
Attribute: Knowledge
Type: Utility
Time: N/A
Description: Those with skill have a greater understanding of mechanisms, giving them a greater chance of success when working with them. The device must be studied for at least one round, though the actual amount of time required may vary based on complexity and obscurity. On a successful skill check, the character ignores any complexity modifier to an Open Locks or Disable Device attempt. If the skill check fails, this bonus modifier is not available for that device until the skill rank has increased.
Prerequisites: The Search skill and four points in the skill tree
Attribute: Agility
Type: Attack
Time: One Action
Description: A character can use this skill to lift a small item and hide it on his person, palm an unattended object, or otherwise casually take something without being noticed. On a successful skill check, the larcenous attempt is successful and all in the area have a -1 modifier per 2 points in the skill tree to notice the attempt. Difficulty is based on the general awareness of the target, type of environment, speed, and the type of plunder. If the skill check fails, the attempt fails and the modifier to notice it is lost.
Tactical Use: Pluck the ammo from a weapon, palm a gem from a jewelers table, bump into a foe and casually pull something from a pocket, etc.
Specialization: None
Attribute: Knowledge
Type: Utility
Time: N/A
Description: Those with this skill can assume the role of panhandler, including credible attire, mannerisms, and accessories. The ability to pass as a panhandler in a particular area is based on the number of skill points in Guile, i.e. novice 0-3 points, expert 4-7 points, master 8+ points. A novice can fool people in passing, earning enough coin for a meal, while an expert is convincing in direct interactions earning a day’s worth of meals, and a master can stand up to scrutiny, earning a day’s salary for a Plebeian. In addition, these characters understand the mindset of panhandlers and can more easily speak with them to get information, increasing NPC reactions to the character by one level, i.e. hostile to unfriendly, neutral to friendly, etc., with a successful skill check. If the skill check fails, they do not earn coin for the day or get the bonus for that particular interaction.
Specialization: None
Attribute: Influence
Type: Utility
Time: N/A
Description: Those with this skill can play songs and participate in combat. The character gains access to all six “Minstrel songs” and take attack actions in combat, without breaking the rhythm and ending the song. In addition, they can improvise music to entertain or distract by drawing a number of people up to the skill rank or increasing NPC reactions by one level. If the check fails, additional attempts may be made at a progressive difficult (-4) modifier, but after three fails, attempts may not be made again in that area.
Prerequisites: The (E) Minstrel skill and eight points in the skill tree
Attribute: Constitution
Type: Move
Time: N/A
Description: Characters with this skill can slow or break falls to avoid taking damage. With a successful skill check, the character can grab an object to stop the fall; hit ledges, tree branches, or other such objects to break the fall, etc. Assuming these techniques are available to slow or break it, the fall is considered ten yards shorter per two points in the skill tree to calculate damage. If the check fails, the damage cannot be mitigated.
Prerequisites: The Tumbling skill and eight points in the skill tree
Attribute: Influence
Type: Utility
Time: One Free Action
Description: Characters with this skill can change their voice and throw it. With a successful skill check, the character can mimic the voice of another, make themselves sound different, and make the voice appear to come from a specific target to deceive those in the area. Targets get a Willpower or related skill check to uncover the deception, with a -1 modifier per 2 points in the skill tree. In addition, the character can produce a variety of natural, musical, or mechanical sounds using one’s mouth, lips, tongue, and voice. If the skill check fails, the affect goes unnoticed and any targets in the area get an Observation check to notice the attempt, depending on the situation.
Prerequisites: The Oration skill and four points in the skill tree
Attribute: Constitution
Type: Move
Time: One Action
Description: Those with this skill can swing from ropes, cables, bars, or other such supports to move from one place to another. On a successful skill check, the character can use hanging or fixed aerial mediums to move normally. The distance moved is dependent upon the length and/or location of the medium, and the character can use a number of them equal to the number of points in the skill tree, with one skill check. If the skill check fails, the character is unable to make a direct transition to complete the move and/or falls, depending on the situation. A difficulty modifier may be applied to the skill check based on encumbrance and the type of medium.
Prerequisites: The Balance and Vaulting skills, and four points in the skill tree
Attribute: Influence
Type: Utility
Time: Two Actions
Description: Characters with this skill can mix instrumentals and vocals to create a dynamic tune that can affect enemies or allies in combat. With a successful skill check, the character is able to play a song that has the emotional power to offer specific modifiers, based on the number of points in the skill tree. There are six types of “Minstrel songs”, each of which can be played in a host of different ways, using instruments and/or vocals. The character can choose any two to learn initially. After a skill check, the character can play for 1 round per 2 points in the skill tree. After the first round, one action must be spent playing, but any attack action breaks the rhythm and ends the song. There is a progressive difficult (-4) modifier to recapture that emotional power after each time a song is played during an encounter. If the skill check fails, the modifiers are not applied, and each additional attempt carries the progressive difficult (-4) modifier as stated above.
Prerequisites: The Crooning and Instrumentalist skills, and four points in the skill tree
Attribute: Agility
Type: Utility
Time: One Free Action
Description: A character with this skill is able to perform minor feats of trickery with the use of timing, misdirection, and natural choreography. With a successful skill check, the character can palm tiny objects to replace them with other tiny objects or make them seem to disappear, draw a tiny or small weapon, or take a tiny or small object off a target, while under scrutiny. Targets are allowed a Search, Observation, or related skill check to notice the deception, with a -1 modifier per point in the skill tree. If the check fails, the intent of the action is not accomplished and those in the area may get an Observation check to notice the attempt, depending on the circumstances.
Prerequisites: Four points in the skill tree
Attribute: Agility
Type: Move
Time: Two Actions
Description: This skill is used to move across an environment by navigating around, through, over, and under the its features, in the fastest way possible. With a successful skill check, characters can run, jump, climb, swing, vault, and roll across obstacles, allowing them to quickly cross an area and/or pass through an opponent’s threat zone, without drawing an attack of opportunity. After the first round, distance traveled increases by the number of points in the skill tree for all successive moves, but resets when the character stops. In addition, while the character is moving with this skill, opponents have a -1 modifier per 2 points in the skill tree to hit them. On a failed skill check, movement is halved, and the character may land prone or take falling damage, depending on the circumstances. A difficulty modifier may be applied to the skill check based on encumbrance and the type and/or size of the obstacles.
Prerequisites: The Tumbling and Vaulting skills and four points in the skill tree
Attribute: Constitution
Type: Utility
Time: N/A
Description: Those with this skill are flexible, able to twist themselves in a variety of positions. This provides them with an additional +1 bonus modifier per two points in the skill tree to any Dance, Escape Artist, Dodge, or Evade skill checks, assuming the character has the skills. In addition, with a successful skill check they can dislocate a shoulder and hip joints to squeeze into and move through tiny places. If the check fails, additional attempts to dislocate the joints may be made at a progressive difficult (-4) modifier, but after three fails the character takes disable damage equal to the skill rank to the target joint (normal damage saves apply), and may not try again during that encounter.
Prerequisites: The Escape Artist skill and four points in the skill tree
Attribute: Agility
Type: Move
Time: One Action
Description: Characters use this skill to make greater leaps with the help of an obstacle. With a successful skill check, they can spring forward or upward with a running start, a distance equal to two move actions, plus one yard per point in the skill tree. In addition, it can be used to make a series of vaults horizontally or vertically equal to the number of points in the skill tree, assuming there is a series of available obstacles no further apart than that of a standard vault. A failed skill check indicates that the character missed the jump and possibly lands prone, depending on the circumstances. The difficulty is based on distance and encumbrance.
Specialization: None
Attribute: Agility
Type: Move
Time: One Action
Description: This skill is used to twist, turn, roll, and/or bound through an area to escape or avoid combat. With a successful skill check, the character can disengage from melee combat or move through an opponent’s threat area without drawing an attack of opportunity, to a distance equal to one move action. In addition, it can be used to negate the impact from a fall, based on the number of points in the skill tree, i.e. novice 0-3 points, expert 4-7 points, master 8+ points. A novice can negate the damage from a ten-yard fall, while an expert can negate the damage from twenty-yard fall, and a master can negate the damage from a thirty-yard fall. For a fall greater than the allotted distances, damage is calculated normally. If the skill check fails, the character is subject to an attack of opportunity or takes falling damage.
Tactical Use: Jump from a moving vehicle or off a wall and roll to avoid taking damage, escape a melee combatant, etc.
Specialization: None
Attribute: Agility
Type: Move
Time: One Action
Description: Those with this skill are able to move normally across narrow, slender, or other similarly precarious surfaces. With a successful skill check, a character can cross a narrow surface such as a rope or cable, so long as it can support their weight, based on the number of points in the skill tree, i.e. novice 0-3 points, expert 4-7 points, master 8+ points. A novice can move at half move rate, an expert can move at full move rate, and a master can use a move-based skill. A difficulty modifier may be applied to the skill check based on the stability of the surface. If the skill check fails, the character is allowed a Reaction save to avoid a fall.
Specialization: None
Attribute: Agility
Type: Attack
Time: One Action
Description: This skill is used to manipulate a long rope or other type of line, with a running noose at one end, to ensnare a person or thing without causing damage. With a successful skill check, the character can catch a target a distance away equal to the skill rank, around a limb or the torso. Targets get a defend action to avoid the attack; the effect is based on the area hit. Lassoing the torso leaves the target standing prone, an arm that is lassoed is effectively disabled, and a target’s legs that are lassoed must make a reaction save to avoid being knocked prone for each action the attacker takes to pull the rope. If the skill check fails or the target makes a successful defend, the attack misses.
Specialization: None
Attribute: Influence
Type: Attack
Time: Two Actions
Description: Character use this skill to play an instrument in a way that affects the emotional state of those within range. With a successful skill check, the character is able to embolden allies during combat, providing a +1 bonus modifier per point in the skill tree to their Willpower saves, or induce feelings of dread in opponents, giving them a -1 modifier per point in the skill tree to Willpower saves. At least two actions must be spent playing the instrument, remaining actions may be used to move or defend, but any attack action ends the effect and requires a new skill check to begin again. The effect lasts so long as the character continuously plays the instrument, each time the music ends, there is a progressive difficult (-4) modifier to begin again and recapture that emotional effect. In addition, it may be used before combat begins either to encourage allies, providing a +1 bonus modifier per two points in the skill tree to the first round of combat actions, or to discourage enemies, causing a -1 modifier per two points in the skill tree to the first round of combat actions. This effect ends after the first round of combat regardless of whether or not the character continues playing. If the skill check fails, the modifiers are not applied, and each additional attempt carries the progressive difficult (-4) modifier as stated above.
Specialization: None
Attribute: Constitution
Type: Attack
Time: One Action
Description: Those with this skill are able to create a plume or stream of flame by spitting some type of combustible fuel past an ignition source. To use this skill, the character must have both a fuel and flame source at hand. With a successful skill check, the character is able to spit flame at an opponent to either cause damage or serve as a distraction. Targets get a defend action to avoid taking damage; the amount of damage is determined by the flash point of the fuel source, i.e. high flash point fuels cause 12 points of damage, but burn out instantly, while low flash point fuels cause 8 points of damage per round for up to three rounds. When used as a distraction, opponents get a Reaction save with a -1 modifier per two points in the skill tree, those who fail lose an action for that round, assuming they have at least one remaining (this effect does not carry over to the next round). If the skill check fails, there is a risk of self-ignition which requires a Reaction save, if it fails, the character takes damage based on the fuel source.
Specialization: None
Attribute: Agility
Type: Defend
Time: One Action
Description: This skill is used to slip bonds or other restraints, escape a maneuver, slip into a tight passage, etc. With a successful skill check, the character can contort their body to make an escape, wriggling free of some type of bindings or a grapple, or squeeze into and out of a tight area; while it does not provide the ability to pick a lock, this ability to contort body parts could allow the character access to be able to pick a lock or other similar action. When used as a grapple defense it takes one action to wriggle free but getting free of bindings can take multiple rounds depending on the type and complexity. The difficulty is based on the amount of time, quality of bonds, and the subtlety that the action requires; if the skill check fails, additional attempts may be made at a progressive difficult (-4) modifier, but after three fails the bonds are beyond the ability to escape.
Specialization: None
Attribute: Influence
Type: Attack
Time: Two Free Actions
Description: A character with this skill can sing or hum in a soothing voice, to effect those around them. With a successful skill check, they can use their voice to help an ally under a mind-altering affect, providing a +1 modifier per two points in the skill tree to a Willpower or related save. It can be used to temper a tense situation, increasing NPC reactions to the character by one level, i.e. hostile to unfriendly, neutral to friendly, etc., calm an alarmed animal or approaching monster, etc. Targets are allowed a morale save with a -1 modifier per two points in the skill tree. This skill is useful for diffusing a situation before combat begins, though it can be effectively used against those with an animal intelligence during combat, so long as no one is actively attacking the target. If the skill check fails, additional attempts may be made at a progressive difficult (-4) modifier, but after three fails, additional attempts may not be made again during that encounter.
Tactical Use: Hum soothing notes during a tense exchange, speak in a cheerful sing-song tone to calm a frightened ally, pacify a frightened animal with a soft tonal song, etc.
Specialization: None
Attribute: Agility
Type: Defend
Time: Free Action
Description: This skill can be used to better resist a knockdown, trip attack, fall, or other type action that would leave them prone. Characters gain a +1 modifier per rank in the skill tree to their Reaction save against any attack type that that involves a prone save, so long as they are not in a grapple. In addition, it may also be used to reduce or negate modifiers for fighting from an unstable, moving, or other type of surface with challenging footing. A difficulty modifier may be applied to the skill check based on the complexity of the action and/or type of surface.
Specialization: None
Attribute: Knowledge
Type: Utility
Time: N/A
Description: This is an advanced type of aide that is used to treat severe physical injuries while in combat. When treating body damage, with a successful skill check, bleeding damage is halted, and a number of body points are restored equal the target’s healing rate plus one per point in the skill tree. In addition, it can be used outside of combat to perform battlefield surgery, i.e. reattach or amputate a limb, remove shrapnel, repair an organ, etc. A surgical kit is required.
Prerequisites: The (E) Triage skill and eight points in the skill tree
Attribute: Knowledge
Type: Utility
Time: N/A
Description: A character with this skill has knowledge virulent pathogens, how they spread, and how they affect the body. With a successful skill check the character is able to identify the affliction, based on the presented symptoms, giving them a +1 bonus per two points in the skill tree to synthesize an agent that can suppress the effects or cure the disease. Not all diseases can be cured, i.e. lycanthropy, vampirism, zombie fever, etc., though they may be suppressed, lasting a number of days per point in the skill tree. Curing agents can take hours or days to complete, depending on the strength of the pathogen and/or the degree of exposure. If the pathogen has a recurrent save, the agent will provide a bonus modifier equal to the number of points in the skill tress at the time it was synthesized. If the identify skill check fails, no bonus modifier is applied; if the synthesis skill check fails, the ingredients are lost.
Prerequisites: The (E) Toxicology and Diagnose skills, and eight points in the skill tree
Attribute: Knowledge
Type: Utility
Time: N/A
Description: Those with this skill understand how synthetic or natural contaminates impact the body. With a successful skill check, the character is able to identify a poison, venom, or toxin based on the presented symptoms, giving them a +1 bonus per point in the skill tree to synthesize an agent that can hinder or neutralize the effects. In order to neutralize the contaminant, the number of points in the skill tree must be greater than the toxicity modifier, otherwise the agent relieves the effects for one hour per point in the skill tree. This skill can also be used to create doses of a poison, venom, or toxin, with a toxicity modifier equal to the number of points in eth skill tree. The specific effect of the toxin, i.e. damage, paralysis, blindness, etc., is dependent on the available chemicals. If the identify skill check fails, no bonus modifier is applied; if the synthesis skill check fails, the attempt fails, and the chemicals are lost.
Prerequisites: The Diagnose and Anatomy skills, and four points in the skill tree
Attribute: Knowledge
Type: Utility
Time: N/A
Description: This is an advanced type of aide used to heal physical injuries outside of combat. When treating body damage, with a successful skill check all bleeding damage is halted, and a number of body points are restored equal the target’s healing rate plus 1 per 2 points in the skill tree. In addition, it can be used to reattach severed limbs with a difficult (-4) modifier. A surgical kit is required. Triage may be performed every three hours to treat Body damage.
Prerequisites: The Anatomy and First Aide skills, and four points in the skill tree
Attribute: Knowledge
Type: Utility
Time: N/A
Description: This skill is used to revive, treat, and stabilize, those who have reached the point of death. With a successful skill check, a character who has lost all Health and Body, but not suffered a devastating injury, i.e. beheading, frozen, cut in half, etc., can be stabilized, gaining a number of health points equal to their healing rate plus one per two points in the skill tree. Further, characters who have died within the past ten minutes can be revived, with a successful skill check at a difficult (-4) modifier. A medical kit is required. If the skill check fails, additional attempts may be made at a progressive difficult (-4) modifier, but after three fails, no more attempts may be made.
Prerequisites: The First Aide skill and four points in the skill tree
Attribute: Knowledge
Type: Utility
Time: N/A
Description: Characters with this skill know how herbs, minerals, and toxins can be mixed to affect biological functions. With a successful skill check, chemical ingredients can be synthesized to create a hot-boost, increasing a single attribute by 1 per 2 points in the skill tree for up to a number of rounds equal to the skill rank, or a stim, which negates the effects of fatigue for up to a number of rounds equal to the number of points in the skill tree. Once the effect of either enhancement wears off, the character becomes uncomfortably warm and nauseated, entering a fatigue state that takes a few hours of rest to wear off. If the skill check fails, the character is unable to synthesize the enhancement, wasting the chemicals.
Prerequisites: The Anatomy skill and four points in the skill tree
Attribute: Knowledge
Type: Utility
Time: N/A
Description: Those with this skill know how to collect, preserve, and analyze biological evidence to provide details about a scene. With a successful skill check, the character can provide a general cause of death, time of death within a small window, determine the most likely weapon used, identify the presence of toxins, etc. It may also be used to locate clues about others who may have been at the scene, including general factors such as height, weight, species gender, etc., depending on the circumstances. If the skill check fails, additional attempts may be made at a progressive difficult (-4) modifier, but after three fails, additional attempts may not be made again on that scene until the skill rank has increased.
Prerequisites: The Anatomy skill and four points in the skill tree
Attribute: Knowledge
Type: Utility
Time: N/A
Description: Characters with this skill can heal those who suffered disable damage, outside of combat. For standard disable damage, with a successful skill check, full use is restored with no negative effects; for devastating disable damage, this skill may be used with a healing kit to splint broken bones, cauterize losses, or stabilize those in shock with a difficult (-4) modifier. In addition, this skill can be used during combat to negate the second-round effect of stun damage, at a cost of two actions. Selecting a specialization gives a +1 modifier per 2 points in the skill tree. A medical kit is required to use this skill; without it there’s an additional difficult (-4) modifier to the skill check. If the skill check fails, usage to the appendage is restored at a difficult modifier until the damage heals naturally or it is treated by someone with a higher skill rank.
Specialization: (Optional) Specific race/species
Attribute: Knowledge
Type: Utility
Time: One Action
Description: A character with this skill is better able to assess damage to treat an injury. With a successful skill check, the character gains a bonus modifier equal to 1 per 2 per points in the skill tree to the healing attempt. In addition, with this skill they can perform basic forensics to determine cause of death, time of death, etc. If the skill check fails, these modifiers may not be applied to any healing attempt on that being.
Specialization: None
Attribute: Knowledge
Type: Utility
Time: N/A
Description: Those with this skill understand humanoid and animal biology, allowing them to better treat a variety of beings. With a successful skill check, the character gains the specialization bonus from healing skills in the tree. In addition, the modifier for treating body damage is reduced by one per two skill points in the skill tree. If the skill check fails, these modifiers may not be applied to any healing attempt on that being.
Specialization: None
Attribute: Perception
Type: Move
Time: N/A
Description: Characters with this skill know how to locate evidence of passage and follow the trail. With a successful skill check, the character is able to: find a trail, see through attempts to hide a trail, or relocate a trail that’s been lost. It can also be used to determine specific aspects of the being that left the trail, based on the number of points in the skill tree, i.e. expert 4-7 points, master 8+ points. An expert can determine general species, it’s overall size, and whether or not it is injured; a master is able to determine what it was doing when the trail was left, i.e. hunting, fleeing, roving, etc, and guess at its habits. The difficulty is based on the age, type, and condition of the trail, and may be modified by countermeasures. If the skill check fails, additional attempts may be made at a progressive difficult (-4) modifier, but after three fails, additional attempts may not be made again on that trail until the skill rank has increased.
Tactical Use: Find and follow prints along a path; see through the use of foliage to hide a trail; determine that an injured animal is fleeing; etc.
Prerequisites: The Search skill and four points in the skill tree
Attribute: Knowledge
Type: Utility
Time: N/A
Description: Those with this skill understand how to explore and navigate cave systems. With a successful skill check, the character is able to determine the best way to gear up based on the type and location of cave, determine the likely inhabitants based on size, tracks, sounds, etc., and select the best routes based on the presence of water, sloping, air quality, etc. In addition, any move modifiers based on environment or terrain are reduced by 1 per 2 points in the skill tree, and they get a +1 modifier per two skill points in the skill tree to Search, or related skills, while in the cave. If the skill check fails additional attempts may be made at a progressive difficult (-4) modifier, but after three fails, additional attempts may not be made for those caves until the skill rank has increased.
Prerequisites: The Survival skill and four points in the skill tree
Attribute: Agility
Type: Move
Time: N/A
Description: A character with this skill can break from pursuers and move quickly without drawing attention or leaving evidence of passage. On a successful skill check, the character escapes line of sight and is able to move without being tracked. Additional attempts to locate or track the character with a Search or related skill check have a -1 modifier per point in the skill tree. This skill may be used to defend against a location attempt. If the skill check fails, the character either fails to break line of sight, leaves evidence of passage, or is spotted, depending on the situation.
Prerequisites: The Stealth skill and eight points in the skill tree
Attribute: Perception
Type: Attack
Time: One Action
Description: Those with this skill can use natural aspects of an area to conceal their actions, allowing them to add a surprise attack to any move skills in this tree, (assuming the character has the skill). It may be used with any novice attack skill the tree, (assuming the character has the skill), with all related and general combat modifiers and action requirements applied normally. With a successful skill check, the target is hit, Surprise rules apply to the target’s defend actions for that attack. If the skill check fails, the miss results of the move and attack actions both apply.
Prerequisites: The (E) Venery skill and eight points in the skill tree
Attribute: Perception
Type: Utility
Time: N/A
Description: Characters with this skill have a keen understanding of the dynamics of predator-prey relationships. It provides the character with a +1 modifier per 2 points in the skill tree to: locate concealed targets (Search skill), determine if a foe intends to fight or flee (Interpreting skill), divine the best way to stand up to a foe (Intimidate skill), deceive (Bluff skill), and prevail upon a foe to make a deal (Persuade skill). For those with a specialization in Survival, the bonus modifier is +1 per point in the skill tree while in their specific terrain. If the skill check fails, no additional attempts may be made during that encounter.
Prerequisites: The Search and Survival skills, and four points in the skill tree
Attribute: Knowledge
Type: Utility
Time: N/A
Description: A character with this skill can fashion simple mechanical devices designed to hold or damage a target. There are five aspects to a trap: components, trigger, reset, effect, and obscurity. When designing and building the trap, it’s up to the character to find the components to make the trap, determine its effect, and decide whether or not it can be reset or can be used one time. Once the trap is built, a skill check is made to set the trigger—if successful, the trap functions as designed and any who try to disarm it get a -1 modifier per 2 points in this skill tree. A failure indicates a problem that may include accidental triggering. A set trap can be obscured, requiring a successful Observation or Search skill check, and can be enhanced with the use of the Camouflage skill. If the skill check fails, additional attempts to set the trigger can be made at a progressive difficult (-4) modifier, but after three fails, the mechanics of the trap are destroyed, and it must be rebuilt.
Prerequisites: The Disable Device skill and four points in the skill tree
Attribute: Knowledge
Type: Utility
Time: N/A
Description: A character with this skill has knowledge of herbal remedies and their effect on the body. It is used to locate herbal ingredients in an area and to prepare and administer remedies. The character’s ability to locate herbal ingredients is based on the number of points in the skill tree, i.e. expert 4-7 points, master 8+ points; an expert can collect the required ingredients so long as the ingredients are native to the area, while a master is able to substitute the required ingredients with those that have similar properties in the area. Remedies can aid in healing, providing a +1 to the target’s healing rate per two points in the skill tree, or to provide temporary relief from toxins, suspending the effects for one hour per point in the skill tree. If the skill check fails, the character is either unable to locate herbal ingredients or fails to create the remedy, wasting the herbs.
Prerequisites: The First Aide skill and four points in the skill tree
Attribute: Knowledge
Type: Utility
Time: Four Actions
Description: This is a quick type of aide that can be used to bind wounds and perform basic battlefield care while in combat. It can be used to treat both Health and Body damage to a limited extent. Treating Health damage has a base (-o-) difficulty and restores a number of points equal to the target’s healing rate plus one per two points in the skill tree. There’s a difficult (-4) modifier to treat body damage; it restores a number of points equal to the target’s healing rate and halts bleed out damage. Disable damage may be treated, restoring use of the limb or appendage, leaving the target with a difficult (-4) modifier until more advance treatment is provided. A medical kit is required to use this skill; without one there’s an additional difficult (-4) modifier to the skill check. At the end of combat, additional aide may be performed to treat Health or Body damage.
Tactical Use: Tend to a combatant to restore Health points; wrap a wound to restore Body points; reset a joint to restore mobility, etc.
Prerequisites: The First Aide skill and four points in the skill tree
Attribute: Agility
Type: Utility
Time: N/A
Description: Those with this skill can attempt to pick mechanical padlocks and door locks, trick digital locks, finesse combination locks, etc., with the use of some type of tool, i.e. pick, pry bar, gadget, etc. With a successful skill check, the lock is opened, bypassed, etc. Difficulty and amount of time required is based on the type, complexity, and quality of the lock, and type of tools. If the skill check fails, additional attempts may be made at a progressive difficult (-4) modifier, but after three fails, additional attempts may not be made on that device until the skill rank has increased.
Tactical Use: Pry a door away from the frame to overpower the lock, turn locking tumblers with a file, recognize tumblers falling into place, etc.
Specialization: None
Attribute: Perception
Type: Utility
Time: Two Free Actions
Description: Those with this skill understand non-verbal communication, and can read facial expressions, body language, tone, and inflection to effectively determine intent or deception. With a successful skill check, the character negates any negative modifiers from an opponent’s attempt to use the Bluff, Intimidate, and Persuasion skills. In addition, it can be used to communicate intent, emotion, and general desires with those who don’t speak a common language. If the skill check fails, the modifiers are applied normally to the appropriate saves. When trying to communicate, additional attempts may be made at a progressive difficult (-4) modifier—after three fails, additional attempts may not be made with those people until the skill rank has increased.
Tactical Use: Convince a native to serve as a guide, determine if a merchant is pushing a bad sale, determine if a fence is lying, etc.
Specialization: None
Attribute: Agility
Type: Utility
Time: N/A
Description: This skill is used to disarm traps, jam locks, perform mechanical sabotage, etc. With a successful skill check, the character is able to disable an activation mechanism or cause damage to physical a component to keep the device from functioning correctly. Exactly what can be disabled depends on available access to the component and familiarity with the device. The time required varies, but typically requires a few minutes. The difficulty is based on the complexity of the device, available tools, and materials. If the skill check fails, additional attempts have a progressive difficult (-4) modifier, but after three fails, additional attempts may not be made again on that device until the skill rank has increased.
Tactical Use: Attempt to remove the pin from a grenade trap, jam a stone into a keyhole, or cut most of the way into a saddle strap.
Specialization: None
Attribute: Influence
Type: Utility
Time: One Action
Description: This skill is used to coordinate tactics, instill confidence, and raise morale. When a character with this skill is leading, allies get an additional action in the round to attack, defend, or move, but it lasts only while the character is in control and can be heard, i.e. spending one action per round leading. It can also be used to give an ally a second Willpower save, an NPC an additional morale check, or take command of NPC groups, with a successful skill check.
Prerequisites: The (E) Inspire skill and eight points in the skill tree
Attribute: Influence
Type: Utility
Time: One Free Action
Description: This skill is used to imbue allies with confidence. With a successful skill check, any non-combat save may be increased by 1 per 2 points in the skill tree. The effect lasts a number of rounds equal to 1 per 2 points in the skill tree. The inspiration can be vocal or based on actions; the difficulty is based on the situation and may be modified by roleplay ability.
Tactical Use: Provide a bonus modifier to a poison save, environmental penalty, etc., or rally ally NPCs with a speech, dramatic attack, etc.
Prerequisites: Four points in the skill tree
Attribute: Perception
Type: Defend
Time: N/A
Description: Characters with this skill are a little paranoid, always expecting an ambush. It is used in place of a Perception check for surprise situations. If successful, the character may roll for initiative and act during the surprise round; if the skill check fails, they get a full round of defend and/or move actions. In combat the character can reduce any defend modifiers caused by a tactic or skill by one per two ranks in the skill tree, with a successful skill check. The difficulty is based on situation and any sensory impairment.
Prerequisites: The Observation skill and four points in the skill tree
Attribute: Knowledge
Type: Utility
Time: N/A
Description: A character with this skill has had training in various climates and terrains and can sustain life in these environments for a period of time. This includes knowledge of the gear to purchase, food or water required, how to build a shelter, etc. How long a character can survive is based on number of points in the skill tree, i.e. novice 0-3 points, expert 4-7 points, master 8+ points. A novice can survive days, an expert for weeks, and a master for months, reduced by half to keep unskilled people alive. A specialization increases the time factor by one level, i.e. a novice for weeks, an expert for months, a master for years. Difficulty is based on environment, preparations, and time.
Specialization: (Optional) Specific terrain type, i.e. arctic, desert, forest, jungle, etc.
Attribute: Perception
Type: Utility
Time: N/A
Description: Those with this skill are familiar with shady or disreputable aspects of society and are able to identify its subtleties, the degree of which is based on the number of points in the skill tree, i.e. novice 0-3 points, expert 4-7 points, master 8+ points. Novices identify criminal controlled areas and understand the mannerisms for making or avoiding contact; an expert knows where and how to directly contact members of a particular group or underground profession; masters understand the dynamics between groups and knows how to contact the ranking members. Selecting a specialization allows the character to attempt to increase their expertise in a particular interaction to the next level with a difficulty modifier, i.e. novice to expert at a difficult modifier, novice to master at a very difficult modifier, and allows for immediate low level contacts. The difficulty is based on the familiarity with an area or group, reputation, and the overall situation.
Tactical Use: Acquiring information about a project, locating a fence, bribing an official, etc.
Specialization: (Optional) A specific city or group
Attribute: Influence
Type: Attack
Time: N/A
Description: Characters can use this skill to negotiate the purchase of goods or services to get more for less without using deception, or in trade for other goods and services rather than currency. In the former, the degree of discount is based on number of points in the skill tree, i.e. novice 0-3 points, expert 4-7 points, master 8+ points. A novice gets a discount up to 5%, an expert up to 15%, and a master up to 30%. In the latter, the character can convince an unwilling target to consider a trade for goods and services. Targets get a Willpower or related defend skill to resist the attempt, with a -1 modifier per 2 points in the skill tree. The difficulty is based on target temperament, local supply and demand, and the situation, and may be modified by roleplaying. Either party may refuse a deal regardless of die rolling.
Tactical Use: Purchase weapons or gear packs at a discount, hunt down a thief in exchange for a transport, pay a debt with a stolen vehicle, etc.
Specialization: None
Attribute: Perception
Type: Attack
Time: One Action
Description: This skill is used to actively find a hidden or otherwise concealed person or object; to discern a specific factor or detail; detect hidden passageways or secret doors; etc. It’s an active observational skill initiated by the character. In combat, an action is required to survey an area; opponents may get opposed skill checks to negate detection. The difficulty is based on type of concealment, lighting, time taken, etc.
Tactical Use: Attempting to find a person in a crowd, locate the trigger mechanism of a trap, etc.
Specialization: None
Attribute: Perception
Type: Defend
Time: N/A
Description: This is one of the three character saves and is used to react to an unexpected situation or circumstance that occurs outside of direct combat, typically in an attempt to avoid some type of action with a consequence, such as a trap, radius effect, or fall. The difficulty is based on the action that triggers the save, subtlety of the situation, and the character’s general awareness.
Specialization: None
Attribute: Perception
Type: Utility
Time: One Action
Description: This versatile skill is used to concentrate on one or more specific sounds in the immediate or adjoining area in order to discern factors including direction, number, distance, etc. It may also be used in place of a skill check to foil those using the Stealth skill (this is treated as a save and does not cost an action). The difficulty is based on the sound quality, type of obstacles in the environment, and time taken.
Specialization: None
Attribute: Knowledge
Type: Utility
Time: N/A
Description: This is a generic type of aide that can be used to bind wounds, stitch lacerations, or perform any basic battlefield care after combat. It can be used to treat Health and Body damage—to a limited extent. Treating Health damage has a base (-o-) difficulty and restores a number of points equal to the target’s healing rate plus 1 per 2 points in the skill tree—a specialization will increase this is to 1 point per point in the skill tree. There’s a standard difficult (-4) modifier to treat Body damage; and it restores a number of points equal to the target’s healing rate. A character who has lost all Health and Body, but has not suffered a devastating injury, i.e. beheading, cut in half, frozen, etc, can be stabilized with a very difficult (-8) skill check. This restores one Health point and stops the target from bleeding out (see Chapter 3.4: Injuries and Healing for more information). Disable damage may be treated, restoring use of the limb or appendage at a difficult (-4) modifier until it heals naturally, or more advanced treatment is provided. A medical kit is required to use this skill; without it there’s an additional difficult (-4) modifier to any skill check. First Aide may be performed every three hours to treat Health damage. Body damage may be treated once per day, however, if the target takes additional Body damage the same day, a new skill check can be made to treat the new damage.
Tactical Use: Use smelling salts to wake an unconscious ally; restore use to a disabled limb with a splint, treat an ally with antivenom, etc.
Specialization: (Optional) A specific species or race
Attribute: Constitution
Type: Defend
Time: One Free Action
Description: Characters with this skill can remain focused amid intense distraction or split their focus among a number of different things without losing composure. When used in combat, any distraction modifier, called shot modifier, or casting modifier can be reduced by 1 per 2 points in the skill tree with a successful skill check. By spending an action to Concentrate, the modifier can be reduced by 1 per point in the skill tree. A distraction is any unpleasant audible, olfactory, visual, or tactile sensation. The difficulty is based on the type and severity of the distraction.
Specialization: None
Attribute: Knowledge
Type: Utility
Time: N/A
Description: A versatile skill that covers the general maintenance required to keep weapons and armor functional and make minor repairs or adjustments. Up to one point of damage per two points in the skill tree can be repaired, assuming the tools and components are available. Selecting a specialization increases the repair to one point per point in the skill tree, using makeshift tools and materials. The difficulty is based on amount and type of damage, the availability of tools, and the amount of time spent.
Specialization: (Optional) Specific armament type, i.e. heavy armor, mail, swords, bows, etc.
Attribute: Perception
Type: Utility
Time: N/A
Description: This skill is used to gauge the market value of goods based on local economy, quality, and availability (this requires an Appraisal Kit); or to estimate the importance of something to an individual or group. In the former, the value is measured in coin or trade–with a successful skill check, the character gets a bonus simple (+4) modifier to a related Barter, Bluff, or Haggling skill check. For the latter, value is subjective and based on the number of points in the skill tree i.e. novice 0-3 points, expert 4-7 points, master 8+ points. A novice appraisal determines likeliness of familial or sentimental value; an expert appraisal is able to determine to whom it is important; a master appraisal discloses exact importance. Difficulty is based on the manner in which the skill is used, the amount of information that the character has at hand, familiarity with the goods, and time.
Tactical Use: Gauge the monetary value of stolen artwork to a fence, determine the value of a piece of jewelry to a family, etc.
Specialization: None
Attribute: Influence
Type: Attack
Time: One Free Action
Description: This skill is used to draw the focused attention of the target to the character and maintain that attention for the remainder of the encounter. Targets are allowed a Willpower or related defend skill to resist the attempt, with a -1 modifier per 2 skill points in the skill tree. The target may be allowed additional saves to break the taunt, should the taunting character become viewed as less of a threat than another. A single target may be effectively taunted up to three times in an encounter. The difficulty is based on the temperament of the target, overall situation, and roleplaying ability.
Specialization: The (E) Swagger skill and eight points in the skill tree
Attribute: Influence
Type: Attack
Time: One Action
Description: Those with this skill can inflate their presence with an ostentatious display of strength and/or confidence, drawing all attention to their bearing and attitude. This can be used to distract or manipulate groups. The effectiveness is based on the number of points in the skill tree, i.e. novice 0-3 points, expert 4-7 points, master 8+ points. Novices can affect small gatherings (3-10); experts can affect medium sized groups (10-20), and masters can affect everyone in an area. Target groups get a save based on the highest Morale, Willpower, or related defend skill in the group to resist this effect, with a -1 modifier per 2 points in the skill tree.
Tactical Use: Attract a group to surround and follow the character, acting as inadvertent cover; draw a group’s attention as a distraction so that allies can sneak past; etc.
Specialization: The Persuasion and Intimidation skills and four points in the skill tree
Attribute: Influence
Type: Move
Time: One Action
Description: This skill is used to aggressively approach or pursue a target, to incite fear. With a successful skill check, the character is able to affect a threatening demeanor that causes feelings of apprehension or alarm in the target, giving them a -1 modifier per point in the skill tree to all actions as long as they remain threatening and in visual range. Targets are allowed a Willpower save to negate the effect; those with an animal level intelligence get a morale save to negate the effect. If the skill check fails or the target makes a successful save, the attack is ineffective.
Tactical Use: Make a menacing move toward a foe in combat, cause quarry to panic and flee, approach a person with a malevolent presence to mask what’s happening around them, etc.
Specialization: The Intimidation skill and four points in the skill tree
Attribute: Influence
Type: Defend
Time: N/A
Description: This is one of the three character saves and is used to identify deceptions, thwart attempts at manipulation, defend against assaults on the mind, and generally resist any type of attack that effects the character’s emotional or mental state. The difficulty is based on active use by the player, passive use by the GM, awareness or suspicion of a deception, the situation, and roleplaying ability.
Tactical Use: Ignore the charismatic charm of a friendly politician, resist the effects of a mental attack, see past an attempt to throw suspicion on another, etc.
Specialization: None
Attribute: Agility
Type: Defend
Time: N/A
Description: This skill is used to move about without being seen or heard, or to hide without previously established cloaking (Camouflage). It is most often used as a save against Observation or Search skill checks and works like a save in that it does not require an action, beyond any normal movement requirement. Difficulty modifiers may be applied to the skill check based on the type of ground, degree of awareness in target, obstacles, how much the character stands out, speed, etc.
Tactical Use: Use the shadows of an alley to ambush a guard, sneak through a prison corridor, or hide behind an old stump in a wooded vale.
Specialization: None
Attribute: Agility
Type: Utility
Time: N/A
Description: Characters with this skill can tie a variety of knots, secure objects, bind prisoners, etc. It may also be used to construct simple traps or tripwires. The difficulty is based on the time taken and the type of application.
Tactical Use: Lash heavy crates to a steed, vehicle, or hold; hogtie a captured foe; or make a tripwire or clothesline to slow down pursuers.
Specialization: None
Attribute: Influence
Type: Attack
Time: One Free Action
Description: A character with this skill can convince another of something without resorting to coercion (Intimidate), trickery (Bluff), or bribery. The effectiveness is based on the number of points in the skill tree, i.e. novice 0-3 points, expert 4-7 points, master 8+ points. Targets are allowed a Willpower or related defend to resist the attempt, with a -1 modifier per 2 skill points in the skill tree. The difficulty is determined by the degree of sincerity, target’s demeanor, and feasibility, and may be modified by roleplaying.
Tactical Use: In roleplay, a novice can sway an opinion, an expert can change a position, and a master can instill a conviction; in combat, a novice can intercede before attacking, an expert can negotiate while fighting, and a master can cease hostilities.
Specialization: None
Attribute: Perception
Type: Defend
Time: N/A
Description: This skill represents the ability to notice something is amiss, including a subtle or overt action, movement, sound, a smell that is out of place, etc. Much like a save, it is a passive skill check called for by the GM in place of a base Perception attribute check and is used to glean information that’s perceptible by any of the five senses. The difficulty is based on the character’s attentiveness and the situation or environment.
Tactical Use: Notice someone is staring from across the road; detect a change of attitude in a room, notice an off-color marking on a wall that turns out to be the trigger for a secret door, etc.
Specialization: None
Attribute: Knowledge
Type: Utility
Time: One Free Action
Description: Characters can use this skill to get useful information about a specific category of foe. The degree of detail is based on the number of points in the skill tree, i.e. novice 0-3 points, expert 4-7 points, master 8+ points. A novice gets threat level and general habitat, an expert knows of special attacks or move abilities, and a master has knowledge of their defenses and weaknesses. Skill checks can also be made to determine if an area might be home to a specific type of foe based on tracks, spore, kills, etc. In combat, the character can predict the target’s behavior, temperament, or response to stimuli. The difficulty is based on type of foe, rarity, and time spent observing.
Specialization: (Required) By type, i.e. animal, enemy, or monster, or location i.e. territory, world, or environment
Attribute: Influence
Type: Attack
Time: One Free Action
Description: Characters can use this skill to frighten, coerce, or demoralize a target through a display of menace, verbal threats, and other such psychological scare tactics. With a successful skill check, an enemy morale score is reduced by one per point in the skill tree, and monster morale score by one point per two points in the skill tree. On a failed morale check, those who cannot flee or surrender in combat suffer a difficult (-4) modifier to all attack, defend, and move actions. In roleplay targets become more compliant. The difficulty is based on bearing and roleplaying.
Tactical Use: In roleplay, take command of a reluctant group, marshal information from a foe, etc.; in combat, cause an opponent to stand down, retreat, or surrender
Specialization: None
Attribute: Influence
Type: Attack
Time: One Free Action
Description: This skill can be used to incite or provoke an NPC to act carelessly. Targets are allowed a Willpower or related defend skill to resist the attempt, with a -1 modifier per 2 points in the skill tree. Careless does not mean suicidal, allowing for a difficulty modifier based on the act, the temperament of the target, and the situation, which may be modified by roleplaying.
Tactical Use: In roleplay, cause the target to reveal hidden information, admit to something they have done, etc.; in combat, cause a target to attack aggressively or recklessly use up actions, draw a combatant away from another target, etc.
Specialization: None
Attribute: Influence
Type: Utility
Time: One Free Action
Description: This skill is used to innocuously provide instructions or information through the use of hand signals or body language; the overall effectiveness is based on the number of points in the skill tree, i.e. novice 0-3 points, expert 4-7 points, master 8+ points. A skill check is required and only those whom the character has instructed or those with a related skill can interpret the instructions.
Tactical Use: In roleplay, a novice can subtly provide general information; while an expert can give direction, and a master can relay instruction; in combat, a novice can direct combatants, an expert can set simple combat tactics, and a master can direct a complex tactical deployments.
Specialization: None
Attribute: Influence
Type: Defend
Time: N/A
Description: Those with this skill can use make-up and other props to alter their own or another’s outward appearance, including height and weight, in order to impersonate a person or role. The effectiveness is based on number of points in the skill tree, i.e. novice 0-3 points, expert 4-7 points, master 8+ points. A novice disguise can fool people from a distance, while an expert one is convincing in passing, and a masterful one can stand up to scrutiny. A skill check is required to build the disguise, assuming that the materials are available (usually in a kit); it is a defend action used to save against Observation or Search skill checks at the skill rank.
Specialization: None
Attribute: Influence
Type: Attack
Time: N/A
Description: Characters with this skill are able to negotiate the price of items or services with a combination of persistent harassment and ambiguous or petty arguing. The effectiveness of this quibbling is based on number of points in the skill tree, i.e. novice 0-3 points, expert 4-7 points, master 8+ points. A novice has a range up to 10%, an expert up to 25%, and a master up to 50%. Targets get a Willpower or related defend skill to resist the attempt, with a -1 modifier per 2 points in the skill tree. The difficulty is based on the temperament of the target, local supply and demand, and the overall situation, and may be modified by roleplaying.
Specialization: None
Attribute: Knowledge
Type: Defend
Time: N/A
Description: Those with this skill know how to cloak themselves, others, objects, or places in a shroud of material, paints, or other coverings in order to blend with specific surroundings. The effectiveness is based on number of points in the skill tree, i.e. novice 0-3 points, expert 4-7 points, master 8+ points. Novice camouflaging can fool people in one direction from a long range, while an expert can camouflage from all angles at a medium range, and a master can camouflage from all angles up close. This skill is used to apply coverings, assuming that materials are available and are appropriate to the area; it is a defend action used to save against Observation or Search checks at the skill rank. Selecting a specialization allows the character to attempt to increase the effectiveness of a particular camouflaging to the next level with a difficulty modifier, i.e. novice to expert at a difficult modifier, novice to master at a very difficult modifier, etc.
Tactical Use: Dying or painting clothing and gear to blend with foliage, wearing dark clothes and blackening features at night, etc.
Specialization: (Optional) Specific type of area of terrain, i.e. jungle, urban, barren, etc.
Attribute: Influence
Type: Attack
Time: One Free Action
Description: A character with this skill is adept at deceiving others, usually by portraying confidence or presenting boldness, strength, and self-assuredness in speech and action. Targets are allowed a Willpower or related defend skill to disbelieve, with a -1 modifier per 2 skill points in Cunning. The difficulty is based on the nature or believably of the Bluff and may be modified by roleplaying.
Tactical Use: Passing a suspicious guard with greeting, calling attention to a made-up event as a distraction, reporting the suspicious activity of an innocent bystander, etc.
Specialization: None
Attribute: Constitution
Type: Defend
Time: N/A
Description: Those with this skill have trained themselves to function beyond their physical limits. Characters who suffer body damage may avoid entering a fatigue state with a skill check, though a new check is required each time body damage is suffered, additionally, the duration for all Athletic based skills is doubled. This skill can also be used to resist the effects of a kill shot with a successful skill check.
Prerequisites: Eight points in the skill tree
Attribute: Constitution
Type: Utility
Time: N/A
Description: Characters with this skill have had rigorous training, forging their physique into solid muscle, allowing them to withstand more damage. Acquiring this skill allows the character to permanently increase their health and body scores by one per two points in the skill tree.
Prerequisites: Four points in the skill tree
Attribute: Constitution
Type: Move
Time: One Action
Description: Characters with this skill can dive, tread water, and perform basic swim maneuvers. A swimmer moves at one-half their normal move rate per action and may keep up this rate for a number of minutes equal to the skill rank. Exceeding the total number of rounds with continuous Swimming will put the character in a fatigue state. A fatigued character is required to make a skill check each round to tread water or will begin to drown. The difficulty is based on the amount of weight being carried, strength of the current, temperature of the water, etc.
Specialization: None
Attribute: Constitution
Type: Defend
Time: N/A
Description: This is one of the three-character saves and is used to resist the bodily effects of stressful situations where the character’s physical attributes or capabilities are called into question. The difficulty is determined by the type of event, amount of time, etc.
Tactical Use: Resist the effects of poisons and disease, disable damage, drowning, etc.
Specialization: None
Attribute: Strength
Type: Move
Time: One Action
Description: This skill is used to leap, vault, or grasp something out of reach. A standing jump is equal to one move action x ½, plus one yard per two points in the skill tree, and a running jump is equal to one move action, plus one yard per point in the skill tree. A failed skill check indicates that the character missed the jump and possibly lands prone, or missed the target, depending on the goal. The difficulty is based on distance and encumbrance.
Specialization: None
Attribute: Strength
Type: Attack
Time: One Free Action
Description: Characters use this skill to awe, bully, or frighten an opponent with a menacing display of physical superiority. With a successful skill check, an enemy morale score is reduced by one per point in the skill tree, and monster morale score by one point per two points in the skill tree. On a failed morale check, those who cannot flee or surrender in combat suffer a difficult (-4) modifier to all attack, defend, and move actions. In roleplay targets become more compliant. The difficulty is based on bearing and roleplaying.
Tactical Use: In roleplay, take command of a reluctant group, marshal information from a foe, etc.; in combat, cause an opponent to stand down, retreat, or surrender
Specialization: None
Attribute: Constitution
Type: Move
Time: Two Actions
Description: Characters can use this skill to ascend or descend some vertical surface. A slow, general climb requires only one (modified) skill check, while a combat related climb can require multiple skill checks, based on type of actions and distance. The difficulty is based on the climbing surface and any aids (ropes, climbing shoes, etc.). For every two actions spent climbing, a total of one move action is made vertically. Selecting a specialization allows for faster climbing in that particular arena, making for a full move vertically for every action spent climbing.
Specialization: (Optional) Mountain climbing, urban scaling, tree climbing, etc.
Attribute: Agility
Type: Move
Time: One Action
Description: This skill includes basic tactical movements used to gain a positional advantage. These maneuvers can be used to gain an angular advantage relative to a target for making attacks, as countermoves to hold, maintain, or break a positional advantage, or to disengage and make an escape. Each maneuver has a set of variables that effects position or carries modifiers to attack, defend, or move skills (see Chapter X.x for more information on Mobile Combat). If the skill check is successful, the maneuver succeeds and the variable is applied, otherwise there is an action of movement, but no other effect. This skill is specific to a method of mobility and it can be taken multiple times.
Specialization: (Required) Method of mobility, i.e. wings, technology, vehicle, etc.
Attribute: Constitution
Type: Move
Time: One Action
Description: Characters with this skill can maintain continuous motion without generating thrust. This can be based on lift, momentum, or a slow angle of decent to conserve energy, move stealthily, etc. Skill checks may be required for the character to maintain direction, speed, or distance in order to overcome competing factors such as wind, drag, gravity, damage, etc. Maintaining a glide path requires patience and fortitude, as well as a knowledge of the environment. This skill is specific to a method of mobility and can be taken multiple times.
Specialization: (Required) Method of mobility, i.e. wings, technology, vehicle, etc.
Attribute: Agility
Type: Defend
Time: One Action
Description: This skill is used to avoid being hit in mobile combat. Characters can try to avoid melee or ranged attacks by spending an action and making a skill check, if the check succeeds the attack fails, if not it hits. This type of action is move based, allowing for continuous movement as part of the dodge, but the speed, distance, and direction, must be announced before the skill check is rolled, occurring regardless of the result, but may have other consequences. This skill is specific to a method of mobility and can be taken multiple times.
Specialization: (Required) Method of mobility, i.e. wings, technology, vehicle, etc.
Attribute: Constitution
Type: Attack
Time: One Action
Description: A character with this skill can move and make a melee attack in the same action. This is a disciplined move, not a rush type attack that includes moving into, through, and/or out of a foe’s threat area, without any penalty modifiers or drawing an attack of opportunity. All speed factor and movement rules apply, and it may be countered by a readied action which will force the attacker to stop and defend or suffer an attack of opportunity. It may be used with any Novice attack skill in this tree, with related and general combat modifiers applied normally. If the skill check fails or the target defends successfully, the attack misses and leaves the mech character open to an attack of opportunity, unless they stop to take a defend action.
Tactical Use: Make an attack and escape a flanked position, run past a foe while attacking, move through a threat area to setup a flank, etc.
Prerequisites: The Blitz skill and four points in the skill tree
Attribute: Strength
Type: Attack
Time: One Action
Description: A character with this skill can tear through things with the appendages of the vehicular suit. For this attack, the crit range is increased by one per point in the skill tree; when used against an inanimate object, the durability rating of the object is reduced by one per point in the skill tree. It may be used with any Novice attack skill in this tree, with related and general combat modifiers applied normally. For objects, a failed skill check doesn’t indicate a miss, just that the strike doesn’t get the benefit of the durability modifier. For extremely strong objects, the failure a component must be possible for this skill to be used, i.e. hinges, frame, etc. If the skill check fails or the target successfully defends, the attack misses.
Prerequisites: Four points in the skill tree
Attribute: Strength
Type: Attack
Time: One Action
Description: This skill is used to hit a target with the appendage of a vehicular suit and propel them a distance away. On a successful skill check, the target is knocked back one yard per point in the skill tree and may take falling damage. A Reaction save or related defend skill is allowed to resist the knockback, with a -1 modifier per point in the skill tree. It may be used with any Novice attack skill in this tree, with all related and general combat modifiers applied normally. If the skill check fails or the target successfully defends, the attack misses.
Prerequisites: Eight points in the skill tree
Attribute: Agility
Type: Attack
Time: One Action
Description: This skill is used to catch a target in the threat range with the grasper of a vehicular suit, while causing damage. With a successful skill check, the attacker can make a bludgeoning attack that ends with grasping and holding the target in a single action. While the target is held prone, the character may continue to take actions, within capacity limits. On their turn, the defender can attempt to break the hold with an attack or escape skill, though the attacker can use an action to maintain the grip with a successful skill check, assuming available actions are available. If the skill check fails or the target successfully defends, the attack misses.
Prerequisites: The Seize skill plus four points in the skill tree
Attribute: Constitution
Type: Defend
Time: One Action
Description: Those with this skill can block a melee or ranged attack with a shield attached to or held by the vehicular suit. If the skill check is successful, all damage from the attack is negated by the defend, though the shield must be strong enough to resist damage and may require a structural strength save. If the skill check fails, damage is taken normally.
Specialization: (Required) the type of vehicular suit or mech, i.e. walker, crawler, tumbler, gambol
Attribute: Agility
Type: Attack
Time: One Action
Description: A character with skill can make a pivoting or pitched attack that rotates from the shoulder of the vehicular suit, with a fixed or held weapon. It is a balanced, undulating motion that carries no combat modifiers. If the skill check fails or the target makes a successful defend, the attack misses.
Specialization: (Required) the type of vehicular suit or mech, i.e. walker, crawler, tumbler, gambol
Attribute: Perception
Type: Attack
Time: One Action
Description: Those with this skill can make a powerful stab attack, either as part of a forward lunge or underhanded thrust with a held or fixed weapon on the vehicular suit. The force of this attack carries a -1 modifier to hit but increases the threat range of the weapon by one point for that attack. These modifiers stack with other relevant combat modifiers. If the skill check fails or the target successfully defends, the attack misses.
Specialization: (Required) the type of vehicular suit or mech, i.e. walker, crawler, tumbler, gambol
Attribute: Perception
Type: Utility
Time: Special
Description: This skill is used to operate a vehicle of some type whether on land or water, in air, or in space. It includes a basic understanding of all relevant systems and technologies for the class of vehicle, i.e. acceleration, communications, deceleration, sensors, shields, etc, as well as basic maneuvers, as relevant to the vehicle. Depending on vehicle type, while in combat it costs a free action to activate systems, and at least one action to utilize systems. Maneuvers included in this skill are operational and not intended for combat (see Chapter X.x for information on Vehicle Combat). Difficulty modifiers may be applied based on the type of action, obstacles, terrain, etc. This skill is vehicle specific and may be taken multiple times.
Specialization: (Required) the class and scale of vehicle, i.e. land, air, water, space, yacht, fighter, etc.
Attribute: Agility
Type: Attack
Time: One Action
Description: This skill is used to grab a foe in the threat range with the grasper of a vehicular suit, without causing damage. With a successful skill check, the attacker is able to grasp and hold the defender in a single action. While the target is held prone, the character may continue to take actions during the seizure, within capacity limits. Additional actions in the round may be spent to squeeze the target, causing melee attack damage. On their turn, the target can attempt to break the hold with an attack or escape skill, though the attacker can use an action to maintain the seizure with a successful skill check, assuming they have the action available. If the skill check fails or the target successfully defends, the attack misses.
Specialization: (Required) the type of vehicular suit or mech, i.e. walker, crawler, tumbler, gambol
Attribute: Agility
Type: Defend
Time: One Action
Description: This skill is used to avoid being hit by a melee attack while in a vehicular suit, by spending one action and making a successful skill check. When defending against multiple attacks, the character can choose to take a defensive posture that is more difficult to hit—this must be announced at the start of the round, requires two actions plus a skill check, and gives all attackers a penalty to hit equal to the number of points in the skill tree. Any melee attack (except Surprise) made against the character during that round is subject to this penalty modifier. If the character uses any remaining actions in the round to defend, this modifier is lost.
Specialization: (Required) the type of vehicular suit or mech, i.e. walker, crawler, tumbler, gambol
Attribute: Strength
Type: Attack
Time: One Action
Description: A character with this skill is able to make damaging attack, striking with the lower appendages of a vehicular suit in an undulating or thrusting motion. If the skill check fails or the target successfully defends, the attack misses.
Specialization: (Required) the type of vehicular suit or mech, i.e. walker, crawler, tumbler, gambol
Attribute: Perception
Type: Attack
Time: One Action
Description: Characters use this skill to fire vehicle scale weapons, whether standing alone or mounted. It includes the use of relevant systems, i.e. scanners, targeting systems, etc, associated with the weapon. Any movement and size modifiers apply based on the weapon size and terrain type. If the skill check fails or the target successfully defends, the attack misses.
Specialization: None
Attribute: Perception
Type: Defend
Time: One Action
Description: This skill is used to avoid ranged attacks in a vehicular suit. A single ranged attack can be avoided with one action and a successful skill check. Alternately, it can be used to defend against multiple ranged attacks with erratic movements—this must be announced at the start of the round an requires two actions and a successful skill check. All attackers get a penalty to hit equal to the number of points in the skill tree. Any ranged attack (except Surprise) made against the mech during that round is subject to this penalty modifier; this modifier is lost if the mech stops moving or the character takes another defend action in the same round.
Specialization: (Required) the type of vehicular suit or mech, i.e. walker, crawler, tumbler, gambol
Attribute: Agility
Type: Attack
Time: One Action
Description: Those with this skill can make damaging attacks with the unarmed or grasping appendages of a vehicular suit. This can include a punching strike, a lashing stroke, a chopping motion, or a crushing squeeze, depending on the appendage and its capabilities. If the skill check fails or the target successfully defends, the attack misses.
Specialization: (Required) the type of vehicular suit or mech, i.e. walker, crawler, tumbler, gambol
Attribute: Agility
Type: Move
Time: One Action
Description: Characters with this skill can rush a foe at up to full speed in a vehicular suit without suffering the difficult (-4) modifier to defend actions in that round. Normal rush rules still apply to the target, i.e. difficult (-4) modifier to defend actions for the round, and a Stamina save to avoid being stunned for the remainder of the round. In addition, when used as ramming attack, the target’s stamina save to avoid being stunned has a -1 modifier per two points in the skill tree.
Specialization: (Required) the type of vehicular suit or mech, i.e. walker, crawler, tumbler, gambol
Attribute: Agility
Type: Defend
Time: One Action
Description: This skill is used by the rider to avoid a melee or ranged attack while mounted, and it can be used in two different ways. The mount can be urged to avoid a single melee or ranged attack at it or the rider by spending an action and making a skill check, if the check succeeds the rider and mount move out of the way of the attack, if not the attack hits. When moving, the rider can urge the mount to move erratically to defend against multiple attacks; this requires the mount to take only move actions in the round, the rider must spend two actions directing the mount and with a successful skill check, all attackers have a penalty to hit equal to the number of skill points in this skill tree. Any melee attack (except Surprise) made against the rider or mount during that round is subject to this penalty modifier; this modifier is lost if the mount attacks or stops moving during the round, or if the character is unseated during the round. If the mount stops moving or takes any other defend actions during the round, the modifier is lost.
Specialization: (Required) A specific type of mount, i.e. horse, dog, giant eagle, etc..
Attribute: Agility
Type: Defend
Time: One Action
Description: This skill is used to avoid ranged attacks, and can be used in two different ways. A character can try to avoid a ranged attack by spending an action and making a skill check, if the check succeeds the attack fails, if not it hits. When defending against multiple ranged attacks, the character can choose to make a General Dodge, wherein the character makes erratic moves or disrupts line of sight to disrupt targeting – this must be announced at the start of the round, requires two actions plus a skill check, and gives all attackers a penalty to hit equal to the number of skill points in the skill tree. Any ranged attack (except surprise) made against the character during that round is subject to this penalty modifier; this modifier is lost if the character stops moving or takes another defend action in the same round.
Specialization: None
Attribute: Agility
Type: Defend
Time: One Action
Description: A character with this skill is able to break a hold and immediately reapply it to the attacker during the attack. With a successful skill check, the defender escapes the existing hold and applies the same hold or another of a similar type. i.e. Slam, Joint-Hold, etc. A defend action is allowed to counter this action. If the skill check fails, the move is applied, with all existing modifiers and requirements.
Prerequisites: The Escape skill and four point in the tree
Attribute: Constitution
Type: Attack
Time: One Action
Description: A character with this skill uses momentum to increase the damage of a slam on targets that have been grabbed. On a hit the target is driven bodily onto a surface, taking Strength damage plus basic hits and any modifiers, leaving the target prone. If the target is driven onto a solid object, it may cause additional damage and increases the threat range by one per two skill points in the tree. If the skill check fails, the target remains in the grapple, but the move fails.
Prerequsites: The Slam skill and four points in the skill tree
Spinslam – lift the target horizontal, spin on the ball of the foot to gain momentum, and slam onto a surface, increasing the damage* by one per two points in the skill tree
Modifiers: Attack: — Damage: * Save: — Escape: —
Powerbomb – lift the target horizontal and jump forward when driving onto a surface, increasing damage* by one per skill point in the tree; both the attacker and defender are prone at the end of this move
Modifiers: Attack: — Damage: * Save: — Escape: —
Suplex – apply a side headlock and lift, pulling the target in a vertical arc to slam onto a surface, increasing the damage* sustained by one per two skill points in the tree, and a stun effect; both the attacker and defender are prone at the end of this move
Modifiers: Attack: — Damage: * Save: — Escape: —
Chokeslam – grasp the neck, lift, and slam onto a surface, increasing the damage sustained by one per two points in the tree, requiring a Stamina save to remain conscious; both the attacker and defender are prone at the end of this move
Modifiers: Attack: — Damage: * Save: — Escape: —
Attribute: Agility
Type: Attack
Time: One Action
Description: This skill is used to take a target to the ground without causing damage. Using a combination of balance and leverage, attackers are able immediately knock the defender prone and remain standing for follow up attacks. On a successful skill check, the target is hit and may defend normally; if the skill check fails or the target successfully defends, the attack misses.
Specialization: None
Attribute: Constitution
Type: Attack
Time: One Action
Description: This skill is used to hold a foe on the ground, without causing damage. The hold may be used on grappled or prone targets. With a successful skill check, the attacker pulls the target to the ground and holds them in a prone position. Any attempt to break or escape has a -1 modifier per skill point in the skill tree. One action must be spent each round to maintain the hold and this skill may be used to oppose a break or escape attempt, or to defend against an attack by the target, assuming available actions. Both the attacker and defender are prone during the move. If the skill check fails, the move is not applied correctly, and the target gets a simple (+4) modifier to break the grapple.
Specialization: None
Attribute: Agility
Type: Move
Time: Free Action
Description: A character with this skill is able to quickly regain their feet from a prone position. With a successful skill check, the character is able to spring up into a standing position, requiring only a free action to stand from prone. This skill does not negate an opponent’s ability to keep the character prone. A free action must be available; if the skill check fails the character remains prone.
Specialization: None
Attribute: Agility
Type: Attack
Time: One Action
Description: This skill is used to move inside the melee swing arc and seize the opponent with both hands, without causing damage. With a successful skill check, the attacker is able to grasp and hold the defender in a single action. Both the attacker and defender are prone during the grab. On their turn, the defender can attempt to break the hold with an attack or escape skill, though the attacker can use an action to maintain the grab with a successful skill check, assuming they have an action available. If the skill check fails or the target successfully defends, the attack misses.
Specialization: None
Attribute: Agility
Type: Defend
Time: One Action
Description: Characters can use this skill to duck out of or break grabs, holds, moves, etc. With a successful skill check the character is freed from a melee grapple and related attack actions, disrupting any associated effect. Alternately, it can be used to slip bonds or other restraints, to wiggle into tight places, etc, assuming that there’s a logical path to freedom. The difficulty is based on the amount of time, quality of bonds, and the subtlety that the action requires. If the skill check fails, additional attempts may be made with a progressive -2 modifier per attempt in the round.
Tactical Use: Break the leverage of a slam and step out of the hold, wiggle free of bound wrists, slither into duct work to move from room to room, etc.
Specialization: None
Attribute: Strength
Type: Attack
Time: One Action
Description: Those with this skill can apply a hold that inhibits the flow of blood to the brain, causing unconsciousness. It may only be used on a target that has been grabbed. With a successful skill check, the hold is applied and the defender must make a Stamina save with a progressive -2 modifier per round; on a failed Stamina save, the defender loses consciousness for a minimum of four rounds, after which a base Stamina save may be made to regain consciousness. One action is spent each round to maintain the hold and this skill may be used to oppose any break or escape attempt, at the cost of an action. Both the attacker and defender are considered prone while the hold is maintained, with all appropriate modifiers. If the skill check fails, the opponent gets a simple (+4) modifier to break the grapple. Regardless of success or failure, if the grab is still applied, both attacker and defender are prone at the end of the action.
Specialization: None
Attribute: Strength
Type: Attack
Time: One Action
Description: This skill is used to knock a rider from the saddle. On a successful skill check, the target is hit and unseated, and may take falling damage, though they are allowed a Reaction save or related defend skill to remain in the saddle, with a -1 modifier per point in the skill tree. If the target’s save is successful, the effect fails, and they may resist damage from the hit normally. It may be used with any Novice attack skill in this tree, with all related and general combat modifiers applied normally. If the skill check fails or the target successfully defends, the attack misses.
Prerequisites: Eight points in the skill tree
Attribute: Constitution
Type: Move
Time: One Action
Description: Characters with this skill can get into and out of the saddle with ease. The rider can mount or dismount as a single move action, rather than two actions, with a successful skill check, provided the animal is saddled. If the skill check fails, the standard two actions is required. In addition, the character may use this skill to save against being unseated, with a +1 modifier per two points in the skill tree. If the mount is not saddled, there is a difficult modifier to the skill check.
Prerequisites: Four points in the skill tree
Attribute: Strength
Type: Attack
Time: One Action
Description: Characters with this skill are able to make a forceful attack against unmounted opponents from a position of advantage atop the mount. For this attack, the character gets a +2 modifier to hit and the Strength modifier for the weapon damage is increased by one per two points in the skill tree. It may be used with any Novice attack skill in this tree, with all related and general combat modifiers applied normally. If the skill check fails or the target successfully defends, the attack misses.
Prerequisites: Four points in the skill tree
Attribute: Constitution
Type: Move
Time: N/A
Description: This skill is used to direct the mount over terrain, and includes typical actions such as saddling, mounting, and dismounting. While basic riding on a trained animal doesn’t require a skill check, it is required when trying to urge the mount to perform most other physical acts. In addition, if the steed fails a morale check, the rider can use this skill to remain saddled or overcome the reaction with one or more skill checks. When on an unsaddled mount, the rider suffers a Difficult (-4) modifier to this, and all related skills, other modifiers are based on the type of maneuver, terrain, and environment.
Tactical Use: Urge a mount to gallop down a road, jump a felled tree or small ravine, regain control after fright, etc.
Specialization: (Required) A specific type of mount, i.e. horse, dog, giant eagle, etc..
Attribute: Constitution
Type: Attack
Time: One Action
Description: Those with this skill are adept at striking opponents with a spear, lance, or other type of proficient pole weapon from the back of a mount. The attack can be used in two ways, either to cause damage or to unseat an opponent. When used as a damage causing attack, there is a -2 modifier to hit, but to calculate damage, add the mount’s single action move rate at the time of attack to the weapon damage, plus one per skill point in Mounted Combat. When used to unseat an opponent, there is a -4 modifier to hit and damage is calculated as the mount’s single action move rate at the time of the attack plus weapon damage, and the target has a -1 modifier per two skill points in Mounted Combat to save against being unseated. On a successful skill check, the target is hit and may defend normally; if the skill check fails or the target successfully defends, the attack misses.
Specialization: (Required) Proficient weapon(s)
Attribute: Constitution
Type: Move
Time: N/A
Description: With this skill, characters can use their mount to force one or more animals or monsters to move in a particular direction. With a successful skill check, the rider is able to move the mount into a position to direct the target to a particular place or in a specific direction. The target is allowed a morale save to resist, with a -1 modifier per skill point in the skill tree. There may be additional skill checks required if the target is being driven in a dangerous direction or tries to flee. The effect is broken if the target is attacked or if the target makes three successive morale checks. This skill is ineffective against intelligent animals or monsters.
Tactical Use: Drive giant insects away from a caravan, lead a bear to her lost cubs, guide a predatory amphibian back to a lake, etc.
Specialization: (Required) A specific type of mount, i.e. horse, dog, giant eagle, etc..
Attribute: Influence
Type: Move
Time: Special
Description: Characters use this skill to guide or direct a mounted animal with verbal cues or subtle physical acts, such as a tap of the foot or squeezing the knees, allowing for the use of both hands in combat. This direction can typically be accomplished with a free action and its overall effectiveness is based on the number of skill points in Mounted combat, i.e. novice 0-3 points, expert 4-7 points, master 8+ points. A novice can direct the mount to go in a general direction at a consistent pace; an expert can direct the mount to a specific location, with changes pace; a master can direct continuous movement, controlling the speed, and performing maneuvers. In addition, a character with this skill can command the animal to attack/defend or attempt to gain control over a frightened or untrained animal, granting it an immediate morale save at a +1 modifier per skill point in Mounted Combat. Taking control of a frightened animal typically requires a full round, though if successful, that animal can be directed as if trained and gets the bonus modifier to all morale checks for that encounter.
Tactical Use: Guiding an animal with a series of whistles, changing pace or direction by leaning or nudging, taking a pack animal into combat, etc.
Specialization: (Required) A specific type of mount, i.e. horse, dog, giant eagle, etc..
Attribute: Agility
Type: Attack
Time: One Action
Description: A character with this skill is prepared to exploit weaknesses, allowing them to make an attack during their opponent’s initiative after a miss. The attack against the character must fail to hit without requiring a defend action, the character must have available actions to make the counter, and the opponent may defend against the attack at a negative one modifier per two skill points in the tree. The counter may be used with any Novice strike skill in this tree, with all related and general combat modifiers applied normally. If the skill check fails or the target successfully defends, the attack misses.
Prerequisites: Four points in the skill tree
Attribute: Constitution
Type: Attack
Time: One Action
Description: Characters with this skill can combine multiple strikes into a single attack. Before making a skill check, attackers must choose which strikes will be used and make a skill check using the lowest hit modifier and highest crit modifier. A successful defend negates the attack, but on a hit, the defender must resist damage from each attack separately. Strikes may be combined from multiple combat styles so long as they are the same general type, i.e. punch, kick, elbow, etc. A number of strikes equal to one per two skill points in the tree may be combined into a single attack, with all related and general combat modifiers applied normally. If the skill check fails or the target successfully defends, the attack misses.
Prerequisites: Four points in the skill tree
Attribute: Agility
Type: Defend
Time: One Action
Description: Those with this skill can turn aside an armed or unarmed melee attack with the use of a reinforced bracer or by intercepting the attack at the attacker’s wrist. With a bracer, if the skill check is successful damage from the attack is negated, however the bracer must be of a material strong enough to resist damage and may require a structural strength save. The ability to intercept an attack with a strike to the wrist is based on the number of skill points in Unarmed Combat i.e. novice 0-3 points, expert 4-7 points, master 8+ points. A novice is able to intercept a melee attack, an expert can attempt to disarm the attacker during the intercept (Reaction save to negate), and a master can knock the opponent’s weapon out of position during the intercept and take an immediate attack assuming available actions. The intent to use the additional effect must be called before the skill check. In either instance, if the skill check fails, damage is taken normally.
Specialization: None
Attribute: Constitution
Type: Attack
Time: One Action
Description: This skill is used to take a foe to the ground without causing damage. If the skill check is successful, the defender is knocked to the ground with the attacker landing atop, all prone modifiers apply to the defender, and the attacker considered prone to outside opponents. It is most effective against humanoids; if the skill check fails or the target makes a successful defend, the attack misses and leaves the character open to an attack of opportunity. On the defenders turn, they may attack from the prone position, attempt to break the hold (two actions and a successful Strength check) or use a related skill to escape.
Specialization: None
Attribute: Constitution
Type: Defend
Time: One Action
Description: Characters use this skill to move inside the melee attack arc, hugging the opponent to control their arms to hinder their attacks. On a successful skill check, all damage from the attack is negated and both the attacker and defender are considered prone. The attacker can try to break the clinch with a break or escape skill, though the defender can use an action to maintain the grab with a successful skill check, assuming available actions. While effective against most armed and unarmed attacks, it is not effective against bites, claws, or passive attacks. If the skill check fails, damage is taken normally.
Specialization: None
Attribute: Perception
Type: Attack
Time: One Action
Description: Those with this skill are able to perform fantastic maneuvers when making attacks with a proficient ranged weapon. The type of maneuver is largely dependent on the situation but will often involve bouncing shots off something to hit something else, shooting through a tiny opening to hit a target, or firing at a tiny or fast-moving object. There must be a logical path to the target and difficulty modifiers may be applied based on the overall complexity of the maneuver, as a general rule, a difficulty modifier is added for every obstacle that must be overcome to hit the target after the first. It may be used with any Novice attack skill in this tree, with all related and general combat modifiers applied normally. If the skill check fails or the target successfully defends, the attack misses.
Tactical Use: Bounce a thrown shield off two columns to strike a foe; shoot a target standing behind a door through the keyhole; firing at a grenade that is being thrown by an opponent to cause it to explode; etc.
Prerequisites: Eight points in the skill tree
Attribute: Perception
Type: Attack
Time: One Action
Description: Those with this skill are able to deprive the target of their weapon or other held object with the use of a proficient ranged weapon, without causing damage. It may be used with any Novice attack skill in this tree, with all related and general combat modifiers applied normally. On a successful skill check the weapon or object is knocked a number of yards equal to the number of points in the skill tree. A Reaction save or related defend skill may be attempted to retain the grip on the weapon or object, with a -1 modifier per point in the skill tree. Size modifier rules apply to the attackers hit chance and defenders save attempt, i.e. tiny -8, small -4, medium –, large +4; all modifiers stack. If the target’s save is successful, the skill check fails, or the target successfully defends, the attack misses.
Prerequisites: Eight points in the skill tree
Attribute: Knowledge
Type: Attack
Time: One Action
Description: Characters with this skill know the weak spots in armor, negating armor bonuses from applicable damage saves. If the character has the appropriate Lore skill (i.e. monster, animal, etc), this skill can also be used to attack weak points in natural armors, negating those armor modifiers from applicable damage saves. It may be used with any Novice attack skill in this tree, with all related and general combat modifiers applied normally. If the skill check fails or the target successfully defends, the attack misses.
Prerequisites: The Lore Skill (optional) and eight points in the skill tree
Attribute: Agility
Type: Attack
Time: One Action
Description: Characters with this skill are able to accurately fire two shots with one action. Simultaneous shots are made with a bow using two arrows and a single pull of the string or by throwing two weapons at once; successive shots are made with two quick pulls of the trigger on an energy or projectile weapon. If both shots are made at a single target, the shots are defended as a single action, but damage saves are handled individually. Shots fired at separate targets must be in a forty-five-degree arc, with each target allowed normal defend actions and damage saves. It may be used with any Novice attack skill in this tree, with all related and general combat modifiers applied normally. If the skill check fails or the target successfully defends, the attack misses.
Prerequisites: Eight points in the skill tree
Attribute: Constitution
Type: Attack
Time: Four Actions
Description: This skill is used to unleash an all out flurry of ranged attacks. With a successful skill check, the character fires a number of shots based on the number of points in the skill tree at a single target or multiple targets within the weapon’s range. It may be used with any Novice attack skill in this tree, with all related and general combat modifiers applied normally. If the skill check fails or the target makes a successful defend, the attack misses.
Prerequisites: Four points in the skill tree
Attribute: Knowledge
Type: Attack
Time: One Action
Description: Those with this skill understand the mechanics of ballistic trajectory and can increase the effective range of projectile weapons. The distance increase is based on the number skill points in the skill tree, i.e. novice 0-3 points, expert 4-7 points, master 8+ points. A novice is unable to use this skill, while an expert can multiple the range by 1.5, and a master can multiple the range by 2, extending the range accordingly for each difficulty step. It may be used with any Novice attack skill in this tree, with all related and general combat modifiers applied normally. If the skill check fails or the target successfully defends, the attack misses.
Prerequisites: Four points in the skill tree
Attribute: Perception
Type: Attack
Time: One Action
Description: Character’s with this skill are able to make devastating shots at vulnerable points to cause body damage. For this attack, the crit range for the weapon is increased by one per skill point in Ranged Combat, this modifier doesn’t apply to the use of other skills. On a successful skill check, the target is hit and may defend normally. It may be used with any Novice attack skill in this tree, with all related and general combat modifiers applied normally. If the skill check fails or the target makes a successful defend, the attack misses.
Prerequisites: Four points in the skill tree
Attribute: Perception
Type: Attack
Time: One Action
Description: Characters with this skill have been trained to combat opponents that cannot be seen, cloaked in darkness, or otherwise concealed from sight, by arcing a shot over cover, firing at a sound, etc. The blind fighting difficulty (-8) is reduced by one per point in the skill tree, though range or called shot modifiers still apply, and there must be a logical path to the target. This skill can be used with any Novice attack skill in this tree, with all related and general combat modifiers applied normally. If the skill check fails or the target successfully defends, the attack misses.
Prerequisites: Four points in the skill tree
Attribute: Influence
Type: Attack
Time: One Action
Description: Those with this skill can use misdirection to make a blindsided attack from any character facing. On a successful skill check, targets are subject to an Attack of Opportunity. Targets are allowed a Reaction save or related defend skill to recognize the deception, with a -1 modifier per point in the skill tree. Any damage from the attack is considered body damage, with all appropriate modifiers. If the target’s save is successful, they may defend normally. It may be used with any Novice attack skill in this tree, with all related and general combat modifiers applied normally. If the skill check fails or the target successfully defends, the attack misses.
Prerequisites: The (E) Feint skill and eight skill points in the skill tree
Attribute: Constitution
Type: Attack
Time: One Action
Description: This skill is used to keep a prone target down by disrupting the leverage needed to stand, while causing damage. When the target attempts to stand from prone, the attacker makes an attack to keep them prone. It may be used with any Novice attack skill in this tree, with all related and general combat modifiers applied normally. In addition to the action to stand, targets can spend actions to defend against the Pummel, with all standard modifiers for being prone and a -1 modifier per two points in the skill tree; if the defend is successful the target is able to stand from prone, otherwise they are knocked back prone and must use another action to attempt to stand again. While speed factor rules do not apply, the attacker must have enough available actions left in the round to counter each attempt to stand. If the skill check fails or the target successfully defends, the attack misses.
Prerequisites: Eight points in the skill tree
Attribute: Perception
Type: Attack
Time: One Action
Description: A character with this skill is able to make devastating strikes to specific body parts. With a successful skill check, the target is required to save against the appropriate disabling effect, depending on the body part struck and damage taken, and suffers damage to their health and/or body scores. In addition, the Called Shot Modifier is reduced by one per two points in the skill tree. This attack may be used with any Novice attack skill in this tree, with all related and general combat modifiers applied normally. If the skill check fails or the target successfully defends, the attack misses.
Tactical Use: Attack the arm to keep the opponent from using a weapon in combat; strike an opponent in the leg to keep them from retreating out of combat; go for a knockout with a blow to the head, etc.
Prerequisites: Eight points in the skill tree
Attribute: Strength
Type: Attack
Time: One Action
Description: This skill is used to strike a target to propel them a distance away. It may only be used with proficient blunt weapons. On a successful skill check, the target is knocked backwards one yard per point in the skill tree and may take falling damage, though they are allowed a Stamina save or related defend skill to remain standing, with a -1 modifier per point in the skill tree. If the target’s save is successful, the effect fails, and they may resist damage normally. The attack may be made with any Novice attack skill in this tree, with all related and general combat modifiers applied normally. If the skill check fails or the target successfully defends, the attack misses.
Prerequisites: Eight points in the skill tree
Attribute: Agility
Type: Attack
Time: One Action
Description: Characters use this skill to deprive the target of their weapon or other held object with the use of a proficient melee weapon, without causing damage. It may be used with any Novice attack skill in this tree, with all related and general combat modifiers applied normally. On a successful skill check the weapon or object is knocked away a number of yards equal to the difference between the skill rank and the attack roll. A Reaction save or related defend skill may be attempted to retain the grip on the weapon or object, with a -1 modifier per point in the skill tree. Size modifier rules apply to the attackers hit chance and defenders save attempt, i.e. tiny -8, small -4, medium –, large +4; all modifiers stack. If the target’s save is successful, the skill check fails, or the target successfully defends, the attack misses.
Prerequisites: Eight points in the skill tree
Attribute: Perception
Type: Attack
Time: One Action
Description: Characters with this skill are familiar with the inherent weaknesses of most types of armor and may attempt to strike armored foes in these places, negating armor bonuses from applicable damage saves. If the character has the appropriate Lore skill (i.e. monster, animal, etc), this skill can also be used to attack weak points in natural armors, negating those armor modifiers from applicable damage saves. It may be used with any Novice attack skill in this tree, with all related and general combat modifiers applied normally. If the skill check fails or the target successfully defends, the attack misses.
Prerequisites: The Lore Skill (optional) and eight points in the skill tree
Attribute: Agility
Type: Attack
Time: One Action
Description: This skill is used to catch or impede the target’s foot or ground appendage with the intent of forcing them to the ground, without causing damage. It may be used with any Novice attack skill in this tree, with all related and general combat modifiers applied normally. On a successful skill check the target falls prone, though a Reaction save or related defend skill may be attempted to remain standing, with a -1 modifier per point in the skill tree. If the target’s save is successful, they may defend normally. If the skill check fails or the target makes a successful defend, the attack misses.
Prerequisites: Four points in the skill tree
Attribute: Strength
Type: Attack
Time: One Action
Description: This skill is used to strike a target in such a way as to knock them to the ground; this attack skill may only be used with proficient blunt or pole weapons. On a successful skill check the target is knocked prone, though a Reaction save or related defend skill may be attempted to remain standing, with a -1 modifier per point in the skill tree. If the target’s save is successful, they may defend normally. It may be used with any Novice attack skill in this tree, with all related and general combat modifiers applied normally. If the skill check fails or the target successfully defends, the attack misses.
Prerequisites: Four points in the skill tree
Attribute: Influence
Type: Attack
Time: One Action
Description: A character with this skill is adept at making misleading attacks. On a successful skill check, the attack is treated an attack of opportunity, though the target is allowed a Reaction save or related defend skill to recognize the deception, with a -1 modifier per two points in the skill tree. If the target’s save is successful, they may defend normally. It may be used with any Novice attack skill in this tree, with all related and general combat modifiers applied normally. If the skill check fails or the target successfully defends, the attack misses.
Prerequisites: Four points in the skill tree
Attribute: Perception
Type: Attack
Time: One Action
Description: Those with this skill have been trained to be better able to combat opponents cloaked in darkness or otherwise concealed from sight. The blind fighting difficulty (-8) is reduced by one per point in the skill tree, and applied to the appropriate skill check. This attack may be used with any Novice attack skill in this tree, with all related and general combat modifiers applied normally. If the skill check fails or the target successfully defends, the attack misses.
Prerequisites: Four points in the skill tree
Attribute: Perception
Type: Attack
Time: One Action
Description: Characters with this skill are able to make devastating shots to specific body parts. With a successful skill check, the target is required to save against the appropriate disabling effect, depending on the body part struck and damage taken, and suffers damage to their health and/or body scores. This may be used as a Shoot or Throw attack, with all related and general combat modifiers applied normally. If the skill check fails or the target successfully defends, the attack misses.
Tactical Use: Attack the arm to keep the opponent from using a weapon in combat, hit an opponent in the leg to keep them from escaping, go for a knockout with a shot to the head, etc.
Prerequisites: Eight points in the skill tree
Attribute: Perception
Type: Utility
Time: N/A
Description: A character with this skill ignores Called Shot Modifiers and any difficulty modifier for firing into melee combat without a clear shot. It may be used with any acquired skill and proficient weapon within this tree. All other combat modifiers apply normally.
Tactical Use: Shoot a foe in the weapon arm; firing at a panel to disable the controls; shooting through a small window or slight opening, etc.
Prerequisites: Eight points in the skill tree
Attribute: Agility
Type: Attack
Time: One Action
Description: This skill is used to fling, heave, hurl, pitch, sling, or toss any ranged weapon at a target that can be held by one person. The difficulty is based on the weapon’s range, which is listed in its description. On a successful skill check, the target is hit and may defend normally; if the skill check fails or the target successfully defends, the attack misses.
Specialization: (Required) Proficient weapon(s)
Attribute: Agility
Type: Utility
Time: Free Action
Description: This skill is used to reload a ranged weapon as a free action rather than requiring a standard action; reloads that require more than one action have their load time cut in half. The reload ammo must be either on the character’s person or in the immediate vicinity and be immediately available, i.e. not in a backpack, carried ammo box, or racked. If the skill check fails, the full reload time is required, which can carry over into the next round if necessary.
Specialization: (Required) Proficient weapon(s)
Attribute: Agility
Type: Utility
Time: Free Action
Description: Characters with this skill may draw a tiny or small sized proficient weapon with a free action rather than a standard action. In addition, those with this skill are able to act first whenever opponents tie on initiative rolls (when using a proficient weapon from this skill tree) and maintain the ability to take defend actions. If the skill check fails, the character must spend an action drawing the weapon, if they have no more actions in the round, drawing the weapon will be the first action of the following round.
Tactical Use: Draw to be immediately combat ready; change a weapon in the middle of combat; draw a second weapon if disarmed, etc.
Specialization: (Required) Proficient weapon(s)
Attribute: Agility
Type: Attack
Time: One Action
Description: Characters with skill are able to make practiced pivoting or pitched attacks that rotate from the shoulder, with a proficient weapon. It is a balanced, undulating motion that allows for easy transition between attack and defend actions with no combat modifiers. On a successful skill check, the target is hit and may defend normally; if the skill check fails or the target makes a successful defend, the attack misses.
Specializations: (Required) Proficient weapon(s)
Attribute: Strength
Type: Attack
Time: One Action
Description: Those with this skill are able to make a practiced stabbing attack, either as part of a forward lunge or underhanded thrust with a proficient weapon. The force of this attack carries a -1 modifier to hit, but increases the threat range of the weapon by one point for that attack; these modifiers stack with all other combat modifiers. On a successful skill check, the target is hit and may defend normally; if the skill check fails or the target makes a successful defend, the attack misses.
Specializations: (Required) Proficient weapon(s)
Attribute: Strength
Type: Attack
Time: One Action
Description: A character with this skill is better able to break up, break into, or otherwise attack an inanimate object with the purpose of demolition. When defending against this attack, the durability rating of the object is reduced by one per point in the skill tree. For extremely strong objects, the failure of some component must be possible for this skill to be used, i.e. the hinges, frame, etc. As this is an attack on an inanimate object, a failed skill check doesn’t necessarily mean that the strike failed to hit, just that the strike doesn’t get the benefit of the durability modifier.
Specializations: (Required) Proficient weapon(s)
Attribute: Agility
Type: Defend
Time: One Action
Description: Characters with this skill are able to turn aside a melee attack with a proficient melee weapon, based on the number of points in the skill tree i.e. novice 0-3 points, expert 4-7 points, master 8+ points. A novice is able to parry a melee attack, an expert can attempt to disarm the attacker during the parry (Reaction save to negate), and a master can knock the opponent’s weapon out of position during the parry and take an immediate attack (all normal attack, defend, and speed factor rules apply). If the skill check is successful, all damage from the attack is negated by the parry, however, the intent to use any additional affects must be called before the skill check and the proficient weapon used to make the parry must be strong enough to resist damage, and may require a structural strength save. If the skill check fails, damage is taken normally.
Specializations: (Required) Proficient weapon(s)
Attribute: Strength
Type: Attack
Time: One Action
Description: A character with this skill can make a practiced downward chop attack from the elbow with a proficient weapon. The power of this attack has a -2 modifier to hit but causes an additional point of damage per two points in the skill tree for that attack. The modifiers stack with other combat modifiers. Because of its aggressive nature, use of this attack action negates any defensive modifiers gained by stance or defend skills for the round, i.e. Defensive form, Counter form, general Evade, etc. On a successful skill check, the target is hit and may defend normally; if the skill check fails or the target makes a successful defend, the attack misses.
Specializations: (Required) Proficient weapon(s)
Attribute: Perception
Type: Attack
Time: One Action
Description: This skill is used to aim and fire any weapon that discharges a physical or energy type projectile and can be held by one person. The difficulty is based on the weapon’s range, which is listed in its description. On a successful skill check, the target is hit and may defend normally; if the skill check fails or the target successfully defends, the attack misses.
Specialization: (Required) Proficient weapon(s)
Attribute: Constitution
Type: Utility
Time: N/A
Description: Those with this skill know how to properly wear and move in a specific type and/or weight class of armor, which includes the use of any specialized systems or other such aspects of it. When wearing armor in combat, all skill check modifiers are reduced by one per two points in the skill tree. Additionally, the Move Rate modifier is reduced by a progressive percentage based on the total number of points in the skill tree, i.e. novice 0-3 points (25%), expert 4-7 points (50%), master 8+ points (75%). A skill check is required to use armor of a different type or class and may be modified by the degree of difference between specialized and target armors. This skill may be taken multiple times to acquire additional specializations.
Specializations: (Required) Based on armor size or type, i.e. heavy, medium, light, plasma, ionic, etc.
Attribute: Constitution
Type: Defend
Time: One Action
Description: Characters with this skill are able to block a melee attack with a proficient melee weapon or some type of directed melee shield. If the skill check is successful, all damage from the attack is negated by the block, however, the object used to make the block must be strong enough to resist damage and may require a structural strength save. If the skill check fails, damage is taken normally.
Specializations: (Required) Proficient weapon and/or a specific type of shield, i.e. small, medium, large, physical, plasma, ionic, etc.
Attribute: Perception
Type: Defend
Time: One Action
Description: Characters with this skill are able to turn aside a ranged attack with a proficient melee weapon or some type of directed melee shield, based on the number of points in the skill tree, i.e. novice 0-3 points, expert 4-7 points, master 8+ points. A novice is able to block a ranged attack, an expert can deflect the ranged attack in a specific direction where it will hit a random target, and a master can deflect the ranged attack at a specific target (normal defend actions are permitted). If the skill check is successful, all damage from the attack is negated by the deflect, however, the object used to make the deflect must be strong enough to resist damage, and may require a structural strength save; no additional checks are required to redirect the ranged attack, though the intent to redirect must be announced before the skill roll is attempted, and not all ranged attacks may be redirected in this manner. If the skill check fails, damage is taken normally.
Specializations: (Required) Proficient weapon and/or a specific type of shield, i.e. small, medium, large, physical, plasma, ionic, etc.
Attribute: Agility
Type: Defend
Time: One Action
Description: This skill is used to avoid melee attacks and can be used two different ways. A character can avoid an attack by spending an action and making a skill check, if the check succeeds the attack fails, if not it hits. When defending against multiple attacks, the character can make a General Evade, taking a defensive posture that is more difficult to hit – this must be announced at the start of the round, requires two actions plus a skill check, and gives all attacks a penalty to hit equal to the number of points in the skill tree. Any melee attack (except Surprise) made against the character during that round is subject to this penalty modifier. If the character uses any remaining actions in the round to defend, this modifier is lost.
Specializations: None
Attribute: Knowledge
Type: Utility
Time: N/A
Description: An aggressive combat style used by warring or warlike peoples. Unpredictable and disruptive, it uses vigorous attacks intended to put opponents on the defensive. Learners are instructed in two forms that have attack/defend modifiers and affect the opponent’s ability to defend. The Balanced form has no modifiers and is used to assessing threats or in group tactics. Frenzy has a +2 modifier to hit but leaves the character vulnerable to attack with a -4 modifier to defend and gives the opponent a -2 modifier to defend. During combat the forms can be changed at the start of each round, but may not be changed during the round, carrying over to the next round if no change is announced. It may be used with any attack or defend skills in the tree, and the modifiers stack with all combat modifiers. Only one stance may be purchased during character generation, but others can be selected as the character advances.
Specializations: (Required) Proficient weapon
Form Attack/Defend
Break Guard +4/-2
-defender has –/-2
Attribute: Knowledge
Type: Utility
Time: N/A
Description: The signature combat stance common to military organizations. Simple yet versatile, it allows learners to adapt to situations on the battlefield, providing for the best chance of survival. Those instructed in this style are taught three forms that have attack/defend modifiers. The Balanced form has no modifiers and is used to assess threats or in group tactics. The Aggressive form has a +2 modifier to hit and a -2 modifier to defend. The Defensive form sacrifices the chance to hit with a -2 attack modifier but has a greater chance to avoid being hit with a +2 modifier to defend. During combat the forms can be changed at the start of each round, but may not be changed during the round, carrying over to the next round if no change is announced. It may be used with any attack or defend skills in the tree, and the modifiers stack with all combat modifiers. Only one stance may be purchased during character generation, but others can be selected as the character advances.
Specializations: (Required) Proficient weapon
Form Attack/Defend
Balanced –/–
Aggressive +2/-2
Defensive -2/+2
Attribute: Knowledge
Type: Utility
Time: N/A
Description: A character with this skill knows how to wield a specific type of weapon as defined by group and is relevant to this specific skill tree, negating the -4 modifier for using a non-proficient weapon. Any weapon that falls into the proficient group may be used with any skill that has been purchased in this specific skill tree. This skill may be purchased multiple times within this particular tree to allow for the use of multiple proficient weapons groups, so long as the type of weapon is consistent with the skill tree.
Specializations: None
Attribute: Constitution
Class: Novice
Type: Move
Time: N/A
Description: Characters use this skill to ascend or descend some vertical surface. A slow, general climb requires only one (modified) skill check, while a combat related climb often requires multiple skill checks, based on distance. The difficulty is based on the climbing surface and any aids (ropes, climbing shoes, etc.). For every two actions spent climbing, a total of one move action is made vertically.
Specializations: (Optional) Urban scaling, mountain climbing, tree climbing, etc; selecting a specialization allows for faster climbing in that particular arena, making for a full move vertically for every action spent climbing.